Customer Images
For existing customers, you can assign images to customer records and have those customer images display when viewing the customer record in Prism. You can browse to an image file or use a connected webcam to capture an image directly in Prism.
Sample customer record with customer image:

Basic Steps for using images in RP Prism
- Confirm that the path is correct for images in RP Prism preferences (Themes & Layouts). This is the folder that RP Prism will pull images from when working with customer or inventory records.
- When creating new customers, capture an image at POS. Alternatively, edit images for existing customers as needed by editing the customer record.
- When creating transactions, enter the customer. If an image is assigned, it will be displayed on the transaction form.
Limitations
- Supported file formats are: .bmp, .jpeg, .png
Add or Edit a Customer Image
- Use Customer Lookup to find and display the desired customer record.
- Touch or click the Edit button.
- Touch or click the Edit Customer Information button. On the Customer Information screen click the Edit Image button.
- The Upload Image dialog is displayed. This dialog has options for uploading an image, or if you have a webcam attached to the workstation, taking a picture of the customer.
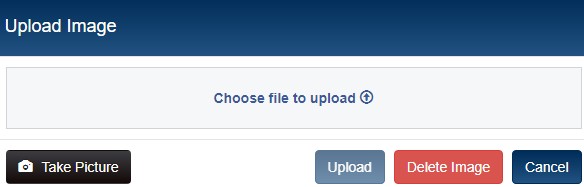
- Touch or click the Choose File to Upload link.
- Navigate to the desired folder, select the image and then touch or click the Open button.
- Touch or click the Upload button.
- Save the changes. The picture is saved to the ...\ProgramData\RetailPro\server\images folder.
Capture Image via attached camera
Users can attach a camera to the workstation and capture photos of customers at point of sale. The image is automatically saved to the customer's record. This feature is especially useful for taking a quick snapshot of a customer to add to the customer record.
Cameras (and some other devices) require a https connection. By default, Prism uses http. This means users must obtain and install SSL certificates for those workstations that will use a camera. After obtaining SSL certificates from a certificate authority, use the SSL Manager feature in Prism Tech Toolkit to install the certificates on workstations.
If a user tries to capture an image using an attached camera on a workstation without SSL, the browser displays a pop-up that requires the user to allow use of the device.

Click Take Picture.
If the camera has not been allowed by the browser, the following message is displayed:

If SSL certificate are installed and have been allowed for the browser in use, the user's webcam launches. Align the customer's face in the viewfinder. When ready, click the Capture button. The image you took is displayed in the bottom pane. Click the Accept button to accept the image. (If necessary, you can retake the picture)
Click the Upload button.

Click the Save button to save the changes to the customer record. The images are saved to the ...\ProgramData\RetailPro\Server\images\Customer folder. The images are saved to the ...\ProgramData\RetailPro\Server\images\Customer folder.
Add image during customer creation
You can add an image directly from the Create Customer screen. This is especially useful when creating customer records at POS. The Associate can use an attached webcam to take a photo while creating the record and then the Associate can add the image to the customer's record.

Delete a Customer Image
- Find and display the desired customer record.
- Touch or click the Edit button.
- Touch or click the Edit icon (pencil) on the customer image.
- Touch or click the Delete Image button. Click the Cancel button to exit the dialog.