AppCard
The AppCard plugin enables retailers to use the AppCard loyalty solution. This document explains how to install and configure the plugin for Prism.
The topic explains how to:
- Install the AppCard Plugin
- Configure Prism Preferences related to AppCard
- Configure the AppCard Plugin
- Use the AppCard Plugin at POS
Install Prism AppCard Plugin
Install the AppCard Plugin on the Prism server (the machine running the full Prism install). If you want to run the plugin at every store, install it on each store server.
1. Navigate to the location of the Prism AppCard for Prism setup.exe file. Right-click on the file icon an select "Run as Administrator."

2. On the opening screen of the installer, click Next.

3. The installer will auto-populate the Apache directory (click Browse to select a different folder if necessary). Click Next..

4. Confirm the Start Menu folder and click Next.

5. Confirm the install directory and click Install.

6. Click OK when the install is complete.

7. Click Finish to close the installer.

8. Clear the cache for the browser that you use with Prism.
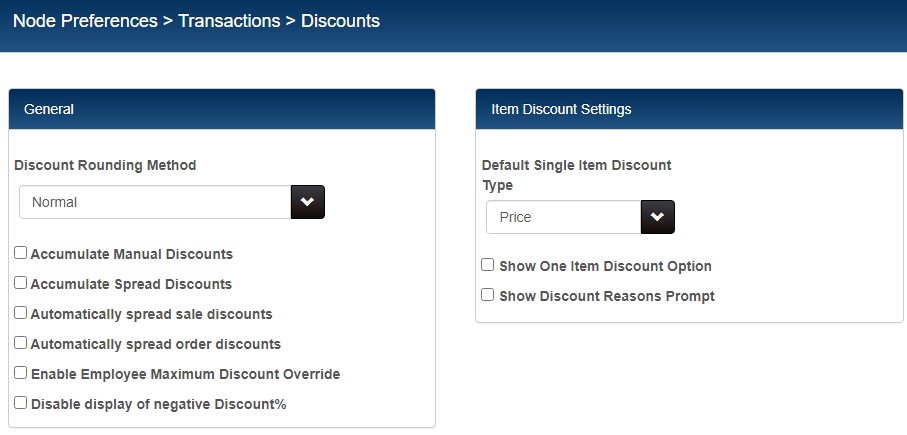
Configure RP Prism Preferences
In Admin Console > Node Preferences > Transactions > Discounts, make sure the following preferences are DISABLED:
- Spread global discounts (for both sales and orders)
- Accumulate manual discounts and accumulate spread discounts
Configure AppCard Plugin for Prism
After the installation is finished, AppCardConfig.exe will launch (unless you cleared the checkbox). This .exe file provides an interface for configuring the AppCard Plugin. You can find information about each of the fields in the Configuration Fields.
Changes to Configuration Settings Require Stop/Start of Proxy and Apache
After changing configuration settings, the user must stop the Proxy, stop the Apache service, start Apache again (do not use the restart option), and then start the Proxy.
About Reason Codes
In the AppCard Plugin Configuration UI, there are dropdowns for selecting a reason code (defined in Prism preferences) for loyalty gift, credit and discount. These dropdowns are not working in the current version of the plugin (2.1.0.8). No matter which reason is selected for any tender, in Item Details > Discounts on the transaction, "L_CRED" will always be the reason.
Configure AppCard Plugin
1. On the Customization Config tab, enter the server information and login credentials. Click Connect to Server.
2. Next, navigate to the Store tab in the lower part of the dialog (see below). On the Store tab of the Configuration screen is a set of Reason selection dropdowns and other fields. Select the reason that will be used for each dropdown. Refer to the Configuration Fields tables for more information. If your retail business practices call for spreading global discounts, you must enable the "Apply loyalty credit as return line item" AppCard configuration setting (Apache stop/start required). See the "Retailers who must Spread Global Discounts" section of this topic for details.
3. Click the Workstation tab. Select the Subsidiary and Store. Select your Workstation, enter the PIN and click Provision.
Header Fields
| Field | Description |
|---|---|
| Prism server | The machine name of the Prism server. |
| Username | The username used to log in to the server. |
| Password | The password for the entered username. |
| Connect to Server | Click Connect to Server. When the connection is established, proceed with configuring the Plugin. |
Store Tab
| Field | Description |
|---|---|
| Loyalty Gift Reason | Select the GIFT reason that you defined in preferences. |
| Loyalty Credit Reason | Select the CRED reason that you defined in preferences. |
| Loyalty Discount % Reason | Select the DISC reason that you defined in preferences. |
| Apply Loyalty Credit |
Apply Loyaly Credit can be set to either "As Line Item" or "As Tender."
The UPC is entered in the Return Line Item UPC field. At POS, the line item will be added automatically based on the user's actions on the AppCard Reward screen. |
| Return Line Item UPC | Enter the UPC of the line item to use for tracking loyalty credits. |
| Card Name | Select the default card name to use when applying loyalty credit as a tender (credit). Any user-defined card names will be listed after the predefined card names. |
| Get Item Description from | Select the Item Description field from which item descriptions will be pulled. |
| Get Customer Phone Type | Select the field from which Customer phone number will be pulled. |
| Save Redeem Portal Type | Select whether to save the phone used to redeem credits. |
| AppCard URL | Leave this set to the default https://api.appcard.com |
| Use Primary Phone | If selected and the customer has multiple phone numbers, the primary phone number will be used. |
Sample Customization Config - Store tab:

Sample Customization Config - Workstation tab
| Field | Description |
|---|---|
| Subsidiary | Select the subsidiary from the dropdown |
| Store | Select the workstation's store from the dropdown |
| Show all workstations | If selected, all workstations are shown. If not selected, only the current user's workstation is shown. |
| Workstation | Select the desired Workstation from the dropdown |
| PIN | Enter the PIN assigned to the workstation. |
Sample Customization Config - Workstation config tab:

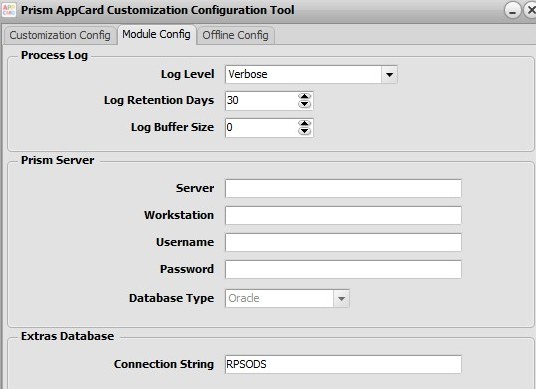
Module Config Tab
On the Module Config screen, set log and server settings. Define Prism server settings. Click Save when finished.
| Field | Description |
|---|---|
| Log Level | The level of logging to perform. Default = Verbose |
| Log Retention Days | The number of days' logs to keep before deleting automatically. Default = 30 |
| Log Buffer Size | Log buffer size. Default = 0 |
| Server | Machine name of the Prism server. |
| Workstation | Workstation |
| Username | Username of the Prism user. |
| Password | Password for the entered username. |
| Database Type | Default = Oracle |
| Connection String | Connection String |
Sample module config tab:
Offline Config Tab
These settings come into play when the connection to the AppCard server is lost.
| Setting | Description |
|---|---|
| Transaction Processing Delay | The number of milliseconds to wait before processing the next transaction. |
| Requests Processing Interval | The number of minutes to wait before making a request to the processor. |
| File Retention Time | The number of hours that offline files will be retained. |
Sample Offline Config tab:

AppCard at POS - Prism
1. Enter Retail Pro and create a receipt. When items are populated in the receipt, the AppCard Rewards button is displayed on the Prism menu.
2. Click the AppCard Rewards button.

3. Enter your phone number as a test. Assuming you have the AppCard app on your smartphone, this will verify a push notification.

4. Go into the AppCard Redeem Portal. Enter the correct email address and password unique to this merchant. This only has to be done once.
5. Select any reward to wish to redeem and/or apply any discount you wish to apply, then click Submit Transaction in the redeem portal. Click Close on the bottom of the redeem portal window.
6. Complete the transaction and tender out the sale. (Note: You can void the transaction afterwards. This is only for test purposes)
7. Verify the push notification on your mobile phone.
8. Verify with the merchant that the description of the items on the digital receipt is what the merchant would want to show to the customer.
Miscellaneous
Retailers who must Spread Global Discounts
By default, preferences related to spreading discounts are disabled; however, some retailers need to spread discounts. If your retail business practices require spreading global discounts, you must use the "Apply Loyalty Credit as Line Item" setting. Here's how it works:
Each store needs to create a line item in inventory.
- Set Description 1 =to APPCARD REWARDS (best practice)
- Configure this item as a non-inventory item
- Set the price to $0.01 item price (best practice)
- Set a unique UPC (Item # in Retail Pro 8,)
After the item is defined, go to the AppCard configuration screen and select the "Apply Loyalty Credit as Line Item" check box. Enter the item's UPC in the Return Line Item UPC text field. Prism users must stop the Apache service and then start it again after making this change (do not use the restart option).
At POS, the designated item is added automatically to the receipt based on the user's actions on the AppCard Reward screen.
AppCardModule.ini
The AppCardModule.ini file contains configuration settings for the AppCard.
Location of AppCardModule.ini file
| Version | Location |
|---|---|
| Prism | C:\ProgramData\RetailPro\Server\conf\appcard.ini |
AppCardModule.ini settings
| Setting | Description |
|---|---|
| LOG_LEVEL | The log level being used by the service. 3 = most detail; 1 = least detail. |
| RETENTION_COUNT | The number of transactions that will be retained. |
| BUFFER_SIZE | The buffer size being used. Default = 0. |
| WEBSERVICE_URL | The URL of the API Card service. |
| API_KEY | The secret key that must be used when making API calls. |
| PRISM_DATABASE | The name of the Prism database. |
| EXTRAS_CONNECTSTR | The database being used. |
| PRISM_SERVER | FQDN or IP Address of the Prism server. |
| PRISM_USER | User's password. |
| PRISM_USER_PWD | Displays a hash of the user's password. |
| PRISM_WORKSTATION | The Prism workstation where AppCard is installed. |