Property Management Link
Property Management Link User Documentation PDF
Property Management Link Technical Specifications PDF
The Retail Pro Prism Property Management Link (PMLink) enables Retail Pro Prism to communicate with external Property Management Systems (aka Hotel Management Systems) for guest inquiries and to charge guest purchases to their rooms while on property. The PMLink uses the Micros 4700/8700 POS to PMS interface and is written to work with hotel/hospitality systems that support this standard.
PMLink sends and receives PMLink Interface messages over a TCP/IP connection to communicate with the Property Management System (PMS) server. Details on this process and the associated specification for the PMLink can be found in the supporting documentation here.
There are two components to the PMLink:
- A back-end web service that communicates with the PMS
- Front-end HTML and Javascript files that enable user interaction
Architectural Overview:
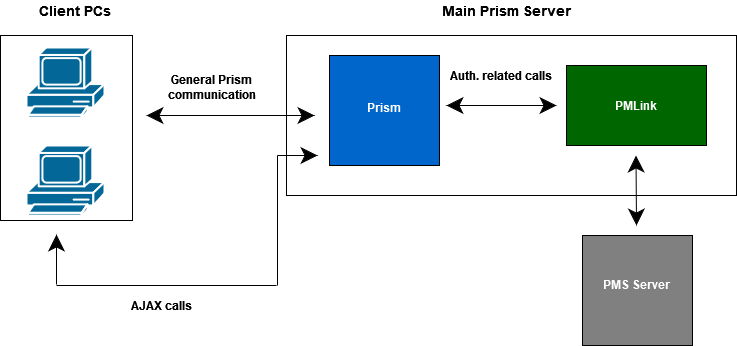
Basic Steps
(On the Prism Server)
1. Install Prism PMLink by running PrismPMLInstaller.exe.
2. Start the Prism PML Server Windows service.
(On the Prism Client)
3. In Prism Admin Console > Customizations, add the PML Customization.
4. In Prism Admin Console > Node Preferences > Node Selection, drill down to the desired workstation and configure HAL settings in the workstation record.
5. Click the PML Configuration button on the Prism menu and configure PML.
6. Record charges at POS.
OS and Web Browser Compatibility
OS: Windows 10/Windows Server 2012 and above
Browser: Tested on Chrome version 85, Firefox version 81.
Firewall Settings
Ensure that the firewall is configured to allow communication between the PMS and PML server ports as configured in the Server and Client setup sections.
About Employee IDs for New Employees
The Employee ID (empl_id) is a key field for the PMLink. The empl_id is sent to the PMS server. Currently, when a new employee is added in Prism, the empl_id is not generated. Therefore, for the current time, create employees in RIL (or Retail Pro 9) and then replicate the employees to Prism. When the employees are created in RIL/V9, the empl_id is generated and can be sent to the PMS server when needed.
Licensing
The Property Management Link is a licensed product. There are three levels of licensing available:
- Store/Site: Allows use of PML in the SBS/STORE the license was generated for.
- Subsidiary: Allows use of PML in ALL stores in that SBS
- Enterprise: Allows use of PML in ALL subsidiaries and stores.
The license file MUST be named PrismPML.lic (case-sensitive) and be in the same folder as PrismPML.exe. By default, this is C:\ProgramData\RetailPro\AddOns\PrismPML
Prism Server Setup
Install Prism PMLink
On the Prism server, run PrismPMLInstaller.exe The installer will install all the necessary files and will also install the PrismPML Windows service (also referred to as the "PrismPML server").
The installer installs the PrismPML Server files to the C:\ProgramData\RetailPro\AddOns\PrismPML folder.
Use the right-click "Run as Administrator" option to launch PrismPMLInstaller.exe.
Click Next >.
Click Install.
When the install is complete, click Finish.
Start the Prism PML Service Windows Service
The Prism PML Service (the Windows service) must be running to configure the PMLink on the Prism client PCs.
1. To run the Prism PML Service:
a. As a Windows Service (recommended for normal operation):
i. Start the Windows Service Manager
ii. Scroll down to the Prism PML Service
iii. Select and start the service
b. As a console app (recommended for first-time configuration or testing/troubleshooting purposes only):
i. Open Windows (file) Explorer and navigate to the:
C:\ProgramData\RetailPro\AddOns\PrismPML folder
ii. Double click PrismPML.exe to launch the PrismPML server.
iii. This will display a console window:
Considerations when Stopping/Restarting PML Server Window Service
Use the Windows Services management dialog to start, stop or restart the PML Server service just like any other Windows service. Note that this may require administrator privileges to access.
NOTE: Stopping or restarting the PML Server when Charge Posting operations are in process may result in a charge being posted to the PMS server and the charge not being relayed back to PML Client, resulting in a timeout. When the service is restarted it is possible that the Prism cashier may try to post a charge again, resulting in a duplicate charge posting to the guest account.
Therefore, it is recommended that all POS users be notified that charge posting tenders should not be used while the PML Server is being stopped or restarted. Prism can continue to be used during the PML Server restart - just not charge postings.
Note however that if Sales Reporting is also enabled, that some reporting may fail during PML Server restart. In this case, if Sales Reporting is enabled, it is recommended that that ALL POS operations be temporarily suspended during restart of the PML Server. Restart of the server usually only takes a few seconds.
Prism Client Setup
Add PMLink Customization
1. Login to Prism.
2. Navigate to the Prism Administration Console.
3. Click the Customizations link.
4. Click the Add New Customization button.
5. The Customization Configuration form is displayed.
a. In the Name field, Enter PML. Important! It MUST be PML, not PrismPML or anything else.
b. In the Configuration Data field, enter the following URL for the PrismPML server:
http://
Use either the FQDN or IP address of this server. Do not use LOCALHOST. Note: This server:port information is how the AddOn in the Prism client knows how to contact the PrismPML server. If the servername, IP address or partially qualified domain name (PQDN) is incorrect, the AddOn will not work properly and will likely hang when trying to access the PrismPML server.
6. Click Save.
Configure HAL Settings
1. For EVERY workstation that will be used for PML charges: In the Node Preferences > Node Selection page, set the context for the SBS and Store and select the workstation, then click the Edit icon.
2. Click the HAL Settings tab.
3. Select the workstation from the drop-down and click Customizations active.
4. Click the Add Customization button.
5. Select the PML customization from the list and click Add Customization.
6. (ONLY needed if using multiple PML servers to connect to different PMS servers) If this workstation needs to connect to a different PMS, enter the PML server URL for the PML server that is configured for the other PMS. Enter the URL in the Configuration Data box and it will override the default configuration.
7. Click the Save button.
Configure PML AddOn
1. Logout and log back into Prism. Navigate to the Prism Admin Console. A new PML Configuration side menu button should appear when you click the Retail Pro button at the bottom right of the screen.
2. Upon clicking the button, the PML configuration settings form is displayed:

Using the information provided by your Property Management System (PMS) provider (e.g., "Opera") and the notes in the table, configure the following settings:
| Setting | Notes |
|---|---|
| Server Host Name, Port | The IP address and port that the PMS server is configured to listen on for incoming messages. |
| PMS Timeout | The number of seconds the PML Server will wait for a response from the PMS system before it times out. If the PMS server is slow to respond and the PMLink regularly times out, try increasing this value (however it is recommended that the PMS system be upgraded to provide better performance instead). |
| Send ACK to PMS | If this option is checked (not checked by default), the PML Server will send an acknowledgement (ACK) to the PMS server after every message the PML Server receives from the PMS Server. This is typically only needed by older PMS systems that do not support TCP/IP communications and are using a TCP/IP-to-serial converter. |
| Account ID Size | This should be either 16 or 19 and is the number of characters allowed for the Account ID. |
| Max Sales Groups | This is the number of Sales Group categories that the PMS server is configured for - this should be 4, 8, or 16. |
| Max Tax Groups | This is the number of Tax Group categories that the PMS server is configured for - this should be 4 or 8. |
| PMS Server | |
| Maximum Client Connections | The maximum number of client connections allowed at any one time. Each client makes a connection only during the time it takes to perform an inquiry or charge posting; then it will disconnect. If more than the "Maximum Client Connections" try to connect at one time, those additional connections will be refused. Increasing this number may reduce performance. If processing is taking too long and it is not due to PMS server processing, try reducing this number. f the PMS server can support the transaction rate, this number can be any value up to 99. Default = 15 |
| PML Options | |
| Enable Sales Reporting | When Sales Reporting is enabled all sales - not just charge postings - will be sent to the PMS server. Some PMS systems can accept this data and use it for accounting purposes or sales tracking. Default = disabled. Sales reporting transactions are charge postings without an Account ID and the Information Field Info field is blank and the Information Field Number field is zero. The PMS Tender ID field will contain the Retail Pro tender ID (currently 0 - 18). Tender ID 4 will not be sent since that is the normal charge posting tender ID. |
| Increment PMS Tender IDs by One | Retail Pro tender IDs start at zero and increment from there. Since some PMS systems do not support tender IDs of ZERO, the tender IDs can be automatically incremented by one when they are sent to the PMS system. This is only needed when using the Sales Reporting option and a PMS system is unable to support a tender ID of ZERO. |
| Message Options | |
| Receipt Number Processing | The Receipt Number Processing setting determines how the receipt number will be sent to the PMS system (what data message fields will be used). Standard: This setting will send the lower four (4) digits of the receipt number to the PMS in the data message Receipt Number field. This is the standard method of sending the receipt number. Receipt-Transaction: This setting will use the Transaction Number and Receipt Number fields, sending the lowest four (4) digits of the receipt number in the Transaction Number field and the next lower four (4) digits of the receipt number in the Receipt Number field. This is a non-standard method but is commonly used by some PMS systems to provide more of the receipt number. The PMS system then combines the two fields and displays them together. NOTE: With this setting, the Receipt Number field will be zero or blank until the Prism Receipt Number exceeds 9999, then the Receipt Number field will contain 1 and the Transaction Number field will roll over to zero and begin counting up with each receipt. |
| PMS Inquire Options | PMS Inquire Options provide the PMLink with the ability to add custom PMS Inquiry options. These custom inquiry types are usually accompanied by a designated prefix pre-pended to the search criteria entered by the cashier. Some inquiry types and prefix might be: Account Number: "A" or "AN" Folio Number: "F" Guest Name/Room Number: None Reservation Number: "R" If they are supported, the PMS system will provide the inquiry types and their prefixes where the prefix is typically one or two characters. These will be entered as Name=Value pairs and if there is more than one, in a comma separated list. E.g. (using the examples above) "Name/Room/Any=","Reservation Number=R","Folio=F" On the Charge Posting dialog, they will be displayed listed in the order they are entered. The prefixes are pre-pended to the search criteria when the search button has been pressed and the entire value must be less than or equal to the Account ID size. Examples of usage might be: Cashier enters "Smith" - with the Guest name choice, PMS will be sent "Smith". Cashier enters "102" - with the Reservation Number choice, PMS will be sent "R102". Note that the prefix value could also be entered directly as part of the search criteria - e.g., "R12345" to search for reservation number 12345. For this reason, it is suggested that the first search criteria contain no prefix, so that the cashier can also directly enter the prefix in the typed in search criteria. E.g., "Name / Room / Any=","Reservation Number=R","Folio=F" If the PMS system does not support search prefixes, or it is desired to not use any search prefixes, then this option should NOT be blank and should contain an entry similar to: "Name/Room/Any=" |
| PMS Tender ID Types | PMS Tender ID Types provide the PMLink with the ability to add custom PMS Tender ID Types. These custom tender IDs are sent to the PMS system and may be remapped by the PMS to its own internal tender types or accounts. Retail Pro has its own standard tender IDs that will be sent during sales reporting (if enabled) so any custom PMS tender IDs used should be in a range ABOVE the Retail Pro tender IDs. The interface supports tender IDs in the range of 0 - 999. Standard Retail Pro tender IDs start at 0 (or 1 if incrementing IDs is enabled) and currently go to 18 (or 19). The range of 0 - 50 is reserved for use by Retail Pro. It is suggested that custom tender IDs start above 99 so as not to conflict with the Retail Pro standard tender IDs and any future expansion. Some custom tender IDs might be: Facilities Account 100 Dry Cleaning Charge 101 If they are supported, the PMS system will provide the Tender IDs and their values. These will be entered as Name=Value pairs and if there is more than one, in a comma separated list. E.g. (using the examples above) "Room Service Charge=100","Dry Cleaning Charge=101" It is recommended that the default ID value of 4 be used as the first value in the list and be used for standard room charge postings so that it will be consistent with the sales reporting charges if sales reporting is enabled. Example: "Room Charge=4" Or "Room Charge=4","Room Service Charge=100","Dry Cleaning Charge=101" If the PMS system does not support PMS Tender ID Types, or it is desired to not use any additional ID's, then the value should contain an entry like the example below with ID 4: "Room Charge=4" |
| Send Store Code in Charge Posting | If this option is checked (not checked by default), the first three characters of Store CODE will be sent in the Posting request Store field instead of the Store NUMBER. |
| Send Store Code in Header ID Message | If this option is checked (checked by default), the Store CODE is sent in all the message headers. If it is not checked, then the Store NUMBER will be sent in the message header |
| Send Store Zero as Store 999 | Some PMS systems are unable to support a store number of zero. If this option is checked (checked by default), when charge postings are made from Retail Pro store 0, the store number will be sent to the PMS system as store 999. This setting will have no effect when "Send Store Code In Charge Posting" is enabled as the store code will be sent instead of the store number |
| Sales Groupings | |
| Group Sales by Code Type | This option determines what Retail Pro field will be used for grouping when reporting Sales categories. It can be one of DCS, ALU, or UPC. DCS is the default. |
| Sales Groups | Sales groups are used to create sales grouping categories and the maximum number of categories is determined by the Max Sales Groups setting. The last group (the highest or maximum value - either 4, 8, or 16) is a catch-all group and will contain any values not specifically designated in the other groups. This group cannot be modified and will not be shown (e.g., Max Sales Groups = 4. Only groups 1 - 3 will be displayed.) Sales group values are specified as comma separated values. PMLink does not currently support wildcard or partial values, so full DCS, ALU or UPC values must be entered. DCS Codes are case-specific. For example, if a DCS Code in Prism is GEN, the Sales Group in PML must be GEN too. Groupings are case-sensitive. |
| Tax Groupings | |
| Tax Calculation Method | The tax calculation method selected will determine how sales and tax data is sent to the PMS. This should match the tax calculation method defined in Prism Sales Tax: Sales and tax data will be separated in the PMS message fields. VAT: Sales data will contain the tax amount and Tax data will contain the sale amount. Tax will be calculated at the PMS. |
| Tax Groups | Tax groups are used to create tax grouping categories and the maximum number of categories is determined by the Max Tax Groups setting. The last group (the highest or maximum value - either 4 or 8) is a catch-all group and will contain any values not specifically designated in the other groups. Tax group values are specified as comma separated values. The values that can be entered are one or more of the Tax codes specified in Retail Pro preferences Groupings are case-sensitive. For example, if the Tax Code in Prism is TAXABLE, the Tax Group in PML must be TAXABLE too. |
Retail Pro standard tender ID's and the comparable incremented values:
| Standard Tender ID # | Tender Name | Incremented Tender IDs as received by the PMS |
|---|---|---|
| 0 | Cash | 1 |
| 1 | Check | 2 |
| 2 | Credit Card | 3 |
| 3 | COD | 4 |
| 4 | Charge | 5 |
| 5 | Store Credit | 6 |
| 6 | Split Tender | 7 |
| 7 | Deposit | 8 |
| 8 | Payments | 9 |
| 9 | Gift Certificate | 10 |
| 10 | Gift Card | 11 |
| 11 | Debit Card | 12 |
| 12 | Foreign Currency | 13 |
| 13 | Traveler's Check | 14 |
| 14 | Check in Foreign Currency | 15 |
| 15 | Central Gift Card | 16 |
| 16 | Central Gift Certificate | 17 |
| 17 | Central Credit | 18 |
| 18 | Customer Loyalty | 19 |
Configure Prism Preference to Spread Sale Discounts
PMLink requires configuration of an additional Prism preference. In Prism Admin Console > Node Preferences > Transactions > Discounts, enable the preference "Automatically spread sale discounts."

Property Management Link at POS
To use PMLink at POS, start a New Transaction.

Searching for a Guest, Room, or Account and Posting Charges
1. Add items to the transaction and hit the Tender button
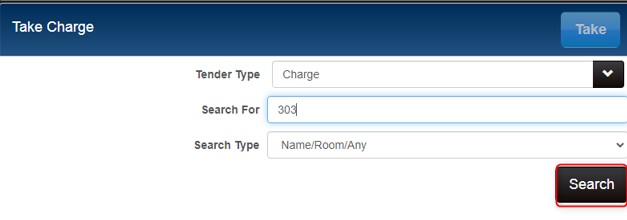
2. Select Charge as the tender type.

3. As mentioned in the configuration section, some PMS servers support custom search types. These custom types can be configured to be displayed in the PML Interface dialog using the PML Configuration page in the Prism Admin Console. Please refer to your PMS server documentation for how to use custom search types and what they do.
From the PML Interface point of view, all searches are custom searches since the Retail Pro PMLink has no knowledge of what the search terms mean.
Most PMS servers support searching by last name or room number and of these, last names are only alphabetic and room numbers are only numeric.
Assuming the PMS server you are connected to behaves this way, this is how to perform a guest account search.
From either the PML Search dialog or the PML Interface dialog:
a. Enter all or part of a search value in the Search For box, select the Search Type and click on the Search button.
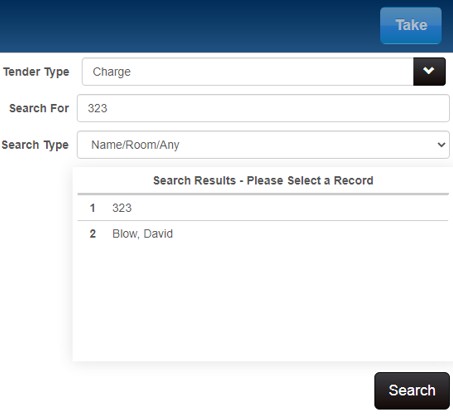
b. Look at the Search Results box. EITHER the search will return results as shown below or it will return an error message similar to *NOT FOUND*. The actual text returned is PMS server dependent, please refer to your PMS server documentation for expected results.
NOTE: If a Bill To customer has been added to the receipt, the customer's name will automatically be populated into the Search For box when it is first displayed.
c. Select the desired entity in the Search Results box to display the charge details. Verify the Charge Amount, Charge Type, and if applicable, the number of guests (typically only used for food service charges). The amount to charge may be changed if the customer wishes to pay with a split tender or if cash back is allowed. (Note: The Charge button is disabled unless/until a search result is selected.)
Once the charge values have been confirmed, click or press the Charge button

d. The PMS will return either an Approved or Rejected result
Rejected Result
A rejected posting by the PMS server means that the PMS could not approve the posting for some reason. Review the pop-up message for possible additional information.

Approved Result
An approved posting is complete. A success message is displayed, and the tender is added to the document.

Deleting a Charge Tender or Posting a Charge Credit
Sometimes mistakes are made or the customer changes their mind or for whatever reason a tender must be deleted or a previous charge must be refunded.
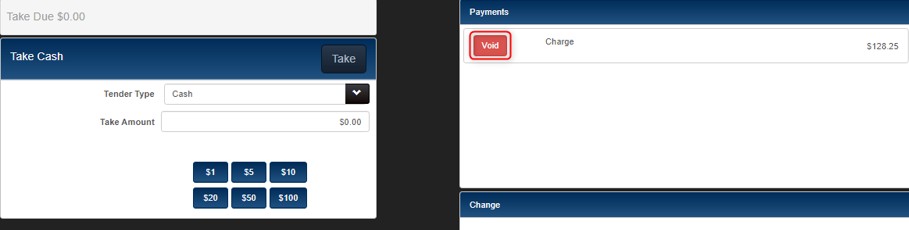
Deleting a Charge Tender
Deleting a charge tender only applies and can be done when there is a receipt in progress and a charge tender has already been posted. To delete a previously posted charge, use the normal Prism Void Tender functionality.
Posting a Charge Credit
To post a charge credit (or refund) for a previous receipt, you add RETURN ITEMS on a receipt by referencing the original receipt:

Using Service Charges to Send Shipping/Fee Charges
The property management interface supports sending service charge information to the property management system. The PML sends the shipping and fee information as service charges.
SHIPPING charges are sent to the property management system in the AUTOMATIC service charge field
FEE charges are sent to the property management system in the MANUAL service charge field
Both types of service charges are sent with any applicable tax associated with them included in the service charge field.
File List
The following files are included with Prism 2.1 and above in the ProgramData\RetailPro\AddOns\Prism PML folder.
| File or folder | Description |
|---|---|
| /Logs | Log files. |
| appsettings.json | Application settings in JSON format. |
| PrismPML.exe | Prism Property Management Link add-on. |
| web.config | Configuration information |