Document Designer
PDF
Document Designer gives retailers an easy-to-use tool for creating and editing receipt and other document designs. This topic has information about the following tasks and features of Document Designer:
- Installation/Configuration/Security
- Edit an Existing Design
- Add a Band and Data Field
- Add a Text Label or Caption
- Add a Barcode to a Band
- Add a Picture Object (Logo) to a Band
- Include Item (Merchandise) Images on Doc Designs
- Change Font, Font Size, Color
- Add a Line Separator
- Page Options (Margins, Size, Endless Paper, etc.)
- Designer Options (Grid Units, Fonts, Colors, etc.)
- Custom Formatting Functions
- Visible Flag
- Modify a Design on another Server
- Original Store Information on Document Designs
- Receipt 40-col Design - Detailed View
- Export/Import Designs
- Create a New Design
- Working with Scripts and Events
- Report Groups
- Print Tax information for items taxed at different rates
- Print Total Foreign Cost
- Print Total Discount Amount
- Print Serial and Lot Numbers on Merchandise Tags
Installation/Configuration/Security
Install Document Designer
Document Designer is a separate RP Prism component that must be installed on each system where it will be used. Install Document Designer via the Autorun.exe program. When installing Document Designer, you must enter the FQDN (or IP address) of the desired Prism server.
Document Designer Security
You can control employee access to Document Designer via the Document Designer - Access security permission.
Launch Document Designer
- Navigate to the …\Program Files (x86)\RetailPro folder.
- Double-click the DocumentDesigner.exe file.
- Enter the name of your server. Enter your username and password. Click OK.
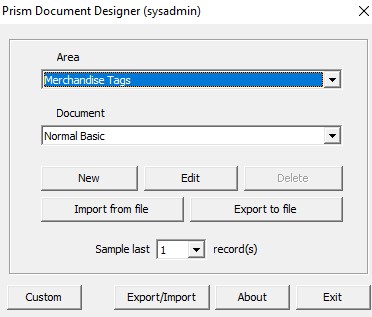
- The home screen for Document Designer is displayed. From the home screen, you can:
- Create a new design
- Edit an existing design
- Export a design to a file
- Import a design from a file
Document Designer home screen:
Edit an Existing Design
The easiest way to create a new design is to edit one of the designs included with Document Designer. The default designs are sized for the most common paper sizes and contain the fields that are typically found on most receipts. In many cases, adding or removing a few specific fields or adding a company logo will make the default design suitable for use by the retailer.
- Launch DocumentDesigner.exe and log in.
- Select an Area. Select a Document type. Click the Edit button.
- The design screen is displayed.
- Select Save As ... and save the design with a new, unique name.
- Edit the design and save the changes.
Default Document Designs
The following tables list the document designs included in Prism. You can edit these designs to suit your needs.
Merchandise Tags
| Design Name | Description |
|---|---|
| Normal Basic | This is a regular-sized tag. |
| Small Basic | Smaller than the normal. Can be printed two wide |
| Jewelry | Special small size tag for rings, necklaces and other small items |
Physical Inventory
| Design Name | Description |
|---|---|
| PI Store | PI Sheet for a store. |
| PI Good Scans | List of good scans for a PI. |
| PI Bad Scans | List of bad scans for a PI. |
| PI Discrepancy | List of Start Qty, Scanned Qty and Discrepancy Qty for a PI. |
POS Transaction
| Design Name | Description |
|---|---|
| Gift Receipt 8 x 11 | Gift receipt (no prices) optimized for standard printer paper. |
| Gift Receipt 40 col | Gift receipt (no prices) optimized for a typical 40-column printer. |
| Item Grid 8 x 11 | Shows items in a grid format, optimized for standard printer paper. |
| Receipt 40 col |
Regular receipt optimized for a typical cash register receipt printer. |
| Receipt 8 x 11 - Coupon | Receipt that includes a barcode for a coupon awarded on the transaction - 8 x 11 format. |
| Receipt 40 col - Coupon | Receipt that includes a barcode for a coupon awarded on the transaction - 40-column format. |
| B+S Receipt 40 col | Receipt design for receipts created using the B+S EFT processor |
| Receipt 40 col - OPOS | Receipt design in 40-col format for OPOS printers. |
| Receipt 40 col - Coupon - OPOS | Receipt design in 40-col format that includes an element for printing coupons (for OPOS printers). |
| Gift Receipt 40 Col - OPOS | Gift receipt design in 40-col format for OPOS printers. |
| Receipt 40 col - Image | Receipt design in 40-col format that includes an image element for printing merchandise images on the receipt. |
| Receipt 8 x 11 - Image | Receipt design in standard copy paper format that includes an image element for printing merchandise images on the receipt |
EFT Transaction
| Design Name | Description |
|---|---|
| Declined Receipt 40 col | Receipt design for declined EFT transactions (Cayan) in 40 col format. |
| Declined Receipt 8 x 11 | Receipt design for declined EFT transactions (Cayan Genius) in 8x11 format. |
| Declined Receipt 8x11 - OPOS | Receipt design for declined EFT transactions (Cayan Genius) in standard copy paper format for OPOS printers |
B+S EFT
| Design Name | Description |
|---|---|
| B+S Declined Receipt - 40 col | Receipt design for declined EFT transactions in 40 col format. |
| B+S Declined Receipt - 40 col - OPOS | Receipt design for declined EFT transactions in standard copy paper format. |
Disbursements
| Design Name | Description |
|---|---|
| Disbursements - 40 col | Disbursement design in 40 col format |
| Disbursements - 8 x 11 | Disbursement design for printing receipts for things such as Cash Drops, Paid Ins, and Paid Outs in 8x11 format. |
| Disbursements - 40 col - OPOS | Disbursement design in 40 col format for OPOS printers. |
Gift Card Balance
| Design Name | Description |
|---|---|
| Gift Card Balance 40 col | A document showing gift card balance in 40 col format. |
| Gift Card Balance 8 x 11 | A document showing gift card balance in 8x11 format. |
| Gift Card Balance 40 col - OPOS | Gift card balance in 40 col format for OPOS printers. |
Gift Receipt
| Design Name | Description |
|---|---|
| Gift Receipt - 40 col | Gift receipt (prices not included) in 40 col format. |
| Gift Receipt 8 x 11 | Gift receipt (prices not included) in 8x11 format. |
| Gift Receipt 40 col - OPOS | Gift receipt in 40 col format for OPOS printers. |
Purchase Orders
| Design Name | Description |
|---|---|
| PO Active | Purchase Order in 8x11 format |
Vouchers
| Design Name | Description |
|---|---|
| Voucher | Receiving (or Return) voucher in 8x11 format |
| ASN | Advanced Shipping Notice (ASN) voucher in 8x11 format. |
Transfer Orders
| Design Name | Description |
|---|---|
| Transfer Order | Transfer order in 8x11 format. |
Slips
| Design Name | Description |
|---|---|
| Slip | Transfer slip in 8x11 format |
Adjustment Memos
| Design Name | Description |
|---|---|
| Cost Memo | Cost adjustment memo in 8x11 format. |
| Price Memo | Price adjustment memo in 8x11 format. |
| Qty Memo | Quantity adjustment memo in 8x11 format. |
| Price Memo - VAT | Price Memo in 8 x 11 format showing "with tax" values as appropriate for a VAT environment. |
| Qty Memo - VAT | Quantity Memo in 8 x 11 format showing "with tax" values as appropriate for a VAT environment. |
X/Z-Out
| Design Name | Description |
|---|---|
| X-Out 8 x 11 | X-Out report in 8x11 format. |
| X-Out with Tax 40 Col | X-Out report including tax in 40-column format. |
| X-Out with Tax 8 x 11 | X-Out report including tax in standard copy paper size. |
| Z Out Close 40 col | Z-Out close report, with tax, in 40-column format. |
| Z Out Close 8 x 11 | Z Out close report, excluding tax, in standard copy paper size. |
| Z Out Close with Tax 8 x 11 | Z Out close report, with tax, in standard copy paper size. |
| X Out 40 Col - OPOS | X-Out report without tax in 40-column format for OPOS printers. |
| X Out with Tax 40 Col - OPOS | X-Out report with tax in 40-column format for OPOS printers. |
| Z Out 40 col - OPOS | Z Out close report, without tax, in 40-column size for OPOS printers |
| Z Out with Tax 40 Col - OPOS | Z-Out close report, with tax, in 40-column format for OPOS printers. |
Basic Design Elements
The following table lists the most commonly used design elements:
| Element | Description |
|---|---|
| Band | Bands are used for placing the objects they contain at particular locations on the output page. When placing an object in the PageHeader band, the given object is displayed at the top of each page in the finished report. Similarly, objects in the PageFooter band are displayed at the bottom of each page. |
| Text | Displays one or more lines of text within a rectangular area |
| Picture | Insert logos or photos in "BMP", "JPEG", "ICO", "WMF" or "EMF" format. |
| Barcode | Displays data as one of several barcode types. |
| Checkbox | Displays a checkbox with either a tick or a cross. |
Document Designer Subsidiary/Store Assignment
You can assign document designs to specific subsidiaries/stores. This enables retailers to define (and update) designs at the POA level and then those designs will replicate to the desired stores based on the Store Assignment selection. Previously, managers at the POA level would have to connect to each store and set the design at the store level. The main screen of Document Designer includes a Store Assignment button. Click the Store Assignment button to display a modal for selecting the subs/stores that can use the design.

To select specific stores, first uncheck the Subsidiary checkbox, then select the individual stores for that subsidiary. Click OK.

Delete a Design
You CAN delete any of the custom designs you have made. You CANNOT delete any of the default designs included with Document Designer.
- Launch DocumentDesigner.exe and log in.
- Select an Area. In the Document field, select a custom design. Click the Delete button.
About the Sample Last Records Setting
On the Document Designer home screen is a field called Sample Last Records. This field determines the number of actual records from the database that will be used when previewing designs from the designer. It can be set from 1 to 5. Users may see a few "blank" records because of the way RP Prism prepares records for document storage. If this is the case, simply advance to the next sample record. Default = 1
Displaying Previews of Documents in RP Prism
Designs are optimized for printed format. When displaying a preview of the design in the Prism Print/Update dialog, (user selects Preview button in the Print dialog) the appearance may be slightly different than the appearance of the printed receipt. This is due to pixel overlaps and other issues when rendering in HTML format.
Item (Merchandise) Images on Document Designs
Item Images on Printed Document Designs
You can include merchandise images (Item or Style) on printed receipts. The following new default receipt designs are available to facilitate the easy printing of merchandise images on receipts:
- Receipt 40 Col - Image
- Receipt 8x11 - Image
When a retailer who uses merchandise images prints a receipt using one of these designs, the appropriate image for the item will be printed, too. Previously, merchandise images were not available in Document Designer and therefore couldn't be included on printed receipts. When printing merchandise images, the print engine will obey the Prism preference that allows the user to choose which merchandise image to use: item images, style images, or dynamic selection.
But what if you have already put in a lot of time and effort creating your own custom receipt designs and don't want to use the default receipt designs with images? Here's how you can edit an existing receipt design:
- Open the Receipt design. Navigate to the Item Band where you want the image to display.
- Drag and drop the Picture object onto the Item Band. You can click the x to close the image dialog.

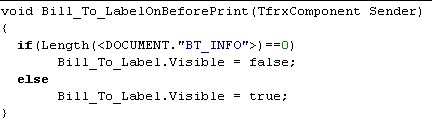
- Select this just added picture object, go to "Events" tab and double click on "OnBeforePrint" event. It will create a stub in code and takes you to the code window where you can copy and paste the following code snippet into the area between the brackets { }.
GetImage(

Modify Design on another Server
The designer working on the document designs can log into any server and modify designs on that server - from around the globe.
- Launch DocumentDesigner.exe.
- Enter the name of the server to which you want to connect.
- Enter a valid username and password and click OK.
- Select an Area and the document design that you want to modify and then click the Edit button.
- Make any needed changes and save the file with a unique name.
Add Original Store Information
You can add original store information to document designs, if desired. Including the original store information enables retailers to know where the original transaction occurred and can make it easier to verify the return.
The following fields are available for doc designs: orig_document_number, orig_store_number, orig_subsidiary_number. You can clear the visible flag for these fields so that they are not visible on the printed document. These fields are only populated for return items that reference an original receipt.
Add a Barcode
Receipt designs will often have a barcode of some type that can be scanned when performing a return or exchange. The default Prism designs include a barcode for the Document SID at the bottom of the design. Having a barcode field linked to the document SID makes it easy to scan the barcode on the customer's physical receipt and find the correct document.
- Create a band and place the band where you want the bar code to appear.
- Touch or click the Bar Code button.
- Select the type of bar code.
- Place the bar code in the band you created.
- The Bar Code Editor opens.

- In the Code field, touch or click the Function button.
- Select the Data tab and then drag/drop the field that will be used to create the barcode into the Expression text box. For a document, the field be the
- Select or change other options in the Barcode Editor dialog as needed and then click OK.
Bar Code Editor Fields
| Field | Description |
|---|---|
| Code | Select the Prism DOCUMENT or DOCUMENT_ITEM field that will be used to create the barcode. |
| Type of Bar | The bar code format. Choose from any one of several popular barcode formats. Calc Checksum If selected, a checksum will be calculated. Default = Not Selected. |
| Calc Checksum | If selected, a checksum will be calculated. Default = Not Selected. |
| Text | If selected, the number is displayed under the barcode. If not selected, the number is not displayed. Default = Selected. |
| Zoom | This controls the magnification of the barcode. By default, Zoom is set to 1. Increasing the Zoom to 2 will double the size of the barcode. Increasing Zoom to 3 will triple the size of the barcode. |
| Rotation | The angle (in degrees) at which the barcode will be displayed: 0 = horizontal (default) 90 = barcode points to the right 180 = vertical 270 = barcode points to the left |
Add a Logo or Picture Object
Retailers may want to put a company logo at the top of the receipt in a PageHeader band or at the bottom of the receipt in a PageFooter band. Alternatively, you can create a Child Band and add the image in the Child Band at the desired location in the design.
- Add a band and place the band in the position where the graphic will appear.
- Touch or click the Picture Object button.
- The Picture dialog is displayed. You can browse to an image file or copy/paste an image.
- To browse to an image file, click the Open button. Navigate to the location of the image file.
- Select the image and click OK. The image is loaded in the dialog.
- Click the OK button. The image is added to the band. Resize or reposition as needed.
Change Font Size
You may want to use a larger or smaller font, or apply bold or italic formatting to text, or change the text color. To change font, font size, or other text properties for the currently selected text element, use the Text toolbar.
Add a Line Separator
A common design element on printed receipts is some type of line separator to provide a visual separation between different areas of the receipt (Store info, items and totals, thank you message, etc.). You can easily add a child band and then draw a line inside the band. You can then adjust the height, width and color of the line as needed.
- Click the Insert Band button.
- Select Child.
- Click the Draw button.
- Select Draw Line. Draw the line inside the band. Resize as needed.
- Save the changes.
Page Options
Select File > Page Options to display a dialog for changing:
- Margins
- Page orientation
- Page size and other settings
- Multi-column format options
- Endless paper configuration
The dialog has two tabs: Paper and Other options.
Paper tab
On the Paper tab, you can set the size and alignment of the printout as well as the margins. In "Paper source" the drop-down lists allow selection of printer tray for the first page and for the rest of the report pages.
Other Options tab
On the Other Options tab, the following options are available:
| Setting | Description |
|---|---|
| Columns | Set the number of columns for multi-column designs. |
| Print to previous page | Allows you to print pages without starting a new page, instead beginning in any blank space on the previous page. This option can be useful when a design consists of several pages. |
| Mirror margins | Switches the right and left margins of even-numbered pages during previewing or printing of a report. |
| Endless page width/endless page height | Increases page size depending on the number of data records on the page (when the report is run). When set the design will appear on one big page in the preview window instead of on several standard size pages. Additionally, Paper Height on the design needs to be set. |
| Large height in design mode | (Required for Overlay bands) Increases the page height in the designer. This feature can be useful if there are many bands on a page: It must be used when working with overlayed bands. It only effects the page height in design mode. |
Designer Options
Select View > Options to display a dialog that enables you to customize the designer interface.
| Option | Description |
|---|---|
| Grid | Set the preferred units (centimeters, inches, pixels) and grid spacing You can set grid visibility and alignment to grid. (This can also be done via buttons in the "Standard" toolbar from within the designer) |
| Fonts | You can set a font for the code editor window and for the "Text" object editor. If the "Use object's font settings" option is enabled, the font in the text editor window matches the font of the object being edited. |
| Colors | The default white background of the designer workspace and tool windows can be modified via the "Workspace" and the "Tool windows" buttons. The "LCD grid color" option increases contrast of the grid lines a little and improves their visibility on LCD monitors. |
| Show editor after insert | Controls what happens when new objects are inserted. If the option is enabled, its editor will be displayed each time an object is inserted. When creating a large number of blank objects, it is recommended to temporarily disable the option. |
| Show band captions | Disabling this option hides band captions, so saving some space on a design page. When disabled, the band captions are shown inside the band workspace. |
| Show dropdown list of fields | Controls whether the drop-down list is accessible when pointing with the mouse to "Text" objects which are connected to data fields. This may be necessary if there are many narrow "Text" objects in a band. |
| Free bands placement | Disables snapping of bands to the page. This option is disabled by default and bands are automatically grouped on the page according to their function. The gap between bands is set in the "Gap between bands" field. |
Custom Formatting Options
Document Designer includes several custom functions that read from the Prism installation's Regional Settings and use those settings to format dates, prices, taxes, etc.
The following table lists the custom formatting expressions included with Prism.
| Function | Description |
|---|---|
| FormatCost | Formats numeric values using Cost decimals from Regional Setting (using Base Currency). |
| FormatCurrency | Note: This function is not currently used in any of the Prism default designs. Formats numeric value. Made for use to format tenders. If tender type is 12 (foreign currency) or 14 (foreign check), it returns something formatted like: "$12.0 (Ω4321.56)" - amount in base currency plus amount in foreign currency using currency symbol for foreign currency taken from our currency table if symbol exist). If a currency symbol doesn't exist, it uses the currency code. If tender type is not foreign currency or foreign check, it works the same as FormatPrice. |
| FormatCurrency2 | This function tries to find the currency (base or foreign, doesn't matter) in the currency table, gets the currency symbol and decimals from there and returns something formatted like "Ω4321.56" or "$12,455.000" depending on the currency code passed as a parameter |
| FormatPrice | Formats numeric values using Price decimals from Preferences regional settings (uses Base Currency symbol). |
| FormatQty | Formats numeric values and groupings using Numbers decimals from regional settings. No currency symbol used. |
| FormatTax | Formats numeric values using Tax decimals from regional settings (uses Base Currency symbol). |
| HasPermission | Tells if the user has the specified permission. For instance, in a report design script, you can check if a user has permission to see item cost and if not, you can hide cost-related fields (including margin, coefficient, etc.). Using this function requires you to know the name of the permission in the database. For instance, the permission to see item cost is named "SeeItemCost". |
| FormatDateTime | Format date time values in long format using date/time format from regional settings. |
| FormatDateTimeShort | Format date/time values in short format using date/time short format from regional settings. |
| IsNotZero | Returns true if value is not zero (number zero, string "0" or null). Note: A string such as "123" returns true; a string such as "blah" returns false |
Assign a Formatting Function
- Add the band into which the formatted data field will be added.
- Click the Functions tab.
- Navigate to the last subfolder in the Functions folder (The folder without a name). Expand the node to display a list of custom formatting functions developed especially for Prism Document Designer.
- Select the desired function and then drag/drop it into the band.
- Double-click the function element in the design. Place the cursor in the middle of the parentheses.
- Click the Insert Expression button.
- Select the Data tab and expand the node for the desired dataset.
- Scroll to the desired data field. Select the field and then drag/drop it into the Expression pane. The field you selected is added to the Format expression. Click OK. Save the changes.
FastReports Functions
Fast Reports includes a number of other functions for
- Aggregating data (SUM, AVG, COUNT, MAX, MIN)
- Converting data from one type to another (e.g. from number to string, or from string to number)
- Manipulating string characters
The details of these functions are beyond the scope of this documentation. Please refer to the Fast Report help files for information.
Visible Flag
The Visible flag plays a key role in designs. If there are any elements that you don't need to include, you can set the Visible property to "False" for the element.
Several of the default scripts included with Prism will print or not print elements based on the Visible property's setting.
Receipt 40-col Design - Detailed View
This section presents a detailed look at Prism's default Receipt 40-col design, section-by-section. You will learn why the design elements are placed where they are as well as any special formatting applied. You can use the information in this section as a reference as you create your own designs. By examining this section in detail, you will get a better idea of how Prism's default designs are structured and can use that information when editing or creating your own designs.
Sample Default 40-column Printed Design

Report Title
At the top of the design is a ReportTitle band with Date and Time system variables added. Because this is a ReportTitle band, it will only appear once, at the beginning of the printout (as opposed to a PageHeader band, which will appear on every page).
Store Name
The Store Name is placed in a MasterData band. The font size has been increased and bold formatting applied.
The MasterData band is "linked" to the Document data type. This means the band and all child bands can use the fields associated with this datatype.
Store Number, Store Code
Under the store name are the store number and store code. Together, these fields enable both the Customer and Associates to easily confirm the location where the transaction took place (e.g. if a customer wants to make a return). These are indicated as CHILD bands. They will use the data type of the MasterData band above.
Store Address and Phone
This section displays store address and phone information. Some retailers may not need these fields on printouts.
How to tell if a band or element has an event and script assigned. A red triangle next to a band indicates that the band has an event and script assigned to it. To display the events/scripts for the selected band, click the Events tab. Each event has a drop-down for selecting a script. This script will hide the band is there is no Store Address 4 by making the entire band invisible. Similar events/scripts are associated with many of the bands in the default Prism designs.
PrintChildIfInvisible Property
An important property on this band is the PrintChildIfInvisible property. This property is set to TRUE for each of the Store Address fields. This means that if Address 2 & 4 are populated, but Address 3 is blank, if Address 3 is hidden, Address 4 still has the ability to show data.

Cashier/Associate
In the Prism default design, a single child band holds both the Cashier and Associate data fields. This enables a manager to quickly see the employees involved on the transaction. A text caption has been added in front of each of these data fields. The text caption has bold formatting (using standard html tags) to make the label stand out on the printed receipt.

Bill To and Ship To Customer Info
Although the Customer Bill To and Customer Ship To fields could be placed on the document in separate bands (like the Store info bands) that can be hidden when they contain no data, two special data "blocks" have been created to accommodate a common design element.
The Special BT_Info and ST_Info "block" fields allow the Billing and Shipping information to be displayed side-by-side. By using these predefined "blocks" of data a blank BT_Address_Line2 can be removed from the Bill To list while the Shipping address can have an Address_Line2 defined. Otherwise when placing BT and ST corresponding fields side-by-side within a band blank lines would be printed if BT contained value and ST did not contain a value.
BT_Name: John Doe ST_Name: Mary Smith
BT_Addr1: 5012 S. Emerald Way ST_Addr1: 6853 Paradise Circle
BT_Addr2:
BT_Addr3: Big Lake, Alaska ST_Addr3: Little Rock, Arkansas

Document Number, Created Date
The default Receipt 40-col design includes a set of bands for printing the sequential document number (or order number) and the date/time the document was created. Each band has a label to the left of the data field.
Notice that the CREATED_DATETIME data field is formatted with the custom "FormatDateTime" function.

Items
The items area of the design has several elements that work together to display key information about each item listed:
- A Header: band holds the labels for various item data fields (Item Type, Description 1, Attribute, and Size). This band functions as a header for the following section.
- A DetailData band is next, with a corresponding data field directly below the each of the labels in the Header band. Note that the DetailData band is "linked" to the Document_Item data type. This means the band and all child bands can use the fields associated with this datatype.
A DetailData band is designed for similar information that must be repeated like listing each item on the receipt. Each of the DetailData Child bands prints, if data is present. Once reaching the last DetailData:Child band the loop is repeated until no more items exist to be printed.
- A child band displays UPC, Quantity, Price, and Extended Price
- A child band displays discount information (Discount percentage and Reason)
- A line separator is at the bottom, providing a visual indication of the end of the item
Together, these elements enable key item information, including discounts, to be displayed on the physical receipt in a clear, organized way that minimizes the amount of paper required for the printout and groups all information pertaining to a particular item.

Summary and Totals
This section of the design is meant to display a summary listing of the charges being applied on the transaction. Each of the data fields added to bands has a label. Notice that the labels and data fields are aligned to the right.
The default design includes the following information: Sale Subtotal, Sales Fee, Shipping, Discount, Tax, Order Deposit, Return Subtotal, Return Tax, and Receipt Total.
Sold Qty, Return Qty
This Footer: band functions as a footer for the preceding section and will use the fields which pertain to the DetailData type assigned. Notice that for the Sold Qty and Return Qty blocks, the labels come after the data field. E.g. "1 Item Sold" or "1 Item Returned" These quantity fields have the "FormatQty" custom formatting function applied.
Associated Script
If multiple items are sold, returned, or ordered, a script has been created that will append an "s" to the label, ensuring the grammar remains correct.
Fees, Shipping, Discounts
This set of child bands displays the key values (except tax) that will comprise the transaction total: Each of the data fields is preceded by a corresponding text label. The labels and fields are aligned to the right.
Taxes
There are separate areas for Sales Tax and Return Tax. For both the Sales Tax and Return Tax areas, there are two child bands (Tax 1 and Tax 2). The second band, for Tax 2, only is used in multi-tax environments (e.g. Canada with HST and PST).
In the default Prism 40-col receipt design, sales tax values are displayed using a combination of two data fields and one label, as shown in the following format used for Sales Tax 1:
[DOCUMENT."TAX_AREA_PERCENT"]% Sales Tax [FormatPrice(
This format takes into account the tax on any return items and displays the net tax amount due for the transaction.
Summing of Sales Tax and Return Tax
The values of Sales tax and Return tax are summed (‘+'). This powerful tool to create custom mathematical operations allows you to manipulate data on the printed document to display unique values not currently defined in Prism.
Order Deposit
Any order deposits used on the transaction will affect the total, so there is a child band that displays the order deposit amount used, if any.
Report Summary (Document SID Barcode)
At the bottom of the default 40-col receipt design is a Report Summary band that has a barcode for the Document SID. Having this barcode on the design is useful if a customer has to make a return or exchange. A cashier can do a transaction lookup at POS and scan the barcode to easily find the transaction.
Object Toolbar
The Object Toolbar runs vertically on the left edge of the screen. Use this toolbar for adding bands, labels, picture objects or shapes.
| Button | Description |
|---|---|
 |
Selection tool. Use this button if you want to select an element on the screen. |
 |
Search tool. |
 |
Edit Text. You can use this button to add a text area to the receipt design |
 |
Copy Format. Use this to copy the format of the currently selected object. |
 |
Insert a band. Use this button to insert the various bands that will hold labels and individual Prism fields from the document, item, order and tender datasets. |
 |
Add a gradient object. |
 |
Add a check box object. |
 |
Add a text object. Use this button to add a label for a field. |
 |
Add a picture object. Use this button to add a .jpeg or other image file of a logo to the design |
 |
Add a Subreport object |
 |
Add System Text. |
 |
Add a shape. Use this button if you want to add a line separator to a design using the Draw Line tool |
 |
Add a barcode element. You can add a child band first and then add the barcode element to the band |
Top Toolbar
The top toolbar provides access to a set of buttons for adjusting the height, width, and spacing of the design elements.

Custom Areas
You can add your own custom areas to Document Designer. This enables retailers to use area names that are more familiar or more appropriate for the retailer's environment or industry.
| Area | Description |
|---|---|
| GIFTCARDBALANCE | This area has attributes and fields for creating designs that show Gift Card Balance information |
| CREDITINFO | This area has attributes and fields for creating designs that show Store Credit Balance info. |
| GIFTRECEIPT | This area has attributes and fields for creating document designs for printing gift receipts. |
| BSCREDITINFO | This area has attributes and fields for creating designs that show EFT information for retailers who use B+S Card Service |
Export/Import Document Designs
There are two ways for a designer to edit or update the design files on another system:
- Launch Document Designer, log in to the desired server, and directly edit the designs
- Export designs from one system and then import the designs on another system
This section explains the export/import process. (See "Modify a Design on Another Server' for information about logging in to another server to edit designs.)
Export
- Launch Document Designer and log in.
- Click the "Export to file" button.

- Navigate to the location where you want to save the file. Enter a File name and click Save. Note: The Type is set to Report(*.fr3) and cannot be changed.
- Copy the file to a portable storage device or a network location that is accessible by the users who will import the design.
Import
- Launch Document Designer and log in.
- Click the "Import from file" button.

- Navigate to the location where you saved the file. Select the file and click Open.
- The file is added to the list of designs available to the current user.
New Document Design
- Launch DocumentDesigner.exe and log in.
- Select an Area. Click the New button.
- A blank design screen is displayed.
- Create Bands and add fields to the bands as needed.
- Save the design with a unique name.
Working with Scripts and Events
Assign a Script to a Band or Element
- With the design displayed, select the desired band or element within a band.
- Click the Events tab.
- Select the drop-down for the desired event (e.g. OnBeforePrint). Save the changes.

Sample Uses Cases for Default Scripts
Confirm a field has Data: Many of the default scripts will set a field's Visible property to True if the field has data (i.e., a length greater than zero) and False if the field has no data (length of zero). By setting this Visible property to False if the field has no data, this type of script will eliminate blank gaps in printing, both shortening the printout and improving the overall appearance because whitespace is removed.
Example
The following script that checks whether or not a Bill To Customer is entered. If there is no Bill To Customer information (Length == 0), the Visible property for the label is set to false:
Change Text based on Data
Some scripts will change the text that is displayed based on the value entered for a certain field. The following script will update the text that is displayed for the Item Type element.

Creating Scripts
When creating your own designs, you can add scripts written in any of the following languages: PascalScript, C++Script, BasicScript, or Jscript.
- On a design in progress, click the Code tab.
- Select a Language.
- If selecting a different language, you are warned that all code will be cleared. Click Yes to continue.
- Type the script in the text box and save the changes. For more information about working with scripts, consult the Fast Reports help files included with DocumentDesigner.exe.

Report Groups
Report groups enable retailers to create different document designs and then print the documents as a group. For example, some retailers need to keep a printed copy of the document at the store with the word "copy" on it (in order to prevent incorrect returns). Using a report group prints the documents one after the other.
Launch Document Designer and click the Groups button.

To create a new group, click the New button.

In the New Group modal, enter a Group Name and select the designs to include in the group by moving them from the Available column to the Selected column. Use the arrow keys to move designs back and forth.
Click OK. The group is saved and is now available in the "Group" drop-down.

Print Tax Information for Items taxed at Different Rates
In some tax locales, different items are taxed at different rates. This section explains how to configure receipt designs to include a break down of the tax amount by the tax % on the printed receipt. This helps retailers in countries like Germany meet fiscal requirements.
Add the DOCUMENT_TAX_BREAK dataset to the document design. You can create a new block that includes the dataset (or copy an existing block and set it to use the DOCUMENT_TAX_BREAK dataset).
The new dataset will allow you to add tax area, tax code, tax percent and sum of tax amt fields to the block. The new block will consider Tax1 and Tax 2 so if there are different tax areas, tax codes or tax percentages, two rows will be populated.
Go to Reports > Data.

Select DOCUMENT_TAX_BREAK.

Click OK.
After you add the dataset, the fields will be available to use.

Total Foreign Cost field on PO Designs
Users can modify an existing PO design in Prism Document Designer and add the Total Foreign Cost field. This enables retailers to view the total order cost in terms of the foreign currency.
When a PO has a single foreign currency, the general process is:
1. Insert Group Header & Group Footer bands around the PO Item details band
2. The Group Header will be defined by data field 'purchaseorder.SID'
3. In Group Footer will contain an expression similar to:
[FormatCurrency2(
*This expression will sum the FC Cost of items in the DetailData1 band and format it based on the foreign currency code.
Show Total Discount Amount on Printed Receipts
This section explains how to show the total discount amount that has been given across all items on a printed receipt. This is useful for seeing the total when multiple items on a receipt have received an item discount.
In Document Designer, navigate to the POS Transactions area and select a design to edit. The field to show the Total item Discount is in the document_item section and is called TOTAL_DISCOUNT_AMOUNT.
Sample 40-col Receipt design with Sold_Qty_Block expanded and TOTAL_DISCOUNT_AMOUNT field highlighted:

Widen the band called 'GroupFooter: Sold_Qty_Block.' , and then drag the TOTAL_DISCOUNT_AMOUNT in the band.
The Sold_Qty_Block band with the "DOCUMENT_ITEM.TOTAL_DISCOUNT" field added:
Next, double-click on the field, and change the text to read:
[FormatPrice(SUM(
Then click OK. (Note: You may want to put a text label in front of the field.)
Serial and Lot Number Fields on Tag Designs
Serial and lot number information can be included on merchandise tag designs. In Doc Designer, navigate to the Merchandise Tags area and select a Document to edit.
In the selected design, drag-and-drop the following fields into the design as needed:
- LOTEXPIRYDATE
- LOTNUMBER
- LOTTYPE
- SERIALNO
- SERIALTYPE
These fields are populated only when printing tags from documents (transactions), vouchers or slips.