1.14.0.9 What's New
This topic has information about installing the Retail Pro Integration Layer (RIL) components that enable you to operate Prism 1.14.0 in a standalone manner. RIL with Prism 1.14.0 provides everything you need to operate Prism - without the need for any other programs or tools.
IMPORTANT! RIL is for new Prism users only. If you are an existing Prism user (version 1.13.2 or earlier), do not install RIL.
STANDALONE INSTALLER COMPONENTS
To operate Prism in a standalone manner, install the RIL components in the order listed. After installing the RIL components, install the Prism stack. Refer to the What's New in this Release document for installation instructions.
- At Prism HQ: Install all RIL and Prism components.
- At each POA: Install all RIL and Prism components.
- At each Store: At each Store: Install all RIL and Prism components. Note: If at the store level you already have a database (i.e. MySQL database), then you do not need to install the RIL Oracle database.
| Component | Description |
 |
Backend database. Installs a blank Oracle 12c database. |
 |
Prism Management interface. Installing this component also applies the latest file updates. |
 |
RIL Communication handles communication between the RIL Oracle Database and other servers. Data is communicated as individual |
In addition, the Prism Admin Console Connection Manager has special profile types for replicating data to/from RIL Oracle database. Chances are good that Prism will provide almost all the functionality you need; however, for certain additional features and advanced management uses, you can turn to RIL.
For information about installing Prism, see the Prism 1.14.0 Getting Started Guide.
Install RIL Oracle Database
- Download the install files from the Retail Pro web site. Navigate to and launch the AutoRun.exe file.
- The Install Options screen is displayed.

- Click the RIL Oracle Database button.
- The EULA is displayed. Select "I accept the agreement" and click Next.
- On the next screen, leave Oracle Server selected. Click Next.
- On the next screen, select the disk drive where you want to install the program and confirm the system meets the memory requirements. By default, the program is installed to the C:\Oracle folder. Click Next.
- On the next screen, click Install.
- Click OK when the setup is finished.
- When the install is complete, restart your system.
- After the system reboots, proceed to install the RIL Management module.
Install RIL Management
- On the Install Options screen, click the RIL Management button.
- Another EULA is displayed. Click I accept the agreement and click Next.
- The default installation path is displayed. Confirm the path is correct. Click Next.
- You have the option of changing the default install directory and creating a Start Menu folder.
- Make sure you select the options to Install Layouts and Install DocDesigns and to Create a desktop shortcut. Click Next.

- On the next screen, click Install. When the install is finished, a message is displayed. Click OK.
- Click the Finish button on the wizard.
Install RIL Communication - On the Install Options screen, click the RIL Communication button.
- Click Next.
- By default, RIL Communication is installed to the C:\ECM folder. You can change the default install location, if desired, by clicking the Browse button.
- Click Next.
- When the install gets close to completion, you are prompted to create a desktop shortcut. Click Yes to create the shortcut. If you don't create the shortcut, you can launch the ECM.exe program from the C:\ECM folder.
- A message confirms the installation is complete. Click OK.
- After installing the RIL components, proceed to install the Prism 1.14.0 components:
- Apache
- Prism Server
- Prism Proxy
- Prism DRS
- Prism Document Designer (optional)
- Prism Tech Toolkit (optional)
Log Files
You can most file log files in C:\PrismMgmt\Logs.
Log files for the RIL Oracle Database installation are in C:\Program Files (x86)\Retail Pro\RIL\PrismDB
Additional log files related to installation and setup can be found in C:\Program Files (x86)\Oracle\Inventory\logs.
Prism Management
Prism Management provides access to certain features that are not available in Prism. Examples include reviewing/updating Physical Inventory, Clean House for deleting inventory, Auto Utilities (e.g. Auto Min/Max and Auto PO), and Commissions.
Launch/Exit Prism Management
When you install the RIL Management module, a desktop shortcut is created for the Prism Management program.
Double-click the shortcut. Windows 10 users should right-click and select "Run As Administrator".

Enter the default username (sysadmin) and the default password (sysadmin) in the Login dialog. Click OK.

The Home Screen displays when you first launch Prism Management or exit an area.
Note: If you want the Home Screen to display something other than the default screen (such as your company's homepage), change the URL of the screen in Workstation Preferences > General > Homepage URL.
Sample Prism Management Home Screen

Exit Prism Management
Click the Prism button in the upper-right corner to back out of the current area, if necessary and to exit.

Navigation
Select any of the buttons on the top menu to access one of the primary areas. Within each primary area are sub-areas that can be accessed by selecting the appropriate button. To display a submenu, click a button on the top menu. For example, the Merchandise button displays a submenu with buttons for Vendors, Departments, Inventory and other merchandise-related features.
Home Screen Menu Buttons
The following buttons are found on the top menu of the Home Screen and provide access to the major areas of the program. There are several modules contained in each area. These modules are grouped into areas by their function in the program. Note: Menu Designer allows you to move or reposition menu buttons.
| Button | Description |
|---|---|
 |
Click this button on any screen in RIL to return to the previous screen. |
 |
The Merchandise area provides access to the Vendors, Departments, Inventory, Clean House, Adjustments and Audit modules, each of which is used to organize and record merchandise. |
 |
The Purchasing area contains ASN Vouchers, Vouchers, Purchase Orders, Auto PO, and Best Replenishment modules that plan, record and track purchasing and receiving of merchandise. |
 |
The Sales area contains Receipts, Sales Orders, Check In/Out, Change Till/Drawer. |
 |
The Transfers area contains Slips, Transfer Orders, Transfer Verification, Auto TO and Best Replenishment modules that plan, record, and track transfers of merchandise between stores. |
 |
The Customer Mgmt area contains the Customers, Customer Segments, and Bins and Scoring modules. |
 |
The Employee Mgmt area contains the Groups, Employees, Commissions, Time Shifts, Change Password, and Sales Target modules where you define user and group records and assign security permissions, as well as define commission, time shift and sales target information. |
 |
The Tools area provides access to the Licensing, Doc Designer, Technician's Tool Kit and Translation Manager tools. |
 |
The Options area includes the Logon, System Preferences, Workstation Preferences, Subsidiary Wizard, and Language modules. |
 |
The X/Z Out area includes the X-Out, Register Open/Close, and Former Z-Out modules. |
Action Buttons
The following buttons are common action buttons on the Main (top) menu of many modules.
| Button | Description |
|---|---|
 |
Start a new record. A new record can be made in either List View or Form View, depending on your system's settings. |
 |
Save a newly created or edited record. |
 |
Edit the selected record. |
 |
Cancel a new record or edit in progress. |
 |
Inactivate a record. If no child records are associated with the record, you have the option of permanently deleting the record. |
 |
Copy the selected record. |
 |
Switch to List View. |
 |
Switch to Form View. |
 |
Print the selected record. |
 |
Refresh the display. |
Enter a program area
1 Select a program area from the home screen (e.g. "Sales" or "Transfers."
2. Select a sub area (e.g. "Receipts" or "Transfer Orders."
Keyboard Users
1. Press the appropriate keyboard shortcut to access the area from the Home Screen. Note: Press
Screen Views
There are two primary ways to view Retail Pro records:
- List View displays a list of several records at one time. These lists can be easily filtered, sorted, and searched to help you find or compare several records at once.
- Form View is a more detailed view that displays all fields of data contained in a single record.
Both views have fully customizable interfaces.
List View
List View displays a list of several records at one time in a format like a spreadsheet. Each row represents a different record; each column represents a data field available for that record type. The list can be easily sorted, searched, or filtered to help you find a specific record or to group related records.
To view the Inventory list, click the Merchandise button and select Inventory. List View can display records for any individual subsidiary or for all subsidiaries. You can select a different subsidiary from the Subsidiary field.
To return to the previous screen, click the Prism icon in the upper-right corner.
- Use the up and down arrow keys or the scroll bars to scroll through the rows in the List View display.
- Use
to move to the first record displayed on the screen and to move to the last. - Use
The selected record is highlighted and has an indicator ( } ) pointing to it. All members that belong to the same style as the selected item are displayed in blue text.
Selecting a Field
Click the necessary field to switch focus to it, or:
- Use the right arrow key or
to move to the column to the right of the selected column within the selected row. - Use the left arrow key or
- Press
to move the cursor to the first column in the selected row and to move it to the last column in the selected row.
Form View
Click Form View to display the record in Form View. Form View can be used to display data for an existing record or to create a new record. Form View allows you to view more item detail and information on a single screen than is possible in List View.
The Items field, where you list items on documents, is only available in Form View. For this reason, all documents are created and edited in Form View. Non-document records can be created in Form View or List View.
Use
Selecting a Field
Click or touch the field, or:
- Use the left and right arrow keys or
to move through the fields and field groups in Form View. - Use
will move through groups can be set with the interface menu. Use standard List View procedures for selecting an item or field within the item list on a document.
Switching to List View
Click the List View button to switch to List View.
Working with Records and Documents
In the Prism Management user interface, you can:
- Create new records.
- Find, copy and edit existing records.
- Place a document on hold while you perform other, more urgent tasks.
- Inactivate records that aren't being used anymore.
RIL Communication
Introduction
RIL Communication performs the critical role of communicating data (via XML files) between Oracle servers. In this way, the RIL Oracle database at the HQ can process out its data and that data can be processed in by RIL Communications at the POA. Once each POA has been loaded with data from the HQ, you can install individual Store servers and then initialize those store servers in the Prism Admin Console > Connection Manager.
RIL Communications is for sending data from an RIL Oracle database at the HQ to each Prism POA.
Basic Steps for configuring RIL Communications (New Install)
- Make sure all the needed subsidiaries are defined in the RIL Management module.
- Configure workstation preferences.
- For each subsidiary, add stations.
- Process out. This will create each station's folders and subfolders within the C:\ECM\Polling folder.
- (optional) Process in data files. If you have data files to import, drop the XML files into the C:\ECM\Polling\[Station]\IN\RECVD folder and process in.
Adding Subsidiaries
A default subsidiary (Sub 1) is created when you install RIL. You can add more subsidiaries, if needed, in RIL Management using the Subsidiary Wizard button on the Options Menu.
Configure Workstation Preferences
- Launch ECM by double-clicking the desktop shortcut. If using Windows 10, right-click and select the "Run-As-Administrator" option.
- Click the Options button.
- Click W/S Preferences.
- Enter a Station Name.
- For the Installation Type, select RIL (Oracle).
- For the Database, select RPROODS.
- For the Prism Mgmt Installation Path, navigate to the PrismMgmt folder. By default, it is installed to C:\PrismMgmt.
- Leave the Path to RmtManager field and the Communication Details fields at their defaults.
- When you finished, click OK.
Add Stations
A station is a database that exchanges information with another database. Create a station record for each station with which your installation will communicate.
- At the Prism HQ: Create a station record for each POA with which the Prism HQ Oracle Server will communicate.
- At each POA: Create a station record for the Prism HQ.
To add a new station, click the Stations button. Select a Subsidiary from the drop-down. Click New to start a new station record. Click Form View.
Enter the station's information in the fields. When finished, click Save.
If you have multiple subsidiaries, repeat the process for each subsidiary by first selecting the subsidiary in the drop-down on the Stations screen (only after selecting a subsidiary in the drop-down, can you add a new station).
Sample Station record:
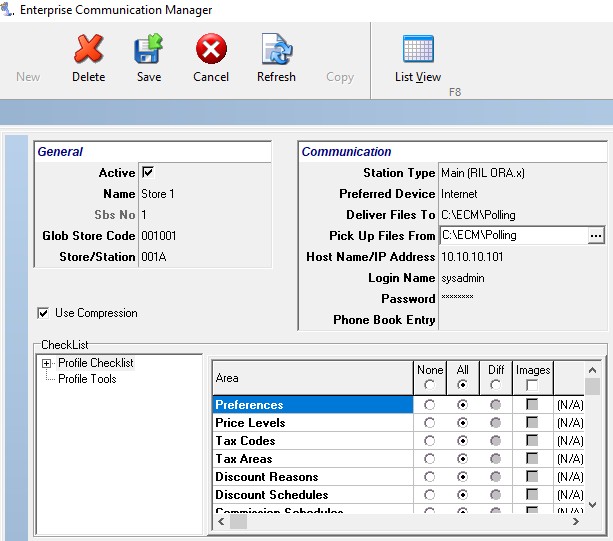
Station Type
You can create the following types of stations:
| Station Type | Description |
|---|---|
| Remote (RIL BTF.x) | Remote station that uses a BTF database. |
| Main (RIL BTF.x) | A hub station that uses a BTF database. |
| Main (RIL ORA.x) | The corporate hub station and central data repository. |
| Remote (RIL ORA.x) | A remote station that uses an Oracle database |
| Other | N/A |
Station Location Details Screen
| Field | Description |
|---|---|
| Store/Station | Enter the Retail Pro Store/Station combination to assign to this station. Note: The Store/Station field is required for all station types; however, you may also enter a Global Store Code if you create a Oracle-based Main or remote. |
| Global Store Code | (Optional) Enter a Global Store Code if you are entering an Oracle-based Main or Remote. |
| Station Name | Enter a unique name for the station that can be used to identify the station during communication. |
| Preferred | Select a communication method, then enter the location of that device. |
| Login name/Password | The Login name that you enter must be unique (no other station can have the same login name). RIL uses the Login name and Password to verify the station's identity upon startup. |
| Use compression ... | Select to send all data from RIL Oracle database in a compressed format, saving transmission time. |
Process Out
When you are finished creating stations, click Process Out. Even though you have nothing to export at this point, when you click Process Out, RIL will create folders and subfolders for each station that will then enable the station to import data files.
Exchange
When you click Exchange, the data in each station's \Out folder (data that has been processed out, but not sent) is transferred to the other station's \In\Recvd folder, where it will wait to be processed in.
Process In
If you want to import data into RIL, you place the necessary XML files in the C:\ECM\Polling\[Station]\IN\RECVD.
The program will create a separate folder for each station. Within each station's folder are subfolders for handling data files (XML format). If you have XML files that you want to use to import data into RIL, drop them into the station's IN\RECVD folder and do a process in. The Process In button will process in any properly formatted XML files it finds in the selected station's IN\RECVD folder.
RIL Communication Logs
To access RIL Communication's logs, click the View Log button. There are two types of logs available: Processing Log and Communications Log
| Log Button | Description |
|---|---|
 |
When you click the Processing Log button, you will see a list of logs, sorted by date/time. Select the desired log and click View Log. This log focuses on process in/process out of data for a station. |
 |
The Export Comm Log button enables you to define a filter for viewing communication logs. This log focuses on the connections between servers. |
RIL File List
The following table lists some of the key folders and files that are installed with RIL.
| Folder/File | Description |
|---|---|
| C:\ECM | RIL Communication module files. |
| C:\Oracle | RIL Oracle database files. |
| C:\PrismMgmt | RIL Management module files. |
| C:\PrismMgmt\PrismMgmt.exe | RIL Management module files. |
| C:\Program Files\Oracle\Inventory | Prism Management UI for working with Inventory and back office documents |
| C:\Program Files (x86)\Oracle\Inventory | XML files and logs for Inventory |
| C:\Program Files (x86)\Retail Pro\RIL | Prism DB and Prism Management files |
| C:\Program Files (x86)\RetailPro | Prism Proxy, Tech Toolkit and other ancillary Prism files. |
| C:\ProgramData\RetailPro | Prism Server files. |
C:\Oracle Folder
When you install the RIL Oracle Database module, an Oracle 12c database is installed. Most of the files are installed to the C:\Oracle folder. Some Oracle files are also installed to C:\Program Files\Oracle and/or C:\Program Files (x86)\Oracle.

C:\PrismMgmt Folder
When you install the RIL Management module, the main set of program files is installed to the C:\PrismMgmt folder.

C:\ECM Folder
When you install the RIL Communication module, the communication program files are installed to the C:\ECM folder. As you create stations, a separate folder and set of subfolders will be created for each station.

Services
The full installation of RIL with Prism 1.14.0 installs the following services
| NAme | Description |
|---|---|
| Apache | The Apache web service facilitates communication between Prism and the Apache web server. Every application that sends data across the Internet requires a web server to make the HTTP/S calls. To use Prism, the Apache service must be running. You can verify whether the service is running by launching Apache Monitor from the taskbar. |
| OracleJobSchedulerRproODS | Oracle service that enables the scheduling of jobs (tasks) against the RIL Oracle database. |
| OracleODS12cr1TNSListener | Transparent Network Substrate (TNS) is the network protocol used by Oracle for connectivity to Oracle Databases. The Oracle Database Listener service provides basic network connectivity to the RIL Oracle database. |
| OracleServiceRproODS | RIL Oracle database service. |
| OracleVSSWriterRproODS | The VSS writer service writes data to disk and ensures that data is in the proper state for backups. |
| RabbitMQ | Data is replicated between RIL and Prism using RabbitMQ. The necessary RabbitMQ and Erlang files are installed when you install the Prism Server. |
| Retail Pro Prism Back Office Service | PrismBackOffice.exe facilitates operations related to inventory, adjustments, physical inventory and other back-office tasks. |
| Retail Pro Prism DRS Service | Facilitates data replication between RIL and Prism. |
| Retail Pro Prism License Service | Although licensing is not yet implemented in Prism, the PrismLicSvr service must be running for Prism to run. You will receive an error message when trying to launch Prism if this service is not running. |
| Retail Pro Prism POS V1 License Service | This service facilitates the creation of transactions and other POS activities in Prism. |
| Retail Pro Prism Replication Service | Facilitates data replication between Prism servers (Prism-to-Prism). |
| Retail Pro Prism Resiliency Service | When using EFT or Centrals, the Prism Resiliency Service facilitates offline processing and the sending of those offline transactions to the processor when the connection is restored. |
| Retail Pro Prism Scheduling Service | Enables the scheduling and running of the tasks defined in Tech Toolkit. At the scheduled time, the service makes the necessary API calls to run the task(s). |
| Retail Pro License Server | RIL License Server. |
Starting/Stopping/Configuring Services
You can start, stop and change configuration setting for services in the Service Manager area of the Prism Tech Toolkit.
Data Replication
There are two types of data replication between Prism and an RIL Oracle database:
Initialization: Loads data into Prism from a source RIL Oracle database. Initialization is meant to be a one-time process, done at the time of install. Depending on the size of the data set, initialization can be time-intensive; be sure to allocate enough time. It is important to initialize servers in the proper order, starting with the Prism HQ server at the top of the hierarchy and then POAs, and then store servers. This makes configuration and data tracking easier.
Day-to-Day: Day-to-Day (D2D) Replication refers to the sending of data on a regular basis between two Prism servers, or between an RIL Oracle database and a Prism server. Unlike initialization, which is typically a one-time operation that replicates all available data, Day-to-Day replication occurs on a regular basis and sends only a subset of records. D2D replication is carried out by creating a profile that includes the desired resources and then linking that profile to the desired connection. When creating profiles for D2D, you can send only those specific data types needed by the receiving location. This reduces overhead and replication times. Resources that are unlikely to change, like Departments or Vendors, can be excluded. You can use the Advanced Filters feature to apply fine-grained control over the specific records that are replicated.
Initialize Prism HQ from RIL Oracle Database
- Launch Prism and log in.
- Click the Retail Pro button and select Administration Console.
- Select Connection Manager from the side menu. The Connection Manager area has a set of dashboards for working with connections, creating profiles, and initializing servers.
- Click RIL Dashboard.
- Click the Add/Edit Local RIL Server button.
- Enter the name of the RIL server. Click Save.
- Next, select the server you just defined from the drop-down. Click Connect. Wait a moment for the connection to be established. This may take a few seconds. When the connection is established, you will see the Connection screen with the connection listed.
- Click the check mark in the left-most column. A pair of panes is displayed below. You don't have any profiles defined yet, so the panes are empty. The left pane will show profiles for the RIL side of the connection (sending data from RIL to Prism). The right pane will show profiles for the Prism side of the connection (sending data from Prism to RIL).
Create RIL to Prism Profile for Initialization
To initialize the Prism server with data from RIL, you need to create an RIL to Prism profile. You can click the Plus sign icon on the RIL Dashboard Connections tab, or click the Profile tab and click the Add button.
Select RIL to Prism as the Type.
Enter a descriptive Name for the profile.
Select the individual resources to include. To send all resources, click the All link.
Select Specific Subs and select the individual subsidiaries to include. In the screenshot below, only Subsidiary 1 is selected. This means that only data for Subsidiary 1 will be sent.
When finished, click Save. The profile is now listed. The profile can be used for initialization at this point.

Link a Profile to a Connection
If you want to use a profile for Day-to-Day replication, you must link the profile to the desired connection.
Click the check mark next to the connection. You will see a grid showing additional information. To use a profile for Day-to-Day replication, the Linked checkbox must be selected. If the Linked checkbox is not selected, data will not be sent.
