What's New in 1.14.5.502
This topic has information about new features and functionality added in Prism 1.14.5.502
- Transfer Verification
- Reverse Slips
- PI Zones
- PMQPROTECTASN setting in PrismMQService.ini
- Customer UDF Field Entry
- Add Customer to Updated Receipt
- Default Status Filter for Pending Transactions
- Enhanced Date Picker for Document Lookup
- Season on Transaction Details
- Store Credit Balance on Receipt Document Designs"Price Level Price" Discount Type for Promotions
- Bogo Promotion Changes
- Override Customer Price LevelTax Code, Tax Area, Tax Rule Management
- Advanced Item Lookup Changes
- Using Loopback for Wireless Connections
- Manage Currencies Permissions
- Reset Button in Preferences
- ZIP Code Lookup
- Print Zero Quantity ItemsResources for Country and Language
- Biometrics Schema and ReplicationCombine Sale and Tax for VAT
- CreatedDateTime and InvoicePostedDate on Gift Receipts Tech Toolkit Scheduler: Added Auto Refresh, Schedule Multiple Tasks
Transfer Verification
Transfer Verification is the process of confirming that the out slip (moving items out of the source store) matches the receiving document (moving items into the target store) created when the merchandise is received. Verifying transfers provides the following benefits:
- Ensures that sent merchandise was received at the target stores
- Maintains correct inventory valuations for auditing purposes
Basic steps for verifying transfers:
- In Node Preferences > Transfers > General, define general preferences for transfers.
- In Node Preferences > Transfers > Resolution Rules define rules for handling differences on transfer documents. You can define a single global rule, or separate rules for individual stores.
- Move merchandise out of a source store by creating an out slip. By default, an ASN is generated from the out slip.
- Move merchandise into the target store by generating a voucher from the ASN.
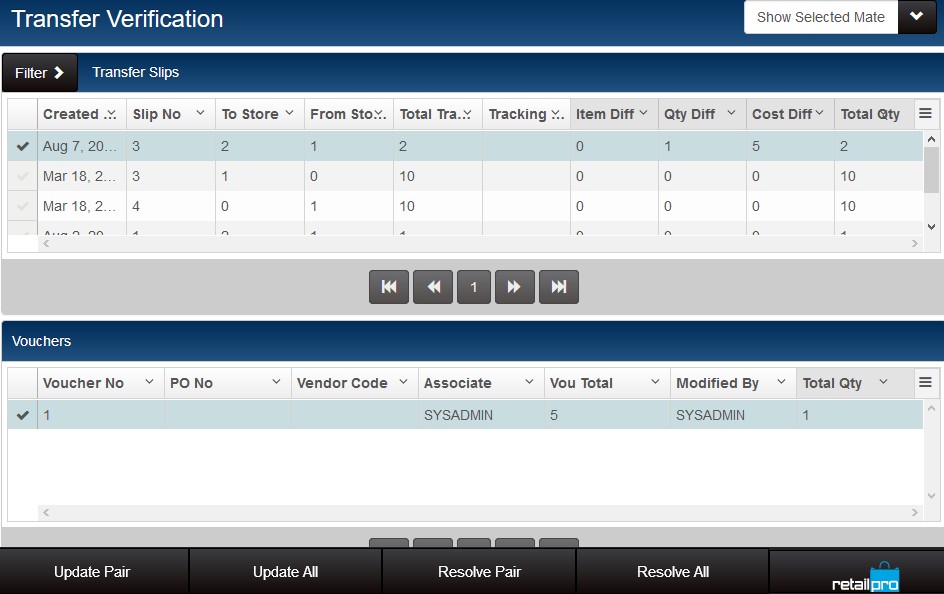
- In Store Operations > Transfers > Transfer Verification find the mate (in slip or voucher) for each out slip and determine what, if any discrepancies exist. Resolve discrepancies between the documents and update.
Sample Transfer Verification screen:
Reverse Slips
DevTrack ID# 16500
Reversing an out slip enables retailers to undo the effects of an out slip and return the item quantities to inventory. When reversing a document, a new document is created that has the reverse effect of the original document. The original document is marked "Reversed" and the new document is marked "Reversal".
Use Transfer Slip Lookup to find and display the slip you want to reverse. Click the check mark for the slip and then click View. The slip is displayed. Click the Options button and select Reverse Transfer Slip.
Sample Transfer Slip Options Menu showing Reverse Transfer Slip option

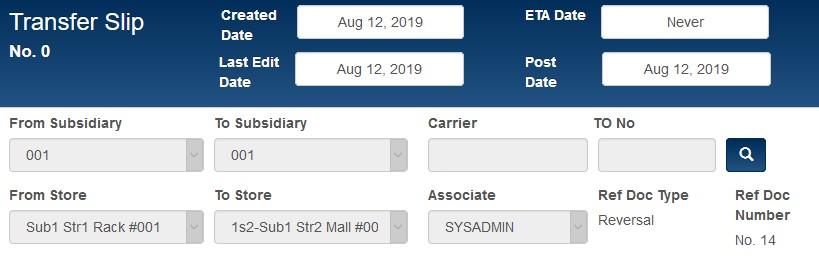
A warning is displayed. Click OK. Both the reversed and the reversal documents can be viewed in Transfer Slip Lookup.

Sample transfer slip showing Ref Doc Type set to Reversal
Physical Inventory by Zones
DevTrack ID #17195
By dividing your store into zones (subsets) and then counting merchandise on a zone-by-zone basis, the physical inventory process becomes more manageable and flexible. You can readily see which zones have been counted and even view the individual item counts and differences for a zone. As you finish counting each zone, you merge the zone counts into the total counts for the store. The on-hand values in inventory can be updated with a single zone count, multiple zone counts, or the entire store.
Any zone counts information that was not merged is not included when inventory quantities are updated. The information does remain part of the store's PI file, though, and is available if the PI update is reversed.
To use zones, you must enable the feature in Node Preferences > Merchandise > PI Tool > Options. After you enable Zone PIs in preferences, the UI elements needed for working with zones are made visible in the Physical Inventory UI.
1. Navigate to the Admin Console > Preferences & Settings > Merchandise > PI Sheet area.
2. Select Zone from the Physical Inventory Type dropdown. Save the changes.
PMQPROTECTASN setting in PrismMQService.ini
In certain scenarios, it was found that items added to an ASN could become "lost" during replication. Now, extra protections are applied to ensure that any edits made (e.g. adding items) are maintained correctly when the document is replicated. These changes work for both RIL-to-Prism and Prism-to-Prism replication (both are needed if RIL sends the document to POA and then the POA sends it to the store).
A new PrismMQService.ini setting "PMQPROTECTASN=True" has been added to address ASN items disappearing while a newer version of the same document is replicated.
By default this setting is NOT exposed in the PrismMQService UI. If you experience losing ASN items, add the PMQPPROTECTASN setting (set to True) to the PrismMQService.ini file. If you change the value of the setting, you MUST restart PrismMQService. If you haven't lost ASN items, do not add the PMQPPROTECTASN setting.
Note: If you add the PMQPPROTECTASN setting, you will lose ability to REMOVE items from an ASN and replicate the change. If the PMQPROTECTASN setting is set, the receiving side will retain the removed item. For the removed item to be removed at other Prism servers, you must first convert the ASN to a voucher.
Default Status Filter for Pending Transactions
DevTrack ID# 12994
When using Pending Transactions, users can filter the list of results by transaction type: All, Held, Pending or Discard. Now, users can also set a default that will be selected by default when a user goes into Pending Transaction Lookup. This helps speed up the process of finding pending transactions. The preference is found in NODE PREFERENCES > DOCUMENTS > GENERAL > PENDING TRANSACTION LOOKUP DEFAULT FILTER.
| Options | Description |
|---|---|
| All | All pending transactions, held transactions and discarded transactions. |
| Held | Transactions placed on hold, either by clicking the Hold button on the bottom toolbar or choosing Hold when discarding a transaction. |
| Pending | Transactions that were started but not completed. For example, when a user starts a transaction and then suddenly closes the browser, the transaction is saved to Pending Transactions. |
| Discard | Transactions that were discarded. For example, when a user clicks the Cancel button on a transaction. A prompt with three options (Hold, Discard, Cancel) is displayed. If the user clicks the Discard button, the transaction is saved (for a limited time) to the discard list |
Improved Date Picker for Document Lookup
DevTrack ID#17274
When looking up documents, users must enter a date range. By default, the date range is set from the first day of the current month to the current date. This release includes a new date picker user interface element. This provides a more consistent and better experience for the user. It also takes advantage of the built-in accessibility and internationalization (i18n) features built-into the latest versions of AngularJS.
In Transaction Lookup, you see From Date and To Date fields. If you click the calendar, the date picker is displayed. Notice that this version of the date picker has a Time button on the interface.
Season on Transaction Details
DevTrack ID #17146
Users can now see the currently active Season by going into Transaction Details. This enables Associates to confirm when seasons change and which season is currently in effect (e.g. to know if certain promotions will be in effect).
New Fields on Transaction Lookup Results
DevTrack ID #17292
When using Transaction Lookup, additional fields are available. These fields are especially useful for the GST system used in India.
| Field | Description |
|---|---|
| Store Code | Store Code of the store where the transaction was made. |
| Total Tax Amt | Total tax amount on the transaction. |
| Comments | Receipt comments |
| Mode of Payment | Payment Type. Indicates the tender used on the transaction (e.g. cash, credit, or debit). |
Store Credit Balance on Receipt DocDesign
DevTrack ID #14117
The Store Credit Balance field can be added to printed document designs. This enables the balance to be printed on the customer's physical receipt.
TENDER.STORE_CREDIT_BALANCE
This field is populated for non-central store credit tenders.
Open the desired receipt design. Click the Data tab.
Expand the TENDER node.
Scroll to the Store Credit Balance field and drag/drop it to the desired area of the design.
Price Level Reward Type on Promotions
DevTrack ID#16434
A new PL Price (Price Level Price) option is available when selecting a Reward Type for Item, Qty and BOGO promotions. Previously, only Percentage, Amount, or specific price were available.
When PL Price is selected as the Discount Type, the selected price level will determine the value of the price discount the customer receives. This allows a Promotion reward (discount $) to be the difference between the active store Price Level and the Promotion Price Level prices.
The list displays all active PL's for the SBS designated on the promotion. Note: Promotions are subsidiary specific. If you change the target subsidiary for a promotion, the list of price levels will change and you will have to make a new selection.
Sample Reward Rules showing PL Price selected as the Discount Type:

Promotion, Customer Discount on Same Item, Transaction
DevTrack ID #17207
This release includes a new setting for Promotions that enables retailers to control whether a promotion can override a customer price level. On the Promotion Activation Details screen, is a Override Customer Price Level check box.
- When this check box is selected, and a promotion is applied to items, any existing customer Price Level discount is removed and the promotion is applied to the active price level.
- If the check box is not selected, and a promotion is applied to items, if a customer with an assigned price level is added to a transaction that customer price level takes priority and overrides other changes to price, including promotions.
- If an item has a customer price level removed by a promotion and then the promotion becomes invalid (by some change to document), the customer price level is reinstated.
This change gives retailers greater control over how a discount will be applied when both a promotion and customer price level are in effect. Previously, the Cashier had to list all the promotional-discount eligible items on a receipt first and then add the customer. But this method required the cashier to know the promotion items beforehand.
Sample Promotion Activation Details with Override Customer Price Level setting:

Tax Code, Tax Area, Tax Rule Management
DevTrack ID #15068
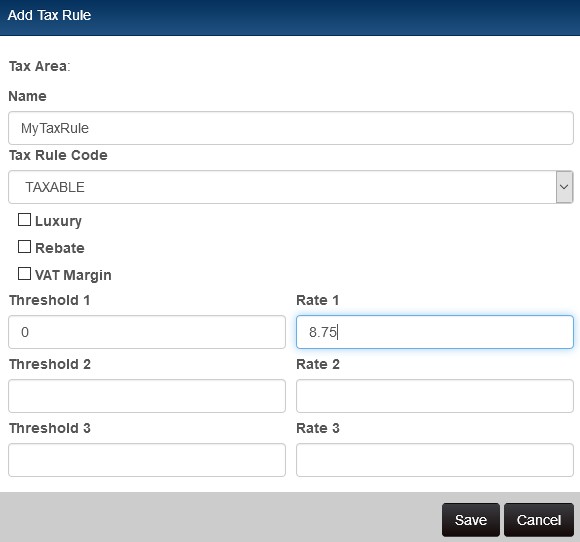
Retailers can add and edit Tax Codes, Tax Areas and Tax Rules in Prism. This enables retailers to manage taxes and make changes in Prism when tax rates and tax rules change.
The addition of these fields enable users to fully manage taxes in Prism. Briefly, Prism uses Tax Methods, Tax Codes, Tax Areas and Tax Rules to determine the tax amount for an individual item at POS.
A tax code is assigned to every item in inventory. The tax code defines categories of merchandise, such as clothing, food, and jewelry, which may be taxed differently within any given tax jurisdiction. Typically, you will need a tax area for each tax jurisdiction in which you make sales. In each Tax Area, you add rules that specify the tax rate to be applied to items that are assigned a that tax code.
Using the specified tax method, tax codes, tax areas, and other options, the program automatically calculates the correct amount of tax on documents. If tax areas have been assigned to customers, then the computed tax amount for the correct area will automatically be suggested when a Bill To customer is added to a document. The suggested tax can be overridden for special situations.
The basic configuration steps are the same for all tax methods:
1. Select a tax method (sales tax or VAT).
2. Define tax codes.
3. Define tax areas.
4. Select the number of decimal places to use when displaying taxes.
5. Assign tax codes to Inventory items.
Advanced Item Lookup Changes
DevTrack ID #17791
Enhancements have been made to the search results dialog that is displayed as part of Advanced Item Lookup feature.
- Doc_qty/Doc_cost/Doc_price(based on type of document) are added to the lookup result grid and are pinned to the right-end of grid. You can enter a value in the 'Doc_qty' cell of any item and it will add that item to the document.
- You can double-click any item in the lookup result grid to add that item to the document and close the lookup modal.
- Selecting an item in the lookup result grid will enable the "Item Details" button (bottom-left button). Only one item can be selected at a time.
- If any item returned by the search has already been added to the document, the Doc_qty/Doc_cost/Doc_price columns are populated.
- You can increase/decrease the Doc Qty by editing the Doc_qty column of any item; however, changing the Doc_qty to zero does not remove the item from the document.
Advanced Item Search Results: Select item and Item Details button is enabled

Use the horizontal scrollbar on the search results to view Cost, Price and Store Quantity:
Using Loopback for Wireless Connections
DevTrack ID#12797
You can use Prism for home-delivery scenarios in which a customer orders merchandise over the phone or internet and the goods are delivered to a customer, with the customer taking payment upon delivery.
In this type of scenario, the associate will download a pending sales order into a tablet or laptop with the Prism stack installed. The associate will then travel with the device to the customer's house. The associate then fetches the sales order, converts it to a sale, taking payment through EFT.
The challenge in this type of scenario is that at the point the order is fulfilled and payment taken, the Associate is not connected to the network. Therefore, to use Prism for this type of scenario, the following configuration is required:
- Add a Microsoft Loopback Adapter and configure it with a private IPv4 address
- Add an entry to the Hosts file that points the device fully qualified domain name (FQDN) to that loopback address.
Note: It is best to install the loopback adapter before installing Prism.
Manage Currencies Permissions
DevTrack ID#17220
Permissions enable you to control employee ability to add/edit currencies and currency exchange rates. These permissions are found in the Admin Console group of permissions.
| Permission | Description |
|---|---|
| Manage Currencies | Allows group members to add or edit currencies. |
| Manage Exchange Rates | Allow group members to add or edit exchange rates. |
Customer Default UDF Field Entry
DevTrack ID #15807
Users can now set a default Customer UDF entry for each UDF field. Previously, there was no way to set a default entry for each UDF field. If the Default checkbox is selected for a UDF field entry, that entry will be entered by default in that Customer UDF field when a user creates a new customer record.
Click the Edit button for the desired UDF field. Select the Default checkbox and then click the check mark to save.
Customer UDF fields showing Default selection checkbox:

Print Zero Quantity Items
DevTrack ID #17514
A preference has been added in Admin Console > Node Preferences > Transactions > General, called Print Zero Qty items (checked by default).
- If selected, the printed receipt will include any items that have a quantity of zero (e.g. voided items).
- If not selected, the printed receipt will not include items that have a quantity of zero.
Replication Resources for Country and Language
DevTrack ID #16776
Users can replicate Countries and Languages via dedicated resources. These resources can be included in all Profile types (Prism-to-Prism, RIL-to-Prism, and Prism-to-RIL).
Sample Prism-to-RIL profile showing country resource:

Biometrics Schema and Replication
DevTrack ID #18710
This release has updates to the BIOMETRICS database schema and there are new guidelines for replicating biometric data.Two database columns play a key role in biometric login: user_name and empl_name:
- The EMPLOYEE table includes user_name and empl_name columns. The BIOMETRICS table includes empl_name column.
- The user_name column is unique across all subsidiaries. When a user does a regular log in using user name and password, the server looks in the EMPLOYEE table and tries to find a matching record. The employee resource is a core resource and cannot be filtered or excluded from replication. As a result, you can use the user_name and password sh a corresponding empl_name and orig_sbs_sid in the EMPLOYEE table. If a match is found, the server uses the user_name and its password from the EMPLOYEE table for the login.
The biometrics resource is not a core resource; therefore, you can apply a filter or simply not replicate the resource. This creates the possibility that a user may be able to log in using the username and password but the log in using the fingerprint fails. If you want to filter your data by subsidiary but still want all fingerprints to be replicated you must create a separate profile that only includes the biometrics resource and do not apply any filter to it.
The rule is: empl_name + orig_sbs_sid from EMPLOYEE table MUST match empl_name + sbs_sid from BIOMETRICS table. Therefore when you create a biometrics record, you should pass empl_name and sbs_sid equal to empl_name and orig_sbs_sid (important! Not employee sbs_sid but employee orig_sbs_sid) of the employee who you are creating the fingerprint for. When you create a biometric record, you must pass the employee's subsidiary number. In that way, when the employee logs in, the subsidiary numbers will match.
Reset Button in Admin Console
DevTrack ID #17435
When defining certain settings, you will notice a button that, when clicked, will reset the setting to whatever it was before the current change was made. This makes it easy to undo a change and then continue working in preferences. The following table has information about where the button is available.
| Area | Fields/Areas where Reset button is available |
|---|---|
| Inventory | UDF fields in Inventory (non required field) |
| Employee | Job Title Till, Drawer, Addresses, Phone Numbers, emails, Use Qty Decimals for department (non required field). |
| Department | Allocation Pattern, Use Qty Decimals for department (non required field). |
| Vendor | UDF fields, Payment Terms, Addresses and contacts in Vendors (non required field). |
| Customer | Customer Addresses, Phones, Emails fields in Inventory (non required field). |
Sample employee record showing entry of a new Job Title with the Reset button:

X/Z-Out - Combine Sale and Tax for VAT
DevTrack ID#18019
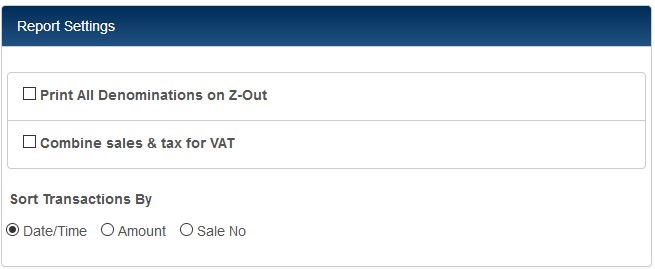
A new preference has been added that enables retailers to control how sales and tax amounts are displayed on X/Z-Out reports. The preference is called "Combine sales & tax for VAT." The preference is in Admin Console Node Preferences > Reporting > X/Z-Out.
- If selected, then in a VAT environment the default XZ designs (X Out 40 Col, X Out 8x11, Z Out Close 40 Col and Z Out Close 8x11) display combined sales and tax amounts (in the tax breakout section).
- If not selected, the X/Z-Out reports display sales without tax.
The preference enables retailers in VAT environments to get a clear view of actual sales.
Sample X/Z-Out Report preferences showing "Combine sales & tax for VAT:
"Create Date_Time" and "Invoice Posted Date" fields on Gift Receipt Designs
DevTrack ID#17563
You can add the Created Date and/or Invoice Posted Date fields to the document designs used when printing Gift Receipts.
1. Launch DocDesigner.exe.
2. Select a Gift Receipt design from the dropdown.
3. Click the Data tab.
4. Drag and drop the CREATEDDATETIME and INVOICEPOSTEDDATE fields on to the Gift Receipt design as needed.
5. Save the changes.

Scheduler: Auto Refresh, Schedule Multiple Tasks
DevTrack ID #17780
The Prism Task Scheduler in Tech Toolkit has some new user interface elements that make it easier to manage tasks. The following table briefly describes the new elements.
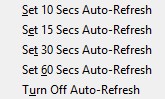
Auto Refresh
By enabling the Auto-Refresh option, a user can view task status in real-time. The task's TaskRun record will be refreshed with execution progress at the interval selected by the user: Every 10, 15, 30 or 60 seconds
The task will display the current status and a processing update message in the Task Run grid. This helps avoid situations where a user is looking at stale information on the Task Run grid.
To enable auto-refresh, click the drop-down arrow on the Auto-Refresh UI element, located at the bottom of the screen. You can select to refresh All tasks or One task.
- All = Refresh all tasks and task run data.
- One = Single task manual refresh or set task to auto-refresh.
The UI will show the current Auto-Refresh setting, on or off.

From the displayed pop-up menu, select the desired interval: 10, 15, 30 or 60 seconds.
Status Field
The Status field displays the current status of the scheduled task.
Holds the tasks current task status. Possible values are:
0 - Running
1 - Idle
2 - Error
3 - Scheduled (meaning not yet run).
When a new task is added, it will show as Scheduled until such time as it runs. When the task completes, it will show as "Completed" if it is a OnceOnly task, otherwise it will show as "Idle." The ScheduleTaskRun record holds more status detail on the last execution of the task.
Duplicate Multiple Tasks
The Duplicate Multiple Tasks setting enables you to control what happens when multiple task records attempt to run the same action url simultaneously (at the same or overlapping times).
Possible values are:
0 - BlockWaitRun
1 - BlockDeactivate
2 - BlockDelete
3 - Allow
Scheduled task form showing Duplicate Multiple Tasks setting

Protection of PMQPROTECTASN setting in PrismMQ
DevTrack ID#18211
Extra protections are now applied to ensure that any edits made to ASNs (e.g. adding items) are maintained correctly when the document is replicated. These changes work for both RIL-to-Prism and Prism-to-Prism replication (both are needed if RIL sends the document to POA and then the POA sends it to the store). These changes help preserve the current state of the ASN.
In certain situations, even strong protection may be required, so separate from the changes mentioned above, a new setting is available for the PrismMQService.ini file (see below).
PMQPROTECTASN setting in PrismMQService.ini
A new setting "PMQPROTECTASN=True" can be added to the PrismMQService.ini file to prevent ASN items from disappearing while a newer version of the same document is replicated.
[PRISM]
PMQPROTECTASN=True
By default this setting is NOT turned on. In fact, it is NOT exposed in the PrismMQ/config UI. if you experience specific problem of losing ASN items, you will have to add the PMQPPROTECTASN setting to the PrismMQService.ini file. If you change the value of that setting you MUST restart PrismMQ. If you are not experienced losing ASN items, leave the PrismMQService file with its default setting.
A side effect of turning on this protection is you will lose ability to REMOVE items from an ASN and have that change be replicated. If the PMQPROTECTASN setting is set, the receiving side will retain the removed item. For the removed item to show up as removed at other Prism servers, you must first convert the ASN to a voucher will that removed item be gone at other Prism servers.