Chapter 12. X/Z-Out
Prism 1.14.7 User's Guide Chapter 12. X/Z-Out PDF
Prism 2.3 User's Guide Chapter 12. X/Z-Out PDF
Retailers benefit greatly by creating a procedure to account for the store's cash. These internal controls are necessary to prevent mishandling of money and to safeguard assets against loss. Not only do strong internal controls promote operational efficiency, they also ensure reliable accounting records. The X/Z-Out area provides all the tools to securely count money, reconcile receipts, and balance the cash drawer.
X-Out Reports - Run Anytime to Check Sales
Store management or cashiers can run a sales report (known as an X-Out report) at any time during a shift. These reports provide a snapshot of sales activity and enable a retailer to know exactly how much money should be in the cash register at any given time. This is extremely useful for things such as avoiding holding too much cash on the sales floor and discovering frequent overages/shortages for particular cashiers.
Z-Out Reports - Balance a Cash Drawer at End of Day
Balancing a cash register usually takes place at the end of the day or at the end of a cashier's shift. The cash drawer and its contents should be taken to an office or other secluded area to prepare the report.
Any overages and or shortages will be listed so they can be investigated. Human nature should be taken into account for minor errors and small amounts. However, frequent discrepancies could be sign of employee theft or may indicate further training is required for a particular cashier.
The starting cash on-hand is put back into the cash drawer and stored for the evening, while the deposit is prepared for the bank. All credit card slips, terminal reports and other register receipts can be stapled to printed Z-Out report and filed by date.
Assigning Cash Drawer to Employee
At the beginning of the next shift, each cashier should be assigned their own cash drawer. When opening the drawer, the cashier will recount the cash to verify the beginning balance. You can assign a cash drawer to each employee in the employee record.
X-Out Reports - Run Anytime to Check Sales
Store management or cashiers can run an X-Out report at any time to get a snapshot of sales activity and see exactly how much money should be in the cash register.
Z-Out Reports - Balance a Cash Drawer at End of Day or Shift
A wizard leads you through the process of opening/closing a register. When the process is complete, RP Prism generates a Z-Out report. Any overages or shortages will be listed so they can be investigated (frequent discrepancies could be sign of employee theft or may indicate further training is required for a cashier).
Z-Out Lookup
Z-Out reports are saved into the RP Prism database. Users can access previously run Z-Out reports by selecting the Z-Out Lookup button. (See the "Z-Out Lookup" section of this document).
Basic Steps for X/Z-Out Reports
1. Start a new report and verify the Subsidiary, Store, Workstation and Cashier are correct.
2. Enter/Confirm the Open Amount. (the previous day's leave amount is suggested as the Open Amount but can be edited if needed).
3. Count the total amount in the drawer.
4. Verify checks, credit cards, gift certificates and other so-called non-currency media.
5. Reconcile the amounts (compares the amount that was personally counted with the total amount calculated from the register receipts)
6. Check for discrepancies and recount, if necessary.
7. Finish the report and print, if necessary.
X/Z-Out Permissions
| Permission | Description |
|---|---|
| X/Z-Out - Access Former Audit | Allow group members to access audit reports in the Former Z-Out area. |
| X/Z-Out - Access Former Z-Out | Allow group members to access Z-Out open and close register reports in the Former Z-Out area. |
| X/Z-Out - Audit Register | Allow group members to audit a register. |
| X/Z-Out - Change Store | Allow group members to change the subsidiary to a different store than the workstation's current Default Store (as defined in the Workstation record). |
| X/Z-Out - Change Subsidiary | Allow group members to change the subsidiary to a different subsidiary than the workstation's current Default Subsidiary (as defined in the Workstation record). |
| X/Z-Out - Close Register | Allow group members to close a register. Note: Override not available for this permission |
| X/Z-Out - Edit X-Out Filter | Allow group members to edit the filter settings (e.g. Date Range, Cashier, or Workstation) used for X-Out reports. |
| X/Z-Out - Edit Z-Out Date | Allow group members to edit Date Range for Z-Out reports. |
| X/Z-Out - Edit Z-Out Filter | Allow group members to edit the filter settings, not including Date Range, (e.g. Cashier, Workstation) used for Z-Out reports. |
| X/Z-Out - Finalize Z-Out | Allow group members to finalize Z-Out reports. Finalizing a Z-Out report is a new step added in Prism 2.1. This enables one level of user (e.g., cashier) to close a register and a different level of user (e.g., manager) to finalize the report. |
| X/Z-Out - Force Close Register | Allow group members to use the Force Close Register feature to close a register that was accidentally left in an "open" state. Note: Override not available for this permission |
| X/Z-Out - Modify Workstation | Allow group members to change the workstation for the report. |
| X/Z-Out - Open Register | Allow group members to open a register. Note: Override not available for this permission |
| X/Z-Out - Run X-Out Report | Allow group members to run X-Out reports. |
Configuring X/Z-Out Preferences
You can define various options for X/Z-Out reports in Prism preferences, including require entry of open and close amounts and require a count of individual currency denominations. If using structured reports, additional options are available like require a blind close and maximum allowable variance amount and number of recount attempts
Structured vs. Unstructured Reports
When configuring preferences, a key consideration is whether to use unstructured Z-Out reports (default) or structured Z-Outs. The decision to use structured or unstructured reports depends on the needs of the retailer and the business. Many retailers find that the use of structured Z-Out reports, including features like currency counts and blind close, helps track of the money going in/out and preventing fraud and abuse. Other retailers prefer to use unstructured reports and only enter total amounts at the end of the day.
Unstructured reports provide more flexibility but less security than structured reports. No separate drawer opening is required at the start of day or shift and report details such as the starting date/time of the report can be edited. In addition, the open and close process is performed at the same time. No recounts are allowed if the user-entered counts don't match the system's values
When using structured reports: a drawer must be open to perform sales and no overlapping of open drawer records is permitted. Filter options are based on the register definition in preferences. Additional options are available like require a blind close and option to do a Z-Out Audit instead of Z-Out Close.
"Allow Add (tender)" setting in Tender Requirements
The "Allow Add" option in tender requirements preferences enables retailers to limit which tenders can be added in the Non-Currency Count screen of a Z-Out Close. By default, the Allow Add option is enabled for all tenders. Disable the option for specific tenders as needed. Previously, users had access to all active tenders in the Non-Currency Count screen; however, many retailers prefer to limit the list and this new option allows that.
- The Allow Add option is paired with the Auto Match option. The two settings work together to limit users' ability to add non-currency tenders on Z-Out reports:
- When Auto Match is enabled for a tender, the Add button is disabled in the X/Z-Out report interface. This forces the Auto Match behavior and prevents the user from adding additional instances of that tender.
When Auto Match is disabled and Allow Add is enabled, the Add button is enabled in the Non-Currency Count screen. The one exception is deposits. The Allow Add option cannot be enabled for Deposits. Deposits are always set to Auto Match.
X-Out Reports
An X-Out report provides a snapshot of sales activity for a specific time range. You can filter the report by various elements, including date range, subsidiary, store, workstation and cashier. Remember, X-Out reports are temporary records and are NOT saved to the database.
1. Select Point of Sale > X-Out from the home screen.
2. Select filter criteria. The default date range is from midnight of the current day to the current date/time. Touch or click the Start Date/End Date buttons to display a calendar and select the desired date/time. By default, the Subsidiary, Installation, Store, Workstation and Cashier for the current logged-in user are selected. Edit if necessary.
By default, all drawers and tills are included. If necessary, select a specific till or drawer.
3. Click the Print button.
4. Select a Print Design, Printer, and other print options as needed. Click Preview to display the results in the preview pane. Click Print to start the printing process.
Reverting to Default X-Out Settings
To return the X-Out screen to its original default settings, click Revert Defaults.
Z-Out Close (Unstructured Reports)
This section explains how to close a drawer when using unstructured reports. If using structured reports, see the section that follows this one.
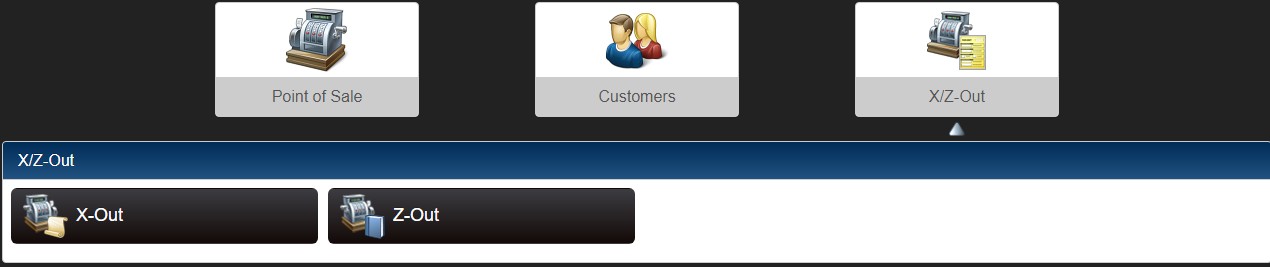
Select X/Z-Out from the home screen. Click the Z-Out button.
Define filter options and click Close Register.

On the next screen, enter currency counts. Select a currency. Enter denominations counts OR a Total amount. If any currency will be left in the drawer, enter the Leave Amount for the currency.

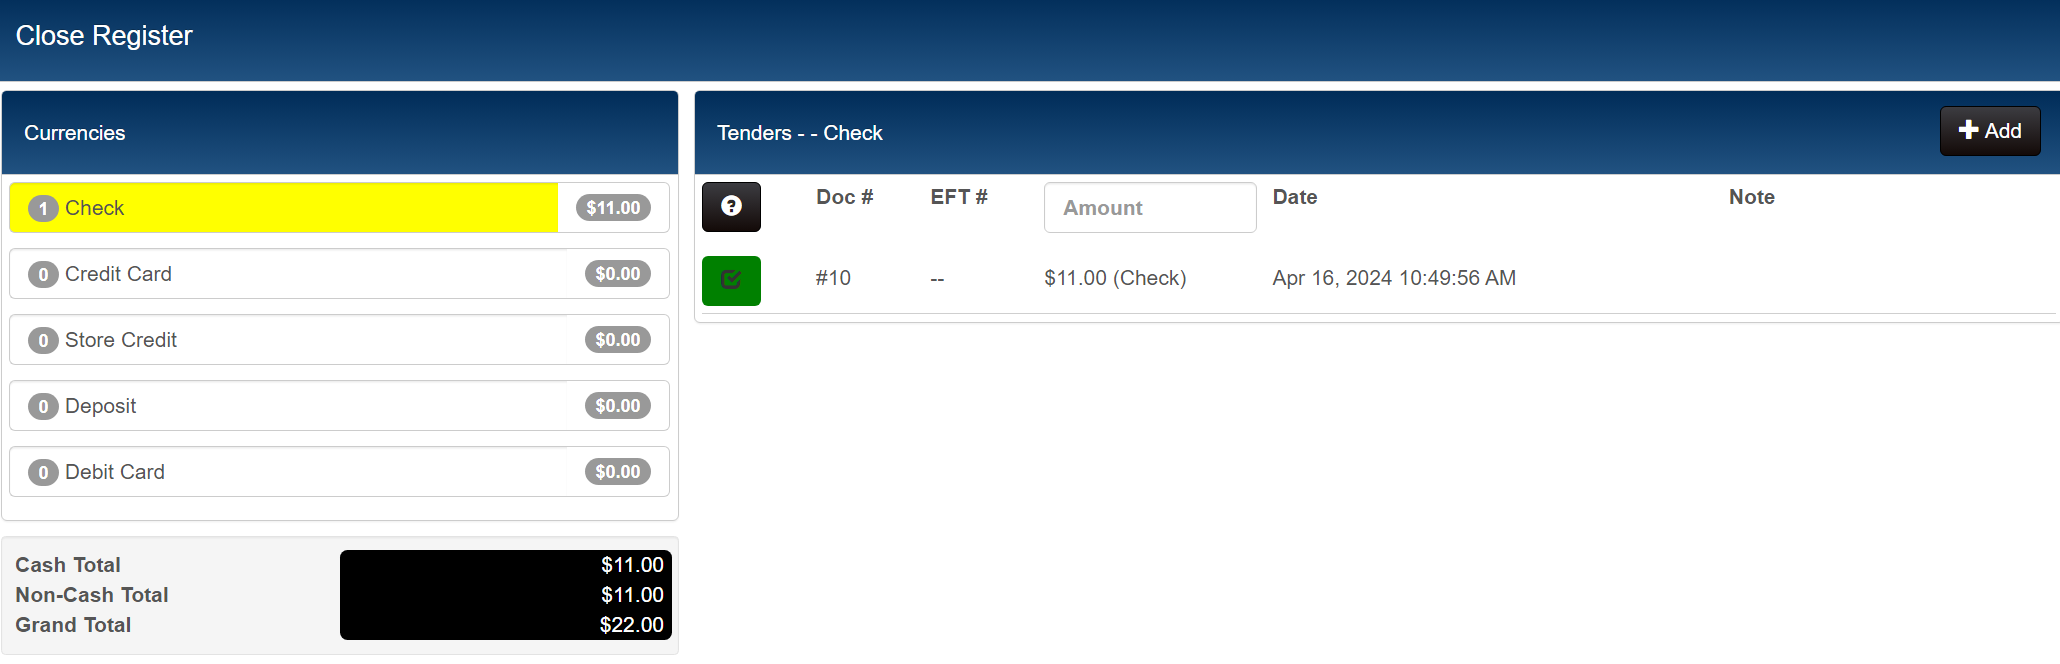
Click the Next button. On the next screen, verify any credit card receipts, checks, or other non-currency media in the drawer. Select a tender on the left (e.g., Check). The instances for that tender are displayed to the right. At first, each instance of a non-currency tender has a red box next to it.

Select the Matched checkbox for each non-currency item in the drawer. If you find a non-currency item that is not in the list, use the "Add New" button to add it. As you select the Matched checkbox for a non-currency tender, the Currency Total and Grand Total fields are updated. A preference option in Admin Console > Node Preferences > Transactions > Tenders > Requirements enables users to configure specific tenders to "auto match" on Z-Out reports. When auto-match is enabled for a tender, users closing a drawer (Z-Out) do not have to manually "match" each instance of the tender on the report. For example, if Credit Card is selected for auto-match in preferences, then on Z-Out reports in the non-currency media section, each instance of the credit card tender on the report will be matched automatically (auto-match). Users can manually uncheck individual instances of an auto-verified tender.
Click the Close button to proceed with the reconciliation.
If you need to go back and do a recount, click the Back button. The system compares the amounts entered by the user with the system amounts and displays any Over/Short amounts. Click the Finalize & Print button.

Z-Out Filter Fields
Refer to the following table for information about Z-Out filter fields. When running Z-Out reports, the selections in these fields will determine the transactions included in the report.
| Z-Out Filter Field | Description |
|---|---|
| Start Date | By default, the date range is from midnight of the current date to the current time. This has the effect of including all sales for the current date. To use a different Start Date, touch or click the Start Date button. On the displayed calendar, touch or click the button for the desired date. To adjust the start hour, touch or click the hour (e.g. "12") button and select the desired hour. Adjust the start minute in the same manner. Select OK when finished. |
| End Date | By default, the current date and time is entered. To adjust the end hour, touch or click the hour (e.g. "12") button and select the desired hour. Adjust the end minute in the same manner. Select OK when finished. |
| Subsidiary | Z-Outs reports are limited to a single subsidiary. By default, the subsidiary for the current workstation is entered. If necessary, select a different subsidiary. |
| Installation | The Prism server that is the controller for the location where the report is being created. |
| Store | By default, "All" is selected and cannot be edited. |
| Workstation | By default, the current user's workstation is entered. Users with the required security permission can select a different workstation from the drop-down. If you clear the Workstation field, all workstations will be included. |
| Drawer | By default, all Drawers will be included. If necessary, select a specific drawer (Drawer 1 or Drawer 2) from the drop-down. |
| Till | By default, all Tills are included. If necessary, select a specific Till from the drop-down. |
| Cashier | By default, the current logged-in user is entered. If necessary, select a different user from the drop-down. If you clear the Cashier field, all cashiers will be included. |
Open Amount and Leave Amount
If the "Use Structured Z-Outs" preference is selected, then the Open and Close Amounts are entered as separate processes and a drawer must be open to perform sales.
Open Amount
The cash amount in the drawer at the start of a shift or day (usually an assortment of bills and coins for change-making) is the Open Amount and is typically set as store policy. When using unstructured reports, if the "Require Entry of Open/Close Amount" preference is enabled, users can enter an Open Amount on the Currency Count screen. The Open Amount is counted in the total. The previous day's Leave Amount is suggested as the Open Amount but can be edited if needed.
Leave Amount
When using unstructured reports, you can enter a Leave Amount - the amount of cash that will remain in the drawer for the start of the next shift or day. The Leave Amount is counted in the total.
Overlapping Z-Outs
When a user starts a new Z-Out report, RP Prism checks if there are any open Z-Out records with the same filter options and any overlap in the time period. If any such overlapping Z-Outs exist, an error message is displayed (see below).
| Option | Description |
|---|---|
| Recount | Select Recount if you want to continue the current Z-Out process and overwrite the report that overlaps with the current report. If you click Recount, then the original Z-Out report will be marked as recounted and linked to the new report. The new report will be adjusted to include the start and end time range for both reports. |
| Cancel | Select Cancel and close the overlapping report and then use Z-Out Lookup to find the open report. Finish the report. Alternatively, you can select Cancel and modify report parameters. In many cases, modifying the Start Date is the only change necessary so that the report doesn't overlap with another open report. Keep in mind that the other "open" report will still exist. |
Z-Out (Structured Mode)
Open Register
Select X/Z-Out from the home screen. Click the Z-Out button.
Click the Open Register button to proceed.
Close Register
If a register is already open and a user wants to close the register, the user can find and select the unfinalized Z-Out record to be closed. The list of records can be filtered by elements like Start Date/End Date or Status. Modify filter elements as needed and click Search. By default, only Z-Out records for the current Subsidiary/Store (displayed in the upper-right) are displayed. Users can click the All Stores or All SBS checkbox to include records from other stores or subsidiaries in the search.
Highlight the desired record and click Close/Audit.

On the next screen, enter currency counts and enter a leave amount if needed.

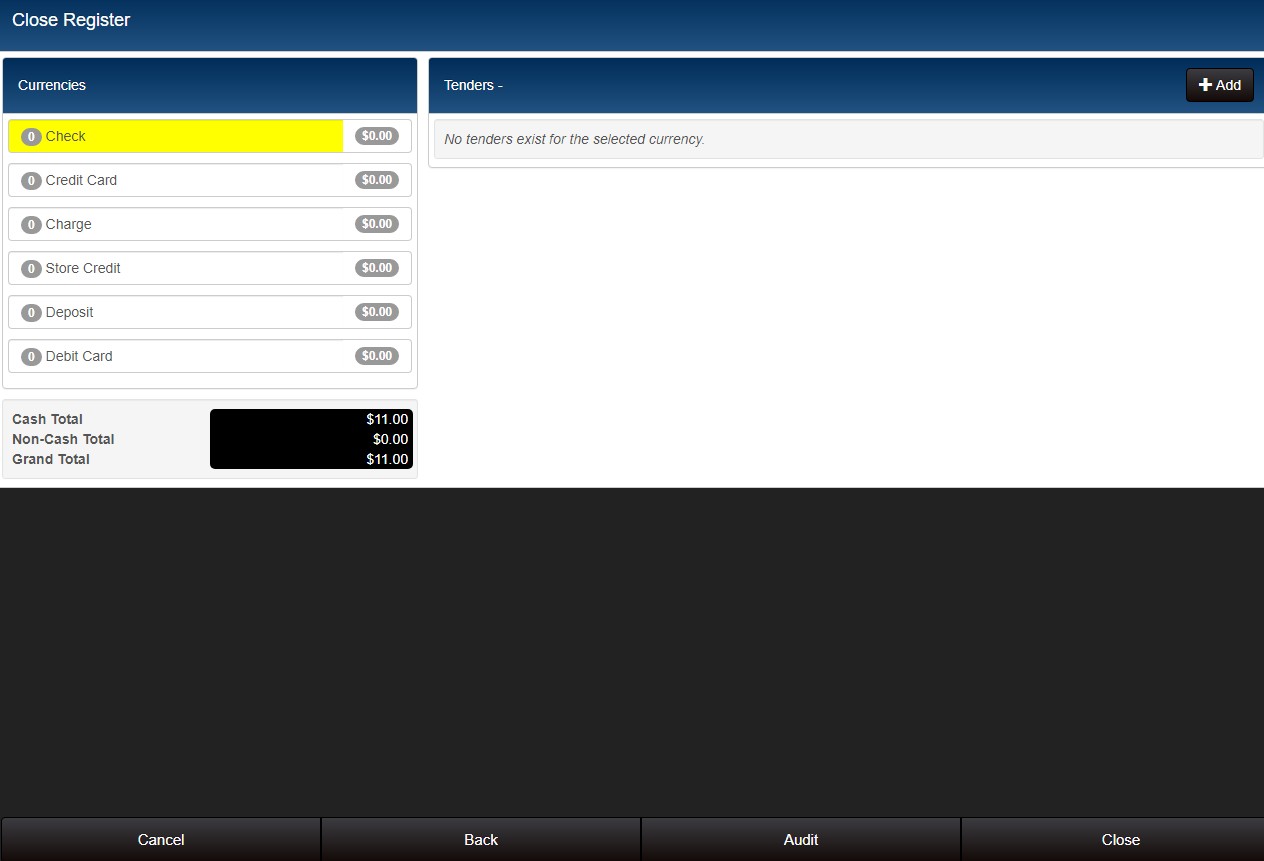
Click the Next button to proceed. Verify any credit card receipts, checks, or other non-currency media in the drawer. Select a type (e.g. Credit Cards) to display a list of Receipts for that type. Select the Matched checkbox for each instance found.

Click the Next button to proceed. Click the Close button.
The system compares the amounts entered by the user with the system amounts and displays any Over/Short amounts. Over amounts are displayed in green; short amounts are displayed in red. Click the Finalize & Print button.

Reconciling Over/Short Amounts
This section has additional information about the process of reconciling over/short amounts. Reconciling compares the closing amounts (and non-currency media counts) entered by the user to the transaction activity for the selected time range. If the amount of currency or non-currency in the drawer does not match that of the day's activity, the amount of the variance (over/short) is displayed. Over amounts are colored green and short amounts are colored red.
Small overages or shortages are usually a result of minor human error. However, large or consistent discrepancies between the cash that should be present and the cash that is tracked by the system could indicate theft or lack of proper training.
Allowable Variance Amount (Structured Reports only)
In Prism preferences, you can define an Allowable Variance Amount as well as the allowable number of retry attempts. If a user reconciles the report and the over/short amount exceeds the value defined in preferences, it counts as an unsuccessful attempt (upon each unsuccessful attempt, a message shows the number of remaining recount attempts). If remaining attempts remain, touch or click the Recount button to count the currency and non-currency again. When doing a recount, if the user is on the final attempt (based on the "Max Number of Attempts" preference), then a message is displayed, explaining that reconciliation will now begin. At this point, there is no option for the user to go back and edit counts.
Reverting Reconciliation
If the "Use Blind Close" preference is NOT selected, then users can navigate back and reverse the reconciliation. If a user clicks the "Back" button after reconciliation has been performed, a confirmation message is displayed. Touch or click the Yes button to reverse reconciliation.
Entering Currency Counts
In unstructured mode, there are two options for entering currency counts: enter a count for each denomination for each currency or enter a single "Total" amount for each currency.
If the "Count Denominations" preference is selected, then you MUST enter a count for individual denominations before you can proceed. If not selected, then users only enter a total for each currency.
In structured mode, users can enter an Open Amount and/or Close Amount directly on the Count Denomination screen. If a user clicks the Enter Totals button, the denomination counts are cleared and the can edit the currency total (i.e. Total DOLLARS). The Enter Totals button is toggles between Enter Totals and Count Denominations. This way, the user can enter individual totals for each currency (base and foreign).
When you click Count Total, the Total Dollars field becomes editable.
In structured mode, if the "Count Denominations" preference is NOT selected, then currency counts are entered on a single screen. If the "Require Entry of Open/Close Amounts" is UNCHECKED, then the Open Amount column is disabled.
Verifying Non-Currency Media
This section provides more information about the process of verifying non-currency media, which takes place after the user has entered currency counts. Non-currency media are things like credit card, debit card and gift card receipts, gift certificates, checks and store credit.
In each of these cases, the retailer wants to make sure the physical copy of the receipt, for example, makes it to headquarters. If charges are contested, these signed receipts become important.
The left side shows the number of receipts for each type.
Select a type that has a number next to it (e.g. Credit Card).
For each record in the list, select the Matched checkbox if the record is present. Leave the Matched checkbox clear if the record is missing
Repeat Steps 1-2 for the other currency types (e.g. Debit Card, Gift Card, etc.)
Click Next to proceed.
Tracking Currency Totals
When you select the "Matched" checkbox for a currency type (e.g. a gift certificate), the amount is added to the total for that type and to the Grand Total (for all currency types).
Adding New Non-Currency Types
Sometimes, a signed receipt or other currency type is found that does not belong to the current Z-Out's date/time range. For example, a user might find a signed credit card receipt that was caught under the till in the drawer. You can add such receipts into the current report.
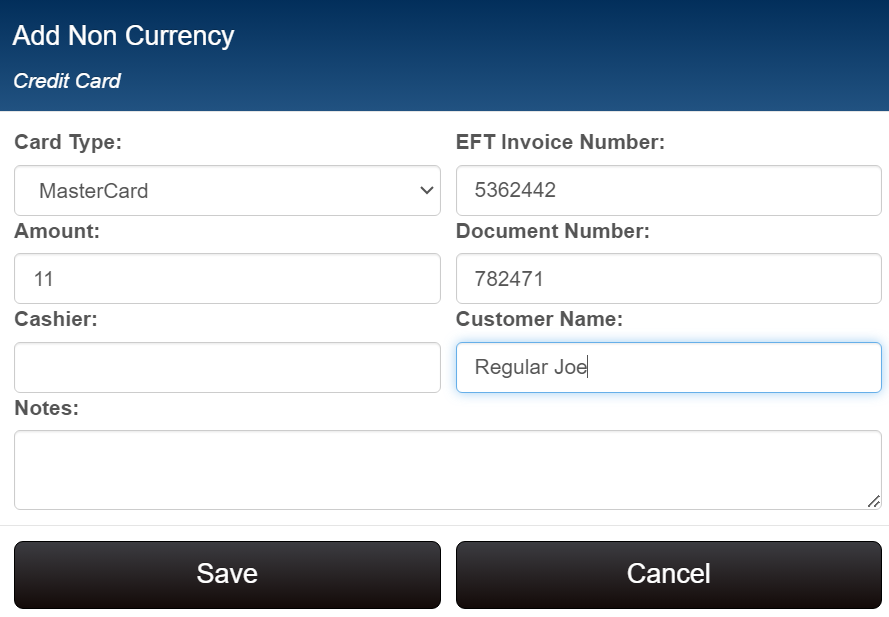
In the Added Non-Currency Tenders area, click Add New.
Enter information about the non-currency item.
(Note: The information you enter will vary by tender type - credit card receipt, check, gift certificate, etc.).
Enter notes that describe the location or circumstances in which the media was found.
Click Save.
The non-currency tender is now listed in the Added Non-Currency Tenders area.
Print Non-Currency Tenders
In Prism Node Preferences > Reports > X/Z-Out, you can select which non-currency tenders will be printed on Z-Out reportsBy clearing a tender, retailers can prevent the individual transaction from printing on the report, helping keep reports concise.
Reconciling Over/Short Amounts
This section has additional information about the process of reconciling over/short amounts. When you reach the point in the Z-Out Close process to reconcile, a prompt will be displayed. Click Yes to continue. If you are unsure, you can click No to return to the previous screen.
Reconciling compares the closing amounts (and non-currency media counts) entered by the user to the transaction activity for the selected time range. If the amount of currency or non-currency in the drawer does not match that of the day's activity, the amount of the variance (over/short) is displayed.
Overages or shortages less than a dollar usually are human error. However, large or consistent discrepancies between the cash that should be present and the cash that is tracked by the system could indicate theft or lack of proper training.
Refer to the following table for information about the columns on the Reconciliation screen:
| Column | Description |
|---|---|
| Open | The Open Amount entered by the user. |
| Sales | Total sales for currency, non-currency and the total sales as calculated by the system. |
| Drop | If a drop amount is specified, it is entered here. |
| Close | The Close Amount as calculated based on the amounts entered by the user. |
| Over/Short | The difference between the Close and Sales. |
Allowable Variance Amount (Structured Reports only)
In Admin Console > Node Preferences > Reports > X/Z-Out, you can define an Allowable Variance Amount as well as the allowable number of retry attempts. If a user reconciles the report and the over/short amount exceeds the value defined in preferences, it counts as an unsuccessful attempt. A message is displayed, showing the number of remaining recount attempts. Touch or click the Recount button to count the currency and non-currency again.
When doing a recount, if the user is on the final attempt (based on the "Max Number of Attempts" preference), then a message is displayed, explaining that reconciliation will now begin.
At this point, there is no option for the user to go back and edit counts. Touch or click the OK button to reconcile the report.
Reverting Reconciliation
If the "Use Blind Close" preference is NOT selected, then users can navigate back and reverse the reconciliation. If a user clicks the "Back" button after reconciliation, a confirmation message is displayed. Touch or click the Yes button to reverse reconciliation or click No to cancel. If you click Yes, all currency counts (and verifications) will be lost.
Transactions with Sale, Return and Global Discount
A receipt in RIL does not have the flexibility to contain sale, return and order items on one document, as RP Prism does. This requires a difference in the application of global discounts. Specifically, when a sale and a return of the same value are included on the receipt (net difference = $0) AND a global discount is applied to the receipt, the method involved in calculating what the global discount applies to will be different in RIL and RP Prism.
To handle this situation, RP Prism checks for transactions in which the subtotal tax is zero and the discount percentage is non-zero. When these transactions occur, the discrepancy is added to RIL Prism Management's Global Discount Amount field so that the receipt Total will match between RP Prism and RIL.
Printing/Emailing Z-Out Reports
This section explains how to print a z-out report at time of closing. You can also print a report at a later time using the Z-Out Lookup feature.
1. On the finished report, touch or click the Print button.
2. The standard print dialog is displayed. Change any settings that need to be modified and then select Print.
Z-Out Lookup
The Z-Out area enables you to review and print previously-run Z-Out reports. All Z-Outs are available, whether closed or not. Users have the option of forcing a close on any open reports.
1. Click the X/Z-Out button on the home screen.
2. Click the Z-Out button.
3. Enter search criteria and then touch or click the Search button.
4. Select the desired report and then touch or click the Preview Z-Out or Print button.

Search by Report Status
You can display only reports that match a certain status. If there are a large number of reports, filtering by status can make it easier to find the report you want. Make a selection in the Status drop-down. You can display all reports, closed reports, forced close reports or open reports only.
Force Z-Out Close
If necessary, you can force the close of structured Z-Out reports. This is typically used to close "ghost" reports - reports for which an open exists but with no corresponding closing record.
Select a report and then touch or click the Force Close button.
Enter the Closing Amount, Leave Amount and any Notes to explain the close.
Z-Out Running Total (Net Sales)
Prism has a field for tracking running totals that can be designed onto Z-Out report document designs. The RUNNINGTOTAL element displays the ongoing total of every sale ever done on the cash register. Including this field on Z-Out reports is especially important for retailers in the Philippines.
To add the RUNNINGTOTAL element to Z-Out designs:
1. Launch Prism DocumentDesigner.exe (…\ProgramFiles(x86)\RetailPro
\DocumentDesigner.exe.
2. Select X/Z-Out in the Area dropdown.
3. Select the desired design in the Document dropdown.
4. Navigate to the GRANDTOTALS section. Drill down to the RUNNINGTOTAL field.
Add the RUNNINGTOTAL field to the desired area of the screen design and save the changes.
Z-Out Sequencing
You can define a numbering sequence for Z-Out reports. Being able to define the starting number for Z-Out sequences is a requirement for retailers in certain locales. The sequence can be set at the Subsidiary, Store, or Workstation level (Admin Console > Node Preferences > Sequencing). Once the level has been set, go into Admin Console > Node Preferences > Node Selection and drill down to the desired SBS, Store or WS and set the desired starting sequence number for Z-Out reports.
Z-Out Audit
The Z-Out Audit feature enables retailers to monitor sales activity via a Z-Out report without going through the reconciliation process. This enables the retailer to flag any abnormalities more quickly and can provide more granular visibility than with one isolated Z-Out. When using the Z-Out Audit feature, you do audits as needed throughout the day and then do a close to roll up all the Z-Outs at the end of the day.
The Z-Out Audit feature is only available when your system is configured to use Structured Z-Out Audit. (Node Preferences > Reporting > X/Z-Out). When using structured Z-Outs, the menu in Z-Out reports enables the user to go through the audit process or the close process as needed. When going through the Z-Out Audit feature, the process is like the normal Z-Out Close process minus the reconciliation step.
Basic Flow for Audit Register
This process assumes preferences are configured for structured Z-Out reports and the drawer is open.
Navigate to Point of Sale > X/Z-Out. Click the Z-Out button.
Find and select the desired open record. Click Close/Audit.
The workflow is the almost the same as for a regular Z-Out close register action.
Count currencies. Click Next.

Enter Non-Cash counts. On the Non-Cash tender screen, in addition to a "Close" button on the bottom menu, users will see an Audit button. Click Audit to create an audit record.
View Audits for a Z-Out Report Period
Find and select the desired structured Z-Out open record. Click the Audits button.

A list of Audit reports for the selected Z-Out open record are displayed. Select a report. Click Print to print the record or Close to close the modal.

Z-Out Audit Notes
- Audits are only available for systems using Structured Z-Out reports
- Audits may be performed for open drawers only (not closed drawers)
- Audits reconcile register balances
- Audits do not close Z-Out registers
- "Total Over/Short" values will be calculated for the drawer period. Calculated from the register open counts.
- "Audit Over/Short" values will be calculated for the audit period. Calculated from the most recent audit counts. If no previous audits exist, calculated from the register open counts.
- Running Z-Out Close will calculate a final "Audit Over/Short" amount.
Foreign Currency on Z-Out Reports
Foreign currencies are listed in Admin Console > Global Preferences > Currency. Those foreign currencies marked as Active will be listed in the Foreign Currency drop-down in Admin Console - Node Preferences - Transactions - Tenders - Tender Requirements. Those foreign currencies marked for Give or Take will be displayed and available for selection in Z-Out Reports and Disbursements. Those foreign currencies that are not marked for Give or Take will not be available for selection on Z-Out Reports and Disbursements.