Prism Enterprise Reconfiguration
Introduction
The hierarchy for a typical enterprise consists of three levels: 1) A single root authority server at the top, 2) one or more intermediate level POA servers and 3) individual store servers at the bottom of the hierarchy. The root HQ server plays a critical role in maintaining data integrity throughout the enterprise. This document explains how to make a different server the root.
The instructions in this document are guidelines to help avoid gaps in reporting or the accidental overwriting of data during the migration process. Modify the examples as needed for your enterprise's specific needs.
In this topic, we look at two different scenarios for changing the root:
- A POA server changing places with the root
- A store server changing places with the root
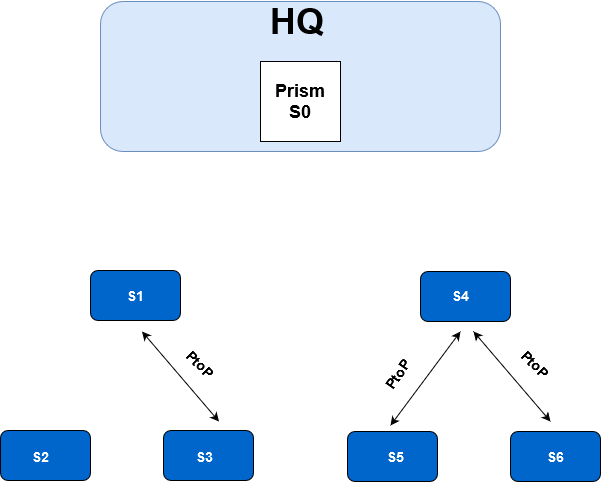
Below is a typical three-level enterprise.
Prism enterprise at start of process:

Note: Schedule a window during which you can stop all operations on all workstations. If workstations are creating data during the migration, there will be no way for the data to propagate back upstream to the HQ.
Scenario 1 - POA and Root Change Places
In this section, we will go through the process of changing the root authority from server S0 to server S1.
Step 1. Unlink Prism-to-Prism Profiles
Unlink profiles to prevent any potential communication between servers during the migration process.
Go to S1:
a. Unlink Prism-to-Prism profile between S0 and S1.
b. Unlink Prism-to-Prism profile between S2 and S1.
c. Unlink Prism-to-Prism profile between S3 and S1.
Go to S4:
a. Unlink Prism-to-Prism profile between S4 and S0.
Step 2. Leave the Enterprise
Go to S1:
a. Launch the Tech Toolkit and leave the enterprise. Allow time for Rabbit MQ to perform all required actions (approximately one to two minutes).
Go to S2:
a. Launch the Tech Toolkit and leave the enterprise. Allow time for Rabbit MQ to perform all required actions (approximately one to two minutes).
Go to S3:
a. Launch the Tech Toolkit and leave the enterprise. Allow time for Rabbit MQ to perform all required actions (approximately one to two minutes).
Go to S4:
a. Launch the Tech Toolkit and leave the enterprise. Allow time for Rabbit MQ to perform all required actions (approximately one to two minutes).
At this point, here's what our hierarchy looks like. Notice the connections between S4 and S5, S6 have been left intact. They are unaffected by the migration.

Step 4. Reconfigure with S1 in the Root Role
Next, we reconfigure the enterprise with S1 and S0 switching roles. S1 will become the root and S0 will be part of the intermediate POA layer.
Here is the current topology:.

Step 5. Rejoin POAs and Store Servers to Enterprise
Go to S0:
a. Launch Tech Toolkit and join the enterprise. For S0's Point of Authority (POA), enter the FQDN or IP Address of S1 (the new root). Wait until the join process completes.
Go to S4
a. Launch Tech Toolkit and join the enterprise. When entering S4's POA, enter the FQDN or IP Address of S1 (the new root). Wait until the join process completes.
Go to S0:
a. Create a Prism-to-Prism profile and link S0 to S1 Prism-to-Prism profiles.
Go to S4:
a. Link the Prism-to-Prism profile between S4 and S1.
Go to S2:
a. Launch Tech Toolkit and join the enterprise, provide POA address of S0. Wait until the join process completes.
Go to S3:
a. Launch Tech Toolkit and join the enterprise, provide POA address of S0. Wait until the joining process completes.
NOTE: While joining the enterprise, the system will display a duplicate controller conflict warning, Click Yes to acknowledge. Next, the user will get an Existing Data found message, click OK.
Go to S2:
a. Link the Prism-to-Prism profile between S2 and S0.
Go to S3:
a. Link the Prism-to-Prism profile between S3 and S0.
At this point, the enterprise is reconfigured with S1 as the new root authority.

Step 6. Post Migration Task - Synchronize Controller Information
After the migration process, some stores might have incorrect controller information. To fix this, edit the POA's controller information in Tech Toolkit and save the edits. This will trigger replication and synchronize controller information. This process needs to be done from top to bottom throughout the hierarchy. In our example, S3, S4, S5, S6 would be left with incorrect controller information.
- Edit Controller Name for S1 and save (updates controller information at S4)
- Edit Controller Name for S0 and save (updates controller information at S3)
- Edit Controller Name for S4 and save (updates controller information at S5, S6)
Scenario 2 - Store Server and Root change Places
In this section, we will go through the process of changing the root authority from server S0 to server S2.
Prism enterprise at start of migration process:

Step 1. Unlink Prism-to-Prism Profiles
Unlink profiles to prevent any potential communication between servers during the migration process.
Go to S2:
a. Unlink Prism-to-Prism profile between S1 and S2.
Go to S0:
a. Unlink Prism-to-Prism profile between S1 and S0.
b. Unlink Prism-to-Prism profile between S4 and S0.
Step 2. Leave the Enterprise
Go to S1:
a. Launch Tech Toolkit and leave the enterprise. Allow time for Rabbit MQ to perform all required actions (approximately one to two minutes).
Go to S4:
a. Launch Tech Toolkit and leave the enterprise. Allow time for Rabbit MQ to perform all required actions (approximately one to two minutes).
Go to S2:
a. Launch Tech Toolkit and leave the enterprise. Allow time for Rabbit MQ to perform all required actions (approximately one to two minutes).
At this point, here's what our hierarchy looks like. Notice that the connection between S1 and S3 and the connections between S4 and S5, S6 are intact; those connections are unaffected by the migration.
Step 4. Reconfigure with S2 in the Root Role
Next, we will reconfigure the enterprise with S2 and S0 switching roles. S2 will become the root and S0 will be a regular (non-POA) server,

Step 5. Rejoin POAs and Store Servers to Enterprise
Note: While joining, the user will get a duplicate controller conflict warning. Click Yes. The user will get an Existing Data found message. Click OK.
Go to Prism S1:
a. Launch Tech Toolkit and join the enterprise, provide POA address of S2. Wait until the join process completes.
Go to S4:
a. Launch Tech toolkit and join the enterprise, provide POA address of S2. Wait until the join process completes.
Go to S0:
a. Launch Tech Toolkit and join the enterprise, provide POA address of S1. Wait until the join process completes.
Go to S0:
a. Create a Prism-to-Prism profile and link to S1.
Go to S1:
a. At S1 link the Prism-to-Prism profile between S1 and S2.
Go to S4:
a. At S4 link the Prism-to-Prism profile between S4 and S2.
At this point, the enterprise is reconfigured with S2 as the new root authority. S0 is in the role of a store server, pointing to S1.

Step 6. Post Migration Task - Synchronize Controller Information
After the migration process, some stores might have incorrect controller information. To fix this, edit the POA's controller information in Tech Toolkit and save the edits. This will trigger replication and synchronize the controller information. This process needs to be done from top to bottom throughout the hierarchy. In our example, S3, S4, S5, S6 would be left with incorrect controller information.
- Edit Controller Name for S2 and save (updates controller information at S4).
- Edit Controller Name for S1 and save (updates controller information at S3).
- Edit Controller Name for S4 and save (updates controller information at S5, S6).