Profiles
A profile specifies the resources that will be replicated from one end of a connection to another. To replicate data, you must link a profile to a connection. Only linked profiles are used for replicating data. If a connection does not have a profile linked for one or both directions, data will not be sent in the unlinked directions. You can define one profile that specifies the data that is sent from Store 001 to its POA, and a different profile for data sent in the opposite direction, or you can reuse the same profile. You can define as many profiles as needed. The important thing is that you link a profile to each side of the connection.
You can specify which subsidiaries are included in Profiles. You can select any or all Subs. If you select All Subs, then all Subs that currently exist will be selected, AND ANY SUBS ADDED IN THE FUTURE. Selecting this option helps ensure that any new subs added to the company are included when replicating data using the profile. Keep in mind that when this option is selected, any new subs will be added automatically. If this is a concern, then you can select the individual subsidiaries.
You must add the profiles you want to use for initialization and the profiles you want to use for day-to-day.
It is important to select the correct resources for profiles. Make sure you understand the data types you want to replicate so you can include the appropriate resources in the profile.
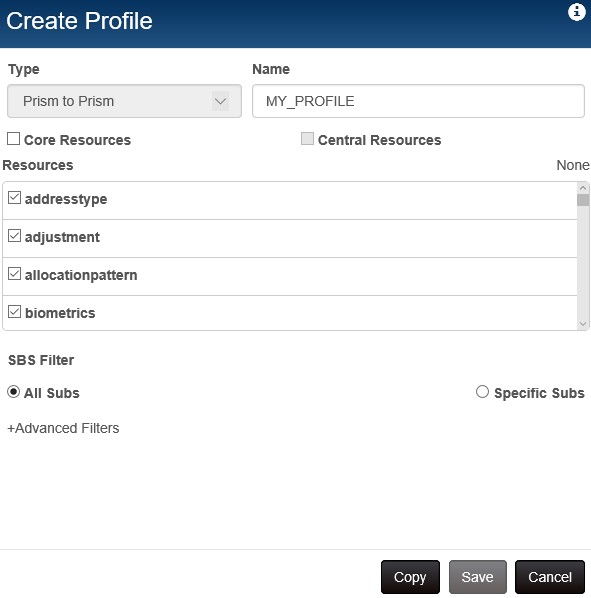
New Profile
Navigate to the Prism Dashboard > Profiles tab.
Click the Add button.

A screen for selecting resources for the profile is displayed.
Enter a Name for the Profile.
Select the individual resources to include. Select the subsidiaries to which the resources will be sent. To select all resources, click the All link.

Define Advanced Filters, if needed. (See the Advanced Filters topic)
Click the Save button. A toast confirms the profile was successfully completed.
Subsidiary Selection/Filtering
You can specify which subsidiaries are included in Profiles. You can select any or all Subs. If you select All Subs, then all Subs that currently exist will be selected, AND ANY SUBS ADDED IN THE FUTURE. Selecting this option helps ensure that any new subs added to the company are included when replicating data using the profile. Keep in mind that when this option is selected, any new subs will be added automatically. If this is a concern, then you can select the individual subsidiaries.
Copy and Import Profiles
Users can copy an existing profile, create a new profile at the desired location, and import (paste) the contents into the new profile. In early versions of Prism, users had to create profiles at each location. This process was tedious and error-prone. Now, users can copy an existing profile and then import (paste) the contents into a new blank profile at a different location. The only restriction is that the profile being created must be of the same type as the copied profile. This enables a user at a central location to create profiles and then assign the needed profiles to individual locations. This simplifies the profile creation process and helps ensure consistency.
When you display a profile in edit mode, at the bottom of the screen is a Copy button. Click the Copy button to copy the profile's contents to the clipboard.
A toast message confirms the successful copy.

Next, start a new profile of the same type that was copied. At the bottom of the Create Profile screen is an Import button. The Import button is only available if you are creating a profile of the same type (e.g. Prism-to-Prism).

If you click the Import button, the contents of the copied profile (except the Name) are copied into the new profile. Enter a Name for the new profile. Make any other needed changes. Save the profile.
Add/edit/delete profiles on Connection Screen
Previously, a technician would use Remote Desktop to go into each individual server to create/edit the profile. This was very time consuming and added significant support costs to Prism deployments.
Profiles can be created, edited and deleted from the connection screen.
| Button | Description |
|---|---|
 |
Create a new profile. This shortcut launches the Create Profile dialog for the type of connection you are working with. |
 |
Select the checkbox to link the profile to the connection. Clear the checkbox to unlink the profile. |
 |
Edit the profile. |
 |
Delete the profile. |
Notes
- When a profile is linked, the delete button is disabled
- Delete and edit functionality are disabled for internal profiles (core resources)
- When creating or editing a profile from the connection screen, the profile type is auto-detected based on the server and connection type
Show/Hide Linked Profiles Button Removed
In previous versions of Prism, users had to go into the Connections area, click a "Show Unlinked Profiles" link and then link one or more profiles to the connection. This Toggle link has been removed. Now, all profiles are now displayed regardless of link status. Users still must click a checkbox to link a profile to a connection.
Linked profiles are always displayed first, in alphabetical order, followed by un-linked profiles, also sorted alphabetically.
Advanced Filters
Advanced filters allow you to apply logic to return only certain records from the server. The basic syntax for a filter is (ATTRIBUTE,OPERATOR,CRITERIA). The attribute is the name of the attribute to search in, the operator provides the type of comparison, and the criteria is the value to look for.
Available Comparison Operators
The current operators you can use in a filter are as follows:
• EQ - Equal to
• NE - Not equal to
• LT - Less than
• GT - Greater than
• LE - Less than or equal to
• GE - Greater than or equal to
• NL - Is null
• NN - Not Null
• LK - Like
Exceptions
While most of these operators use the pattern mentioned above, there are a couple of exceptions.
• In Inventory, the Active flag is not true false but rather 0, 1. Your filter will therefore need to be modified to say (active,eq,1) not (active,eq,true).
• NL and NN do not accept a criteria element e.g. filter=active,nn
• LK filter uses a as a wildcard. For example s matches all entries starting with s
Resource Filter Examples
Note: The filters are not case- or space-sensitive.
| Example | Description |
|---|---|
| (Active,eq,true) | Send active customers |
| (Active,ne,true) | Send inactive customers |
| (Cost,le,4.50) | Send inventory items with a cost less than or equal to 4.50 |
| (AdjNo,gt,200) | Send adjustment memos with an Adj No value greater than 200. |
Compound Filters
Compound filters can also use AND and OR clauses with parenthesis to establish grouping. e.g. (FirstName,eq,jack)AND(LastName,eq,harkness)
Filtering Documents by Subsidiary
Here's an example of filtering documents by subsidiary for Prism Day-to-Day replication.
- Create a new filter in Connection Manager.
- For the filter, select the Document resource.
- Click the Advanced Filter link.
- Enter a filter for the subsidiary whose documents you want to send. (sbsno,eq,2)
- Click the Back button and then save the profile.

Core Resources
The core resources are resources considered to be core and not necessarily part of the standard day-to-day traffic. Generally they are defined as those resources that would be replicated from the POA to its members, but not necessarily back to the POA from a member. The following are the core resources: Controller, Tenant, Subsidiary, CustomSchema, Transformdesign, Season, TaxArea, PriceLevel, Currency, StoreType, Store
- Core Resources must be selected for Prism Day-to-Day replication
- When creating initialization profiles, the Core resources must be explicitly added if desired
The best and easiest way to correct replication , is to edit your D2D P2P profiles. Add Core Resources, select ALL resources, then uncheck: Controller, Customschema, Store, Subsidiary, Tenant, TransformDesign, Subsidiary, Tenant and Transformdesign. This is because they are already in the un-editable ‘CoreResources' profile.
Core resources replicate in both directions.
Subsidiary Selection
You can specify which subsidiaries are included in Profiles. You can select any or all Subs.
If you select All Subs, then all Subs that currently exist will be selected, AND ANY SUBS ADDED IN THE FUTURE. Selecting this option helps ensure that any new subs added to the company are included when replicating data using the profile. Keep in mind that when this option is selected, any new subs will be added automatically. If this is a concern, then you can select the individual subsidiaries.