What's New in 1.13.0.1446
This document provides information about the features and new functionality added in Retail Pro Prism 1.13.0.
- Employee Management and Group Management
- Enable Employee Maximum Discount Override preference
- Activate Gift Cards for Original Amount preference
- Transaction Lookup - lookup by time range
- Show Discounts dialog - Extended Discount displayed
- Print all Denominations on Z-Out
- Upgrade from 1.12.5 to 1.13.0
- PrismMQService Server Mode and Compression Threshold
- Replicate Touch Menu Preferences
- Connection Manager UI Enhancements
- Add/Edit Reason Codes
- Add/Edit Price Levels
- Add/Edit Seasons and Seasonal Pricing
- Add/Edit Subsidiaries
- Subsidiary Modeling
- Add/Edit Stores
- Add/Edit Currencies and Exchange Rates
- Global and Node Preferences
- Price Manager - Price Plan Ownership
- Merchandise Images on Document Designs
- Gift Item Promotion Type
- Serialized Coupons
- Default Subsidiary Assignment for New Promotions
- Prism Scheduler
- Auto Reload Customization after Failure
- Pass Through Cash Drawers
- Print Tags from POS Options Menu
Employee Management and Group Management
Prism's Employees area enables retailers to manage employee records and implement a role-based security system. The Employees area is divided into two sub-areas: Employee Management and Group Management.
- In the Employee Management area, work with employee records, including adding, editing and deleting employee records, changing passwords and assigning an employee to a group.
- In the Group Management area, add new groups. Edit exiting groups (except Group Name). Assign employees to groups. Work with group records, including allowing/denying specific group permissions. Edit group permissions.

Basic Steps
- Verify that employees and groups were replicated correctly from RP 9 during initialization.
- Configure employee preferences and permissions.
- Create additional employee groups, if needed.
- Create additional employees, if needed.
- For each employee group - existing and newly defined groups- edit group permissions to control employee access to specific areas and features in Prism.
- Assign individual employees to groups as needed.
- Adjust employee store assignments, if needed.
Default Security Configuration for New Installs
When you first install Prism, a single default employee group called the Administrator group is created. The default Prism Administrator group enables users to log in to Prism and initialize the system (default login credentials are sysadmin/sysadmin). Initialization will copy employee groups from the source Retail Pro 9 (or the Prism POA) to the new server. You will then have access to all the groups defined in Retail Pro 9. The default Administrator group is overwritten during initialization. You can add or remove employees from groups by editing the group record.
Employee Subsidiary and Store Assignments
Prism tracks the subsidiary and store to which each employee is assigned. It is important to assign employees to the correct subsidiary and store. Specifically, employees (excluding the SYSADMIN user) can only create documents for stores to which the employee is assigned. Prism makes it easy to edit an employee's subsidiary and store assignments. See the "Subsidiary and Store Assignments" section.
User Password Policies
You can define password policies for things like strong passwords, password history and other options in the Admin Console > Preferences > Node Preferences > Employees area.
Enable Employee Maximum Discount Override
A new preference enables managers or others to override the Employee Max Discount setting. When the "Enable Employee Maximum Discount Override" preference is selected, Prism will display an override prompt before reducing the discount. The Employee Maximum Discount is defined in the employee record. The default setting is 100, meaning that employees by default can grant discounts up to 100 percent.
The Employee Maximum Discount field enables you to place an upper limit on discounts that can be given by individual employees. The way it works is that if an applied discount exceeds the employee's Maximum Discount amount, the discount amount is reduced automatically to conform to the max setting.
Global and Node Preferences
This release includes changes to the layout of preferences in the Admin Console. Preferences have been divided into two groups: Global and Node. You can think of the Node Preferences area as a little like "Local Preferences" in RP 9. The Global Preferences area has settings that are best applied at the company (global) level. . Global Preferences are applied to all subsidiaries in the enterprise. Currently, the Global Preferences has nodes for Season and Currency settings. To access other preferences, select Node Preferences.
Previously, all preferences were contained within a single area. As Prism matures and more preferences are added, separating preferences into Global and Node areas makes it easier for users to understand and navigate preferences.
| Preference area | Description |
|---|---|
| Season | Define seasons. The seasons you define can be used with seasonal pricing. |
| Currency > General | Add/edit currencies. |
| Currency > Exchange Rate | Define exchange rates between a selected base currency and a foreign currency. |
Activate Gift Cards for Original Amount
A new preference controls whether gift cards can be activated for an amount other than the original amount. This preference gives retailers more flexibility when it comes to gift card activation.
- If the preference is enabled, gift cards can only be activated for the original amount at which the card was sold.
- If the preference is disabled, then gift cards can be activated for an amount different than the original amount.
Transaction document lookup by time
DevTrack ID #13787
Users can now look up a transaction by a specific time range within a certain day. This is especially useful in high-volume environments. When there are many documents created in a single day, searching by time range makes it easier to zero in on the desired document for a certain date.

Show Discounts - Extended Discount
DevTrack ID#16512
This release includes changes to the Show Discounts dialog to make it easier to view the extended discount amount on transactions. When a user displays the Show Discounts dialog (by clicking the Show Discounts button in Item Details), the grid shows the amount of each individual discount as well as extended amount. Previously, the Show Discounts dialog did not include the Ext Amt field.
The Extended Discount amount field is included in the following receipt designs:
• 40-column OPOS
• 8x11 OPOS
X/Z-Out: Printing all Denominations (even blanks)
DevTrack ID #13250
This release includes a new "Print all Denominations (even blanks)" preference that allows the printing of all denominations on Z-Out reports, even denominations that have no entry. The new preference setting is in Preferences and Settings > Reporting > X/Z Out. Some regions require that all denominations are included on reports, even blank denominations. Previously, if a denomination was blank, then it would not be printed on the Z-Out report.
Upgrade from 1.12.5 to 1.13.0
There are significant changes to the Prism enterprise structure and initialization process in Prism 1.13.0. In Prism 1.13.0, only the Root Authority machine (aka PrismHQ) maintains a connection to Retail Pro 9. Previously, any Prism server in the enterprise could have a connection to V9. As part of the upgrade process, you will have to remove any existing connections to V9 servers and then, at the Root Authority only, recreate the V9 connection.
See the Upgrade from 1.12.5 to 1.13.0 topic for more information.
PrismMQService Server Mode
DevTrack ID #16863
The Server Mode configuration option for the PrismMQ service helps improve performance for high-performance, multi-CPU systems (four CPU cores or more) when high-throughput and increased processing power are needed. For example, during initialization, the server is trying to quickly import and process many records; however, Windows default power management settings can end up throttling performance on high-performance machines. Server Mode enables you to bypass some of these default Windows power management settings so that servers can make more efficient use of available computing resources.
To enable Server Mode, edit the PrismMQ configuration file in the Service Manager area of Tech Toolkit. The Server Mode checkbox is found toward the bottom of the configuration screen, in the "General" area. Enabling Server Mode results in increased CPU usage. We recommend that you only enable Server Mode when it is needed and then disable it when no longer needed.
Limitations
- Limited to systems with four CPU cores or more.
- Server Mode is intended If you use the same machine as both a server and a workstation, then you probably shouldn't use Server Mode. The Server Mode feature is for dedicated server machines.
- Intended for use on a temporary basis when increased processing power and throughput are needed.
Compression Threshold for PrismMQ.ini
DevTrack ID#16558
The PrismMQService has a new parameter called Compression Threshold. This parameter helps avoid problems when replicating large files, such a large Promotions file. The Compression Threshold parameter has a default setting of 100KB. This means that any payload greater than 100KB will be compressed. Setting the parameter to "0" will turn off compression. A typical 10MB file will compress to about 200KB.
To enable compression:
- Launch the Prism Tech Toolkit and log in.
- Select Default (local machine) from the drop-down.
- Click the Service Manager button.
- Select the PrismMQService file.
- Navigate to the General section. You can leave the default Compression Threshold or modify as needed.
- Stop and Start the Service after the changes
Replicate Touch Menu Preferences
DevTrack ID #11853
This release includes a new replication resource so that you can initialize touch menu settings. The Prism Touch POS feature enables retailers to define touch-screen menus. Previously, touch menu preferences had to be recreated at each Prism server. This change expands the usefulness of the touch POS feature and makes it easy to distribute and update touch menu settings. For example, retailers can define touch menus at the headquarters or other central location and then distribute to individual store locations. This helps ensure consistency among buttons.
To replicate touch menu settings, create a Prism Day to Day profile and include the touchmenu resource.
Connection Manager User Interface Enhancements
This release includes changes to the Connection Manager interface. The new layout makes it easier to configure and carry out replication. The interface is organized at the top level by three dashboards: Prism Dashboard, V9 Dashboard and Custom Dashboard. Each dashboard's connection and profiles are specific to the tab title, so for instance, under the V9 Dashboard you will see only Connections and Profiles for replication with Retail Pro 9, On the Prism Dashboard you will only see Prism to Prism connections and profiles defined from the Prism side of a conversation.
Sample Connection Manager interface:

Add/Edit Reason Codes
DevTrack ID#15067
Reason codes enable you to assign a reason for specific POS actions. These reasons can then be used for reporting and other purposes. For example, discount reason codes allow you to assign the reason why a discount was granted. Later, reports can be run showing which discount reason codes are used the most. Users can now add and edit Reason Codes in Prism. Previously, most Reason Codes had to be added or edited in Retail Pro 9. This gives retailers the ability to manage reason codes in Prism. Previously, Retail Pro 9 was required for full management of Reason codes.
Add/Edit Price Levels
DevTrack ID #15065
This release includes support for adding and editing Price Levels. Price Levels enable retailers to define different sets of inventory prices for groups of users.
The price levels that are defined in preferences can be assigned to different types of records:
- Customers
- Stores
- Price Manager updates
- Price adjustment memos
To add/edit price levels, click the Add button. In the dialog, enter a name for the Price Level. Note: Pricel Level names in RP 9 are limited to six characters. Price Level names longer than six characters will be truncated when replicated to RP 9.
Add/Edit Seasons
DevTrack ID#15901
This release includes support for adding and editing Seasons. The preferences for adding/editing seasons are found in the Global Preferences > Seasons area. You can add a season to individual price levels and markdowns.
Note: Functionality to assign a season to a price level or Price Manager markdown is not included in this release.
For example, when updating a scheduled markdown, you select a season. With seasonal pricing, you assign a season to inventory items.. When the season's Start Date arrives, the item's price is automatically updated. When the season ends, the price reverts back automatically to whatever it was before, unless there is another season starting, in which case the seasonal pricing for the new season will be applied.
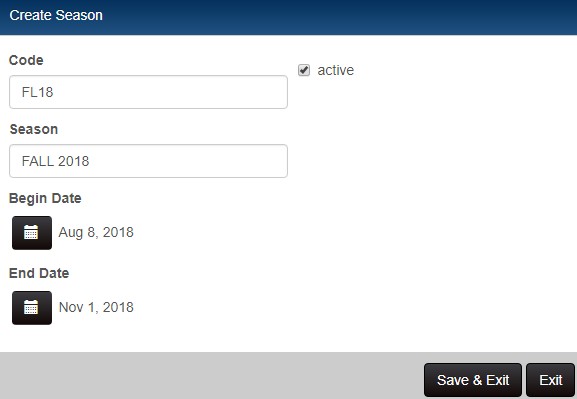
Add New Season
Click the New Season button. In the displayed dialog, enter a Code and a Name for the season. The Code field in RP 9 is limited to five characters. For compatibility with RP 9, keep the code short. In the Name field, you can enter a longer name for the season. In RP 9, season Names are limited to 30 characters.
New Season dialog:
Use Seasonal Pricing
1. Make sure that Use Seasonal Pricing preference is selected in Node Preferences > Merchandise > Pricing > Price Levels. Make sure the Price Levels you will use are Active.
2. Use Price Manager to create a Markdown. When adjusting prices for the markdown, assign the desired Season to the Markdown.
Assign Season to Subsidiary
You can change the season that is assigned to a subsidiary by editing the subsidiary record.
Add/Edit Subsidiaries
DevTrack ID #15063
This release includes support for adding and editing Subsidiaries. Previously, subsidiaries could only be added or edited in Retail Pro 9. To add/edit subsidiaries, select Node Preferences > Node Selection. Click the New Subsidiary button.
In the dialog, the next sequential number is entered. You can change the number, if necessary. Enter a name and select the Active checkbox. Select a Base Currency, Country, Season and Retail Calendar. Save the changes.
Add New Subsidiary:

A prompt asks if you want to activate the new subsidiary. Only active subsidiaries can be used for creating transactions.

Another prompt asks if you want to model this subsidiary on an existing subsidiary. If you click Yes, the Model Subsidiary dialog is displayed, enabling you to select which settings to copy: Inventory, Departments, Vendors and/or Preferences.

Select the desired options and then click Apply.
Model Subsidiary dialog

Add/Edit Stores
DevTrack ID #15064
This release includes the ability to add and edit Store records. Previously, store records could only be added and edited in Retail Pro 9. To add/edit a store record, in Node Preferences > Node Selection, drill down to the desired subsidiary and click the New Store button. When adding/editing a store, enter details for the store in the Store Information dialog. Save the changes. In the Override Global Settings area, you can change global settings for the current store. These global settings are: Subsidiary, Tax Area, Price Level.
Add/Edit Currencies
RP Prism is designed to be used globally, with almost any currency. You can now add and edit currencies (including exchange rates and denominations) in RP Prism. Previously, currencies previously could only be defined in Retail Pro 9 and copied to Prism during initialization.
- Add the new currency in Preferences & Settings > Global Preferences > Currency > General.
- Add the denominations in Preferences & Settings > Global Preferences > Currency > General.
- Enter Exchange Rates for currencies in Preferences & Settings > Global Preferences > Currency > Exchange Rates.
- Assign a specific currency to individual stores as needed.
To add a new currency, click the New Currency button at the bottom of the currency list. Enter details for the currency. Note: If you want to delete a currency, you must do that in Retail Pro 9 Global Preferences > Currency.
Create New Currency:

Inventory Price Manager - Price Plan Ownership
DevTrack ID #16008
This release includes a new "Price Plan Authority" preference for Price Manager. This preference enables retailers to specify which installation within the Prism enterprise is the owner of a price plan. The owner of a price plan is the installation that can create adjustment memos for a markdown (and reverse those memos, if necessary). A price plan is a set of markdown of prices made with Price Manager that is scheduled to take effect on a certain date. The Price Plan Authority preference helps ensure that adjustment memos are created by the correct installation.
Inventory UI Enhancements
DevTrack ID#16359
Various improvements were made to improve performance searching inventory, listing items, and working with UDF fields. Here is a summary of the changes:
Inventory Search:
- "Specific Search" checkbox is selected by default
- Description 1 is default sort
- Active flag is passed as Boolean (not as 1 or 0)
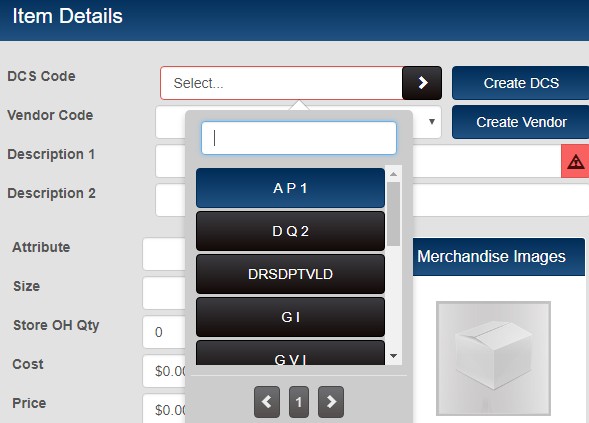
DCS Code assignment for Inventory Items
- DCS Code uses a new drop-down selection with paging and search
Inventory UDF
- Uses a new drop-down with paging and search
- Only UDF fields with defined labels are displayed
- UDF options no longer load until the user clicks the dropdown
- A new button is placed next to the UDF dropdown to toggle between manual and selectable entry
Note: Manually entered UDF options currently are not added to the UDF options table.
DCS Code drop-down selection with search text box. Use the page navigation buttons to move from page to page.
Sample Inventory Item Details user interface:
Inventory UDF Tab
On the Inventory UDF tab, there are the following changes:
- Now uses the new drop down with paging and search
- Only UDF's with labels defined in Retail Pro are displayed
- UDF options no longer load until the user clicks the drop-down
Item Images on Document Designer
DevTrack ID #13682
Beginning with this release, users can include item image fields on document designs. This enables item and style images to be included on the printed receipt. This helps employees at POS identify items for returns. Previously, item (and style) image fields were not available in Document Designer and therefore couldn't be included on printed receipts.
You can select to include the following image fields:
- Merchandise Item Image
- Merchandise Style Image
- Merchandise Dynamic Image
Subsidiary Modeling
The Subsidiary Modeling feature allows you to assign merchandise records and preference settings from one subsidiary to another. The data that can be copied during Subsidiary Modeling includes:
- Inventory: All Inventory records are copied from the model to the target.
- Departments: All Department records are copied from the model to the target.
- Vendors: All vendor records are copied from the model to the target.
- Node Preferences: All node preferences are copied from the model to the target.
To use model subsidiary:
- In the Admin Console, navigate to the Node Preferences area. Click Node Selection on the menu.
- Find the Subsidiary that will be the target of the operation. This is the subsidiary into which you will copy records. Click the Edit button.
- In the dialog, the Target Subsidiary is hardcoded. Click the Source Subsidiary dropdown and pick the desired subs. Merchandise records will copied from this sub to the Target Sub. If you selected the wrong Target Subsidiary, click Cancel to go back to the list of subs and then find the desired subsdiary and edit it.
- Select the individual merchandise record types you want to copy. Selecting Inventory, automatically selects Department and Vendor, too. Click the Apply button. A confirmation is displayed. Subsidiary Modeling is run as a Scheduled Task, once only. The copy process does not take long, but you can check on the status in the Tech Toolkit Scheduler area.
Model Subsidiary dialog:

Gift Item Promotion Type
DevTrack ID#14450
This release includes a new Gift Item promotion type. The Gift Item promotion type allows a reward item to be automatically added to a transaction once the validation rules are met. This is especially useful for things like vendor-supported gift vouchers. When the gift item promotion is validated, the reward item specified by the promotion is added to the transaction automatically; if subsequently invalidated, the reward item is removed automatically. This feature uses a special "gift voucher tender" that is handled by a custom plugin. The gift voucher tender sets the gift item's discount % to 100, making it a free item.
Serialized Coupons
DevTrack ID#11665
The serialized coupons feature provides retailers with a versatile tool for managing coupons as part of a coupon set.
- A serial coupon is a unique coupon code that can be used at POS and whose status can be tracked
- A coupon set is a batch of serial coupons that can be assigned to promotions for validation or reward
Serial Coupon Features
- Each coupon set can be configured with the following options:
- Allow a coupon to be used once, unlimited times, or a specific count (pre-1.13)
- Generate coupon codes
- Append a prefix to codes for easier verification and reporting
- Generate codes even if no more of the original coupon codes are available
- Set Start/End dates to be a certain number of days after issuance of the coupon
- Ability to generate coupon codes by importing a .csv file
Sample Coupon Set configuration screen:

Prism Scheduler
DevTrack ID #15957, 15335, 15900
The Tech Toolkit Scheduler is a user interface to the Retail Pro PrismSchedulingService. The Prism Scheduling Service is a Windows service that runs in the background and executes tasks defined in Scheduler. Tasks are API processes, technically termed "actions," which perform specific functions. The Scheduler user interface in Tech Toolkit enables users to adjust the timing and other settings of the currently defined tasks. End users cannot add new tasks to Scheduler at this time other than by doing do from Prism, e.g., by creating a new Markdown. The main use for the Scheduler UI in Tech Toolkit, is to provide an easy way for users to adjust the settings of existing scheduled tasks such as time of day to run, interval/how often (daily, every other day), or to turn a task off.
Key Uses of Scheduler UI in Tech Toolkit
- Adjust default settings of tasks to better match business hours, data loads, or other factors
- Check the success or status of specific scheduled tasks
- From time to time, delete once-only tasks that have successfully run
The button to launch the Prism Scheduler is in Tech Toolkit.
Sample Scheduler Task Form

Reload Customization automatically after Failure
DevTrack ID#15190
This release includes a new automatic reload feature for customizations. The proxy has been enhanced with recovery capabilities that will detect when a customization becomes unresponsive. After a notification request to a customization times out, the proxy will detect if the customization is running or not. If the customization is not running, the proxy will reload, reinitialize, connect, and repeat the notification request.
Pass-through Cash Drawer Support
DevTrack ID#15410
Instead of connecting to the workstation via a USB cable, a pass-through cash drawer connects to a receipt printer via a RG-12 telephone line cable. When the workstation updates a receipt, a command (the kick code) is sent to open the cash drawer, the signal passes through the printer and continues on to the connected cash drawer, triggering the drawer to open.
To use a pass-through cash drawer with Prism, you need to enter the correct kick code for Windows-driver receipt printers so that when a receipt is printed, the cash drawer opens automatically. Previously, only OPOS-driver based printers could be used with cash drawers. This enables retailers to use their existing Windows-driver-based hardware with Prism. You can find the kick code by looking in the printer's manual, or by calling the printer's manufacturer.
- Install the printer's drivers and connect the printer to the Prism workstation and to the cash drawer. When using a pass-through cash drawer, the printer is usually connected to the cash drawer via a RJ-12 phone jack that provides power.
- Navigate to Workstation Preferences > HAL for the workstation. Select the Cash Drawers tab.
- Click Add Direct Cash Drawer.
- Enter the Hardware ID, Kick Code and select the Printer. Save the changes. The Printer you added is now displayed in the list.
Print Tags from Option Menu
DevTrack ID#15844
Occasionally Associates will have the need to print a price tag for an item from POS. This can happen if a price tag is missing or damaged too badly to read. Prism users can now access a Print Tags button from the Options menu in the POS area. Previously, price tags could only be printed from the item's record in Prism Inventory. Note: You must first highlight or select the item on the transaction