C# Customization
Note: This topic is also available in PDF: Prism C# Customization Guide
This topic gives an overview of a Prism Proxy customization written in C# called EventViewer.exe. The customization displays information about the REST and RPC calls made by the Prism web client as a user navigates the interface and clicks buttons. You can use the information and concepts in this document as a blueprint for setting up your Visual Studio environment and making a Prism Proxy customization.
Differences between RIL (RP9) Customizations and RP Prism Customizations
There are major differences in how customizations are implemented in RIL and RP Prism. In RIL, you just drop a .dll in the \PrismMgmt\Plugins directory and the customization is available. It's a little different in Prism. In Prism, you must register a customization in the Admin Console. You then assign that customization to the individual lanes (workstations). For local executables, if the customization is running on the same machine as the Proxy, you can have the customization auto-start and auto-stop with the Proxy.
| Use | Description |
|---|---|
| Formula calculations | Replace or supplement formula calculations. A good example of this is tax calculations. Customizations can override all or portions of tax calculations |
| Custom user interface actions | Add custom UI elements, including: side/top menu buttons, text edit controls and checkbox edit controls. |
| Electronic Funds Transfer(EFT) | Methods and events are tailored specifically to meet EFT requirements. |
| Hardware Support | Use the Prism Proxy API to create customizations to support different types of POS hardware, such as line display, printers and cash drawers. The Prism Proxy is software that sits between the web client and Prism server. The Proxy facilitates communication between web clients, the server, and POS hardware devices. |
Visual Studio Setup
Step 1: Install Microsoft Visual Studio 2017 with required ".NET Environment". Choose the ".NET desktop development" feature set or workload while installing the .Net components - This is a required component to build "Windows Forms Application".
Refer to Microsoft Installation documentation, https://docs.microsoft.com/en-us/visualstudio/install/install-visual-studio.
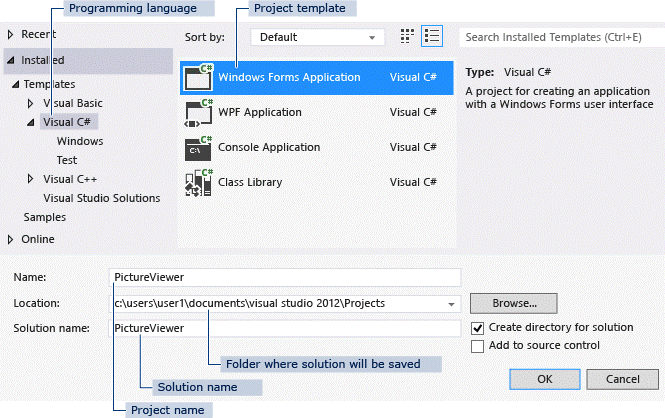
Step 2: Create a new project using the Windows Forms Application template in the New Project dialog box. The Event Viewer customization helps to capture Prism client requests i.e., API calls either to/from the server on specific resources that are supported by the proxy customization interface. All those requests are shown in a tabular format using the Windows Forms user interface.
For overview and info about how to build a Windows Form application documentation, please refer Microsoft Documentation:
https://docs.microsoft.com/en-us/visualstudio/ide/step-1-create-a-windows-forms-application-project,
https://docs.microsoft.com/en-us/dotnet/framework/winforms/windows-forms-overview
Step 3: Add required dependencies to the project using "Manage NuGet Packages".

Sample Customization - EventViewer.exe
The EventViewer.exe is a simple customization that provides a UI for viewing the REST calls made by Prism. You can see the payload included in the request/response. This can be used during troubleshooting to identify any problems with the requests/responses between web clients and the Prism server.
Sample Prism customization code files:
Dependencies
In this EventViewer.exe sample plugin, we added the following dependencies:
log4Net: Handles logging. For logging setup, please refer these links:
NetMQ (native C# implementation of ZeroMQ for .NET): NetMQ is used to create a socket of type response on the server, binds it to specified port (e.g. 32000) and then waits for messages. Please refer this link to learn more about the NetMQ messaging library: https://netmq.readthedocs.io/en/latest/
Below is a sample portion of the EventViewer.exe program.
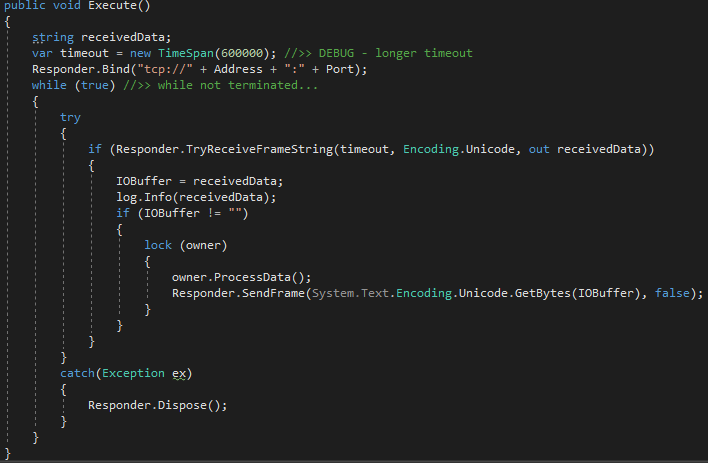
Here is some more sample code from the EventViewer.exe program.

The Subscription List is set up to listen on specific resources which includes: Name of the request/response; Direction of the traffic; Request Type Flag (Get/Post/Put/Delete); Resource (sub resources are separated with slash) and Message Pattern (request/reply).

Build the Customization
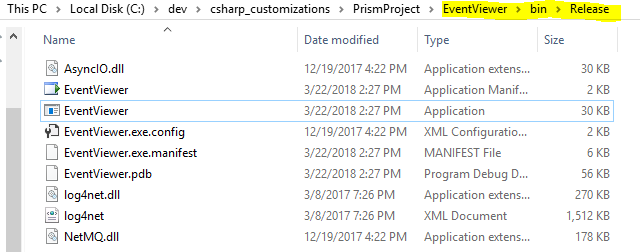
The details of each customization will be different, depending on the intended use of the program. When you have finished coding and are ready to test the customization on Prism, build the .NET application in Release mode. The Release build holds all the application files along with dependencies. This Release Build will be the customization file that is installed on Prism workstations. Locate the "Release" folder under the Project root directory. Copy the Release build to workstations and integrate with the Prism application by registering the customization in Admin Console > Customizations.

Register Customization in Prism
Go to Admin Console > Customizations. Click Add New Customization. Enter info in the fields and save.
Customization Fields
| Field | Description |
|---|---|
| Name | Enter the name of the customization. Must be a unique name. For example, you can concatenate developer name and developer ID at beginning of the customization name to create a customization namespace |
| Version | Enter the version number of the customization. Used to trigger automatic updates |
| Developer ID | Enter the developer ID of the developer who created the customization. Note: Contact Retail Pro for a Developer ID if you don't have one yet |
| Customization | Enter customization ID. Allows you to leverage licensing info for the customization |
| Control Address | Enter the IP Address of the controller for the customization. |
| Control Port | Enter the port number that will be used for the customization to communicate with RP Prism |
| Manifest File Location | Enter the full path to the manifest file for the customization |
| Selection Location | Select where the customization will operate: Undefined, Remote, or Local |
| Configuration Data | This area enables you to define preferences (using JSON file, etc.) for a given store or a given workstation. |
| Auto Start; Auto Deploy/Update; Auto Stop; Required | These options are only available for local customizations, meaning those that run on the same machine as the Proxy |
Add the customization in the workstation record
Drill down to the workstation record. Select HAL Settings and select your workstation from the dropdown.
Add Customization to Proxy
This step will need to be repeated for each proxy that will use the customization.
- Drill down to the workstation level. Click the Edit button.
- Click the HAL Settings tab
- Select the workstation from the HAL dropdown.
- Click the Customizations tab.
- Click Add Customization.
- Enter configuration information and save.
Run the Plugin
After you register the resources, all the traffic data on those resources are received on the specified port and are displayed using Windows Forms Data Grid view. Select an event and the lower pane displays the request and response payloads for the event.