Jan 9, 2026 | Retail Pro Prism
Best Practices for Retail Pro Prism WebClient Customizations
Best Practices for Retail Pro Prism WebClient Customizations
Retail Pro Prism is a highly flexible POS that can be customized both in look and feel of the user interface to match desired aesthetic or workflow needs. This can be accomplished by creating custom html files, customer.css, images, locale files, and even customizations.html files. Listed below are best practices to follow when creating and managing custom files.
Use the customizations folder as your custom "Mini-WebClient"
Beginning in Retail Pro Prism 1.11, Retail Pro International introduced the use of the Customizations folder to save custom html files.
Using this approach, you can easily create and maintain custom html files, customer.css, images, locale files and even customizations.html files.
Within the Customizations folder, you can:
- Create custom folders to reflect what is available in the default WebClient folder, as explained in the User Guide article, "Retail Pro Prism Custom HTML Files." (https://my.retailpro.com/documentation/?bookid=1&documentid=292&chapterid=16)
- Use any file with the same name and directory structure as in the default WebClient
Note: When a new version of Retail Pro Prism is installed, these files will not be overwritten or replaced with the default files. Therefore, any file in the \customizations folder with the same directory structure and file name as the RP Prism default WebClient will be served in lieu of the default file.
Example
The two screenshots below show a sample directory structure that can be created under the customizations folder.


Making layout changes
To make a layout change, always follow this process:
- Determine whether the changes can be achieved by CSS.
- If the changes cannot be achieved by CSS, create a custom HTML file in customizations folder.
- If options 1 or 2 are insufficient, create an extended controller. Learn more about extended controllers here. (https://my.retailpro.com/i/rptv/Video.php?sId=215&vId=2124)
- If the requirements are not achieved by the steps 1 - 3, get help in the RPro Talk forums (https://rprotalk.retailpro.com/).
Tips
- Using the incognito window on Chrome lets you test layout changes or run scripts and HTML files without needing to clear the cache and history every time.
- You can also disable cache in DevTools on the Network Tab.

Finding the appropriate default HTML file
To find the HTML file needed for customization, complete the following steps:
- Inspect a particular element by right clicking on the element and selecting Inspect Element.
- Search for unique properties like ‘id', ‘event-name' tags in Visual Studio Code.
- Search for the ‘data-translate' value in Visual Studio Code if no unique properties exist.
Example
Imagine that you want to modify the Voucher general details file. On inspecting the element, you see that there are no unique properties. However, Freight Amount has a ‘data-translate' value. Copy the value and search for it in Visual Studio Code.


Track changes with comments
Make it a habit to add descriptive comments to the changes you made in the customizations folder files. This helps easily track changes when comparing files with default files after installing a newer version of RP Prism.


Compare modified and default files
If you use default files as custom files in your customizations folder, always compare these with newly installed RP Prism default files to find changes.
Example
Imagine you are using RP Prism 1.13 and edited a default file named ‘nav-landing-partial.htm' in your customizations folder. You then installed RP Prism 1.14.5, which has updates and new features not included in RP Prism 1.13.
When you run RP Prism 1.14.5, the RP Prism 1.13 file in your customizations folder will still be used instead of the default file, so you will not see these updates and new features.
Visual Studio Code
You can use Visual Studio Code text editor to compare the files.
To do so, right click on the files you would like to compare and select from the two options highlighted in the screenshot below.

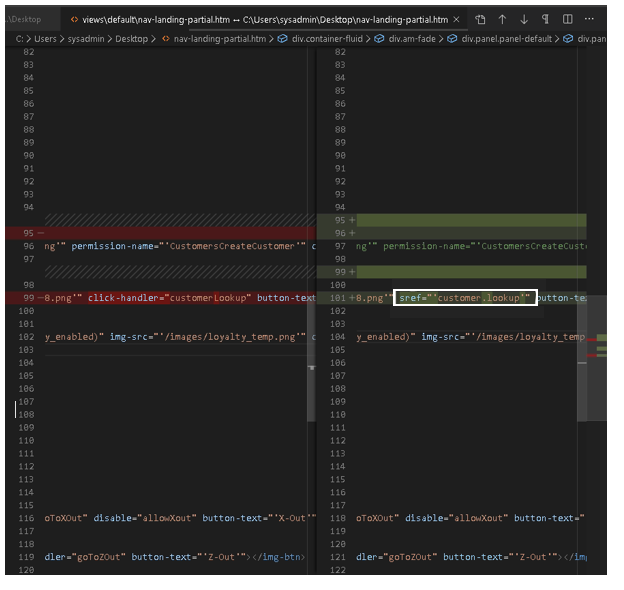
Below is a screenshot of two versions of the same file. The HTML code in the white box shows the change made in RP 1.14.5.