Install Prism HQ Server
This section has information about installing the Prism HQ server. The HQ server has the role of root authority and should be the first server on which Prism is installed. After the HQ server is installed and initialized with data, install Prism on point-of-authority (POA) servers and then store servers..
Install Prism at HQ
1. Run Windows Updates and reboot the machine.
2. Navigate to the location of the Prism install files on your computer (download from the Retail Pro web site or obtain them from a Retail Pro Business Partner). Double-click the Autorun.exe file.
3. The autoscreen.exe menu has buttons for installing individual Prism components. Depending on your configuration and database type, not all components may be required; therefore each component must be installed separately. A full installation of Prism requires an Apache web server, Prism Server and Prism Proxy. Document Designer is optional.
Autorun.exe for installing Prism components:

Prism components
| Component | Description |
|---|---|
| Apache | RP Prism uses an Apache web server. Install Apache before installing the RP Prism server. From time to time, the version of the Apache web server used by Prism requires upgrading. Before upgrading to the new version, you must uninstall the older version of Apache. When uninstalling Apache, make sure to remove any registry keys associated with the old version. |
| Prism Server |
Two versions of the Prism server are currently available: Oracle and MySQL. The Prism server is the data repository used by web clients. The instructions in this topic refer to using the Oracle database option for the Prism server. For information about using the MySQL option, click here. |
| Prism Proxy |
The Prism Proxy enables a Prism web client to communicate with printers, cash drawers and other hardware devices that are on a workstation connected to a Prism server. You should always launch RP Prism via the Proxy. You can install one proxy, or multiple proxies. The Multi Proxy allows different web clients to use different hardware configurations when connecting to a workstation with the Proxy installed. Consider a workstation that has a line display and a Genius CED. One web client can be configured to use the line display (e.g. on port 8080); another web client can be configured to use the Genius CED on port 8081. |
| Document Designer | The Prism Document Designer enables users to edit the default Prism document designs used when printing documents. |
| Technician's Toolkit | The toolkit is installed automatically when you install the Prism server, so most installations won't need to run this installer. This install option enables you to install the toolkit on a Proxy only machine. |
Install Apache
On the Autorun.exe menu, click the Apache 2.4.43 button. You can accept the defaults. During the install, users must enter an email address; however, it does not have to be a valid email address.
Install Prism Server
On the Autorun.exe menu, click the Prism Server button.
On the first screen, click Next >.

Select "I accept the license agreement" and click Next.

When installing the Prism server, you must enter a valid Client ID and password. Click Validate. Upon successful validation, the Next button is enabled. Click Next.

Enter the Fully-Qualified Domain Name (FQDN) or IP Address of the server. Leave the port at 80.

When installing the Prism server, you are prompted to select the type of server to install.

- Oracle: The default choice is Oracle.
- MySQL: Select the MySQL option if you will be using a MySQL database with this Prism server.
In the Server Name field, enter the FQDN of the server machine. The SSL Port is set to 80. This means that Prism will use HTTP (not HTTPS). (If you have SSL certificates, change the SSL Port to 443 and install the certificates later using the Tech Toolkit SSL Manager.)
The next screen asks if you have a server identity file.
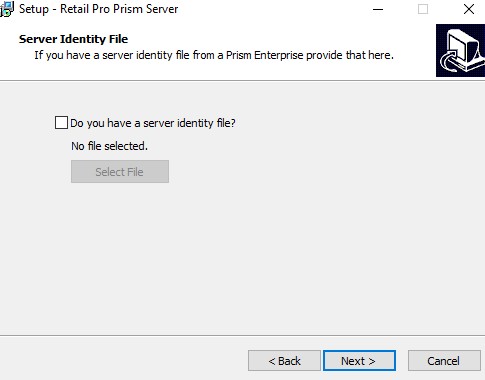
A server identify file is a file that saves certain key information needed to reinstall Prism. Unless this is a reinstall, you can leave the box unchecked and click Next. [Note: You will generate a server identity file later in the install process that can be used if you ever need to reinstall Prism.] Follow the on-screen prompts to complete the rest of the Prism Server install.

When the installation nears completion, you are prompted to select a language.

Next, choose a region for regional settings.

Click Finish when done. You must restart your computer to complete the installation.

Step 3 - Install Prism Proxy
When the Prism Server installation finishes, install the Prism Proxy.

For effective communication between web clients and the Proxy, the Proxy should point at a server on the local network.

After entering the server information, you can accept the defaults, unless you are installing multiple Proxies. If you are installing multiple Proxies, enter the number of proxies you want to run. Click Next.
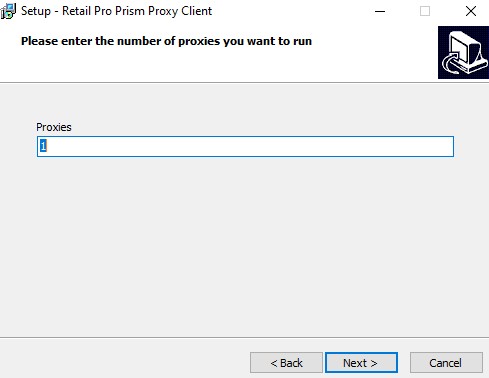
Enter a port number for each Proxy. The Proxy runs on port 8080 by default. If you selected to run multiple proxies, a different port number is used by each proxy. By default, the port numbers for multiple proxies are assigned the next sequential port number (e.g. 8081, 8082, 8083). Click Next.

Make sure you select the option to install a desktop icon. Click Next.

Configure Installation Defaults at HQ
Launch Prism using the Proxy shortcut on the desktop. (Windows 10 users should use the right-click "Run as administrator" option) Log in using the default sysadmin/sysadmin credentials.
Navigate to Admin Console > Installation Defaults. Change the Ctrl No and Controller Name to the desired values.

Multi-Subsidiary Installations
In a multi-subsidiary environment, first install the server that you want to be the "root authority" for the enterprise. For example, first install Sub 1 as a standalone, making it the root authority. After Sub 1 is installed, install the server for other subsidiaries. These other subsidiary servers will point to the root authority as their POA. Typically, all the non-root subsidiary servers will initialize with data from the same Oracle server as the root authority. The individual stores at each subsidiary can point to their own subsidiary server as the POA.
Installation Notes
Install Apache Notes
- When applying certain configuration changes (e.g. turning on logging), users are required to stop the Apache service and then start it again (aka "bounce" the service). Please note that choosing the "Restart" option is not sufficient. Users must select the "Stop" option, wait for the service to stop, and then select the "Start" option.
- From time to time, the version of the Apache web server used by Prism requires upgrading. Before upgrading to the new version, you must uninstall the older version of Apache. When uninstalling Apache, make sure to remove any registry keys associated with the old version.
Prism Proxy Notes
The Prism Proxy enables a Prism web client to communicate with printers, cash drawers and other hardware devices that are on a workstation connected to a Prism server. You should always launch Prism via the Proxy.
The Multi Proxy allows different web clients to use different hardware configurations when connecting to a workstation with the Proxy installed. Consider a workstation that has a line display and a Genius CED. One web client can be configured to use the line display (e.g. on port 8080); another web client can be configured to use the Genius CED on port 8081.
The Prism Proxy install program checks if you have Visual C++ installed. If not installed, the program will display a prompt to install Visual C++. Click "Yes" to install if prompted.
Document Designer Notes
Prism Document Designer provides retailers with an easy way to modify the default receipt and X/Z-Out reports. For information about using Document Designer, see the Prism Document Designer document.
Failed/Stopped Initializations
Initialization can take a long time for larger databases and can sometimes fail to complete successfully. If an initialization fails or is stopped for whatever reason:
Create a new Sender profile that starts from the resource after the last COMPLETED resource. For example, if the initialization was in the middle of the Inventory resource when the failure occurred, the new Sender profile should include Inventory and the rest of the resources to the bottom of the list. Run initialization again using the new Sender profile.
When you create a new Sender profile and restart, it may take a while to process the first resource (the resource that was being initialized when the failure occurred). This is because the program must do a slower UPDATE operation on each of the resource's records that are already in the tables. Once the program finishes the updates and reaches the unprocessed records for the resource, it switches to the much faster INSERT operation. There currently is no way to restart a failed/stopped initialization from the specific point of failure. The entire resource in which the failure occurred must be sent again.
Factors that Affect Initialization Times
- CPU Cores and Memory: Minimum of four CPU cores and 8GB of RAM. The more CPU cores and memory available, the better initialization performance will be, especially when used in conjunction with Server Mode.
- Server Mode: Server mode enables the initialization process to take full advantage of the CPU cores and memory. By default, only half of the CPU cores are used. When using Server Mode, you can use up to N-1 CPU cores, that is, all cores except one. Set the Prism Initialization Receive thread count to four or the number of cores you have allocated if you allocate more than four.
- Type of Record: Resources such as "COMPANY" are simple and can be communicated quickly, even in large numbers. Other resources, such as customer, are more complex and take longer.
- Number of Stores: The number of stores is one of the primary factors influencing the time required for initialization. During initialization, each item's quantity and other information must be sent to every store. As the number of stores increases, the time required for initialization also increases.
- Number of Defined Preference Settings: The more preference settings in RIL Oracle that are used will also increase initialization times.
- Using Promotions: If the Promotions Plugin is used, this will lengthen initialization times.
- First Initialization or Subsequent: The first time you initialize, multiple records are added to the RP Prism tables using a single INSERT statement. The second time you initialize, RP Prism has a record of the first initialization and therefore each record is added using a separate UPDATE statement, increasing initialization times.
- Log Levels: If log levels are set to 3 (verbose), initialization times will increase.
Configure Permissions and Preferences
After initializing the Prism HQ server, you are still logged in as the default sysadmin user. One of your first tasks after installing and initializing Prism should be to configure security permissions, especially for the ADMIN group.
Prism uses a role-based security system in which individual employees are assigned to groups and groups are assigned permissions. Prism includes a set of default groups and you can add your own, if needed. After assigning permissions to groups, log out and then log back in using a valid Prism username/password (e.g. an admin user's account). This ensures that user identity is captured in log files and system records from the very start.
Preferences can be configured at the Corporate, Subsidiary, or Store level. Configure any preferences that you want the Prism HQ server to control.
Next Topic: Install POA or Store Server