Enterprise Connection Manager
Prior Version: Prism 1.14.7 Connection Manager Guide PDF
Current Version: Prism 2.4.1 Connection Manager Guide PDF
This topic has information about the Connection Manager area of the Prism Administration Console and data replication in general for Prism 2.x. (for information about configuring Connection Manager and Joining the Enterprise in 1.14.7 and earlier versions, download the "1.14.7" PDF linked above).
Data replication is the sending/receiving of data between two Prism servers, for example a store sending transactions to the headquarters or the headquarters sending new inventory to a store. Using profiles, you select the specific types of data to send (customers, documents, inventory, etc.) from each server in each direction. Initialization is a specific type of data replication (one-time only) that loads a new server with data from an existing server,
In the Connection Manager area, you can:
- Initialize servers with data from the server's Point of Authority (POA)
- Configure data replication profiles to control what data is exchanged with other servers during Day-to-Day (D2D) replication
- View lists of sent/received data links and reprocess if necessary
This topic includes:
- Background information about the Prism enterprise hierarchy. Understanding how Prism servers are organized makes it easier to understand how data can (and cannot) be replicated among the servers in the enterprise.
- Best practices for replication
- Join the Enterprise information
- Initialization information
- Day-to-Day replication information
- Troubleshooting information
- Resources
About the Prism Enterprise Hierarchy
Prism is deployed in a hierarchy, or tree structure, with a single Root Authority (RA) at the top of the hierarchy (e.g., a server at headquarters). Each server (except the RA) must join the enterprise through a Technician's Toolkit process. This structured hierarchy enforces synchronization of data throughout the enterprise. Enterprises with more than 100 stores may benefit from an intermediate-level POA between the stores and RA.

Enterprise Hierarchy Notes
RA/POA
A single system serves as the Root Authority (RA) (or top-level / ultimate) Point of Authority (POA) for the company's servers.
- Data created at the RA flows downstream to intermediate POAs (if any exist) and stores.
- Data created at stores flows upstream to the POA/RA.
- You cannot send data directly from one store to another; data first must flow upstream to the POA and then downstream to the destination node.
- Certain fields that update quantity and cost are designated as protected fields. These protected fields will update values at a subordinate server when replicated from a POA to a subordinate. When data is replicated from a subordinate to a POA, the protected fields are not updated. See the "Protected Fields" section.
- Create profiles in Prism Connection Manager and link those profiles to connections between servers. The resources included in the profile determine what data is sent from one server to the other end of the connection. You can use different profiles when sending from A to B and from B to A.
Store Level
Data created at the store (e.g., transactions, customers, z-out reports) is replicated upstream to the POA. Store servers are not allowed to send data directly to each other; instead, the data must first flow up the hierarchy to the POA/RA and then back down the hierarchy to the target store.
Joining the Enterprise
All servers other than the RA must join the enterprise. Joining the Enterprise adds the server as a new node in the enterprise hierarchy. As part of the JTE process, the user must identify the server's POA.
Prerequisites for Joining the Enterprise
- The server must have online connectivity to the POA
- The user doing the configuration must know the IP addresses or FQDNs
- The machines must be on the same version number of Prism (e.g., 1.14.7 or 2.0.1; however, different build numbers within the same version are allowed).
- The Prism RA does not join the enterprise. Install and configure the RA first and then join servers as subordinate nodes to the RA.
Enterprise Hierarchy Notes
Root Authority (RA)
- A single root authority system serves as the top-level / ultimate Point of Authority (POA) for the company's servers.
- Data created at the RA flows downstream to POAs (if any exist) and from POAs to stores.
- Data created at stores flows upstream to the POA/RA.
- You cannot send data directly from one store to another; data first must flow upstream to the POA and/or ROOT and then downstream to the destination node.
- By creating "profiles" in Prism Connection Manager and linking those profiles to connections, you control the data that is sent between servers. For example, the store servers will send documents (transactions), customers and other new or changed records upstream to the POA/RA. Likewise, the RA will send things like new items and new vendors downstream to stores.
POA
A server's Point of Authority (POA) is the upstream server in charge of enterprise data (from a store server's point of view). In smaller deployments, the root authority server can serve as the POA for the store servers. Larger deployments (more than 100 stores) may benefit from using an intermediate level of POA servers between the RA and store servers. Data is sent downstream from the RA to the POAs and then from the POAs to the store servers. Data is sent upstream from the stores to the POAs and then from the POAs to the RA.
Store
At the store level, create a profile to communicate daily with the POA. When data is created/edited at the store level, it will b communicated up the enterprise chain to the ROOT. Store servers are not allowed to replicate data directly with each other; instead, the data must first flow up the hierarchy to the POA and ROOT and then back down the hierarchy to the target store.
Joining the Enterprise
- All servers other than the root authority must join-the-enterprise. Joining the Enterprise adds the server as a new node in the enterprise hierarchy. As part of the JTE process, the user must identify the server's POA.
Prerequisites for Joining the Enterprise:
- The server must have online connectivity to the POA
- The user doing the configuration must know the IP addresses or FQDNs
- The machines must be on the same version number of Prism (e.g., 1.14.7 or 2.0.1; however, different build numbers within the same version are allowed).
- The Prism ROOT does not join the enterprise. Install and configure the ROOT first and then join servers as subordinate nodes to the ROOT.
Basic Steps (RA/POA, Store) for JTE, Initialization and Day-to-Day Replication
The basic steps listed here are for Prism 2.x and are explained in more detail in following sections. If you are using Prism 1.14.7 and earlier, refer to PDF linked at the top of this topic. In Prism 1.14.7 and earlier, the UI for joining the enterprise, leaving, and removing servers is different than in 2.x
RA/POA
1. Install the full Prism stack (Apache, Prism Server, Prism Proxy).
2. Launch the Prism Proxy using the desktop shortcut and log in. A prompt explains licensing is inactive and must be activated in Tech Toolkit.
3. Log in to Tech Toolkit as the SYSADMIN user and activate licensing. Allocate sites and seats among the enterprise's controllers. Licensing information will be replicated downstream from the RA to child nodes (POAs and stores).
4. Configure Prism preferences and permissions. These preferences and permissions will propagate to the POAs or store servers that will be installed.
5. Install Prism on the other controllers in the enterprise in a top-down fashion.
Subordinate Server
1. On the new server, install the full Prism stack (Apache, Prism Server, Prism Proxy).
2. At the parent of the new server, navigate to Tech Toolkit and log in.
3. Navigate to the server's Enterprise Management menu and select "Add Subordinate Server to [server]."
4. On the Identity screen, enter the new server's IP information, username and password and select to use SSL certificates or not.
5. On the Verify screen, edit the default Controller number (1) and Controller name (RPS). the controller number must be unique in the enterprise.
6. After the server has successfully joined the enterprise, launch the Prism Proxy and configure the following:
- Admin Console > Connection Manager > Prism Dashboard > Connections: Select the connection to the ROOT or appropriate POA and connect to the server.
- Admin Console > Connection Manager > Prism Dashboard > Profiles: Create a Prism-to-Prism profile. This profile will be used to initialize the new server.
- Admin Console > Connection Manager > Prism Dashboard > Initialization: Initialize the server with data from the ROOT (or appropriate POA) using the Prism-to-Prism profile you created.
- Admin Console > Connection Manager > Prism Dashboard > Profiles: After initialization is complete, create a Prism-to-Prism profile for Day-to-Day replication of data from the POA back to the ROOT. Create any additional profiles that will be needed for Day-to-Day replication and link the profiles to connections.
Replication Best Practices
- Use a VPN to replicate data. RabbitMQ sends messages in plain text, so using a VPN is recommended.
- Install Prism servers from the top down, starting with the RA. Next, install child POAs (if required), join them to the enterprise and initialize with data from the RA. Install store servers last, join each to the enterprise and initialize with data from the RA/POA.
- To initialize a node, the node must be on the same Prism version as the POA.
- Edit the default Controller Name and Controller No of POA and store servers in Tech Toolkit when adding the server. The Controller No must be unique.
- To access or edit a node, the server must be up and running.
- To send data from a server, create a profile and link it to the appropriate connection in the appropriate direction.
- Nodes can modify the controller data for themselves and any subordinate nodes (in Tech Toolkit).
- Any node other than the RA can leave the enterprise; a superior node can remove a subordinate node that is offline via the "Remove [Server]" option in Tech Toolkit.
- At the RA, create separate profiles for each subsidiary to prevent each subsidiary from getting overwhelmed with data from the other subsidiaries (if the data from other subsidiaries is not needed).
- Avoid generating unneeded traffic by being careful about what data is replicated and where it is sent. For example, if you turn on replication of all resources at every location, it could cause the replication message queues to back up and prevent data from being delivered in a timely manner.
- Stores under the same POA cannot send documents to each other without first going through the POA.
- For effective communication between web clients and the Proxy, the Proxy should point at a server on the local network. This enables the proxy to fulfill its primary purpose, which is enabling web clients in the POS lanes to communicate with printers and other POS hardware. To change the server to which the Proxy points, first uninstall the Proxy and then reinstall the Proxy, pointing to the desired local server.
Navigating Connection Manager
Access Connection Manager
Click the Retail Pro button in the lower-right corner and select Administration Console.
Click the Connection Manager link near the bottom of the menu on the left side of the screen.
The Connection Manager area of the Admin Console provides an interface for working with
Connections, Profiles, Day-to-Day replication and Initialization.
The Connection Manager area is divided into a set of dashboards. Select the appropriate dashboard for the task you want to accomplish:
| Dashboard | Description |
|---|---|
| Prism Dashboard | Work with Prism-to-Prism connections, profiles and initializations |
| Custom Dashboard | Work with custom connections to external systems |
Prism Dashboard
The Prism Dashboard is divided into the following tabs:
| Tab | Description |
|---|---|
| Connections | Select the Connections tab to add, edit or remove connections to other Prism servers. |
| Profiles | Select the Profiles tab to add, edit or delete Prism-to-Prism profiles. |
| Day to Day | Select this tab to display the results of Day-to-Day replication. For each job, you can drill-down to view failure/success of individual resources and records. |
| Initializations | Select the Initializations tab to start Prism-to-Prism initialization. |
Custom Dashboard
The Custom Dashboard is for custom connection activity (e.g. a Prism customization). You can use the Custom Dashboard to create custom profiles and view results of Day-to-Day replication to and from a custom connection.
Notes
- Status reporting is for messages on the inbound side only.
- Custom connections are not replicated to other systems.
- Connection tab will only contain the Prism Connection information.
- Profiles Tab contains Sender profiles defined on the Prism side; in other words, sending data From Prism to another system and from another Prism system to this system.
Initialization, JTE and D2D Replication
About Initialization
Prism 2.0 (or later) cannot be initialized from legacy versions of Retail Pro (RP9, RIL, RP8). Initializing Prism 2.0 (or later) requires a "Prism-to-Prism" profile and a connection to another Prism 2.0 (or later) system.
Initialization loads a new Prism server with data from a ROOT or POA server. Initialization is a one-time process. The amount of time required to initialize a server will depend on the amount of data in the source database, especially the size of inventory and customers. The larger the data set, the more time is required. Please set aside enough time for initialization to complete.
Initialize servers in the proper order. For example, initialize POA servers with data from the RA and then initialize store servers with data from the appropriate POA.
Delete Batch
If you need to delete an initialization, make sure that the initialization message queue has finished processing and then click the Delete button. If you delete an initialization while it is still processing, some messages will be stuck in the queue. A confirmation is displayed. Click Yes.
Failed/Stopped Initializations
Initialization can take a long time for larger databases and can sometimes fail to complete successfully. If an initialization fails or is stopped for whatever reason:
Create a new Sender profile that starts from the resource after the last COMPLETED resource. For example, if the initialization was in the middle of the Inventory resource when the failure occurred, the new Sender profile should include Inventory and the rest of the resources to the bottom of the list. Run initialization again using the new Sender profile.
When you create a new Sender profile and restart, it may take a while to process the first resource (the resource that was being initialized when the failure occurred). This is because the program must do a slower UPDATE operation on each of the resource's records that are already in the tables. Once the program finishes the updates and reaches the unprocessed records for the resource, it switches to the much faster INSERT operation. There currently is no way to restart a failed/stopped initialization from the specific point of failure. The entire resource in which the failure occurred must be sent again.
Join the Enterprise
Join the Enterprise refers to the process of adding a new server to the existing enterprise hierarchy. All servers except for the ROOT server must join the enterprise before initialization. The server being added must have online connectivity to the POA to manage enterprise data or use enterprise features and the user doing the setup must know the IP Address, FQDN or hostname information for servers. The JTE process creates a TCP/IP connection between the server and its POA, copies core resources to the new server and adds the server as a new node to an enterprise hierarchy. As part of the JTE process, the user must identify the new server's POA.
Requirements
- The server must have online connectivity to the POA
- The user doing the configuration must know the IP addresses or FQDNs.
- To join the enterprise, the machine joining and its POA must be on the same version number of Prism (e.g., 1.14.7 or 2.0.1; however, different build numbers within the same version are allowed).
1. At the ROOT server machine, launch. To access Tech Toolkit, enter the following in the browser address bar:
A list of prism servers is displayed on the left side of the screen. If this is the first POA server and it is yet to join the enterprise, only the ROOT's own server will be listed.
Highlight the server and click the menu icon. Select Add Subordinate Server to [server name].

2. On the Identity screen, enter the new server Address, username and password and select if you will use SSL or not..
Click the arrow button to proceed.

3. On the Verify screen, edit the default controller number (default=1) and Controller name (default=RPS). the controller number.
Click the arrow button to proceed.
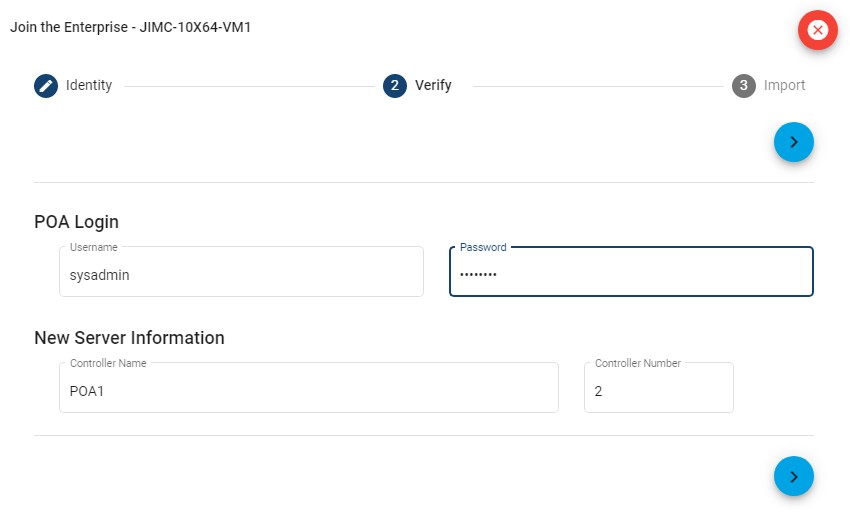
4. When you click the arrow button, the JTE process starts. As part of the JTE process, core resources are imported. The core resources are certain basic resources that are required for initialization. When the initialization of Core Resources is finished, click the checkmark button to finish.

The server you added is now listed in the menu. The new server's listing is indented to show that is located under the ROOT server in the enterprise hierarchy.

After a server has joined the enterprise, it can be initialized with data from its POA.
Confirm the connection has been established by going into Connection Manager at each side of the connection.
Server Menu Layout
The left pane of the TTK System panel shows the servers that are part of the enterprise hierarchy (as well as providing access to the menu for adding servers). The UI elements in the left pane area provide information to the user about the enterprise hierarchy and the servers within it.

Refer to the following table for information about the UI elements in the server list.
| Element | Notes |
|---|---|
 |
The indentation level indicates the server's position in the enterprise hierarchy. At the top and aligned left is the Root Authority (RA) server. Next, an intermediate POA is indented slightly. Below the POA is a store server, indented further right. |
 |
Indicates the server is currently joined to the enterprise and online. If the server is joined but offline, the icon color changes to red. |
 |
Indicates the current user is connected to the server. If the current user is not connected to the server, the icon color changes to red. |
 |
Controller No and Controller Name. In this example, the Controller No is "1" and the Controller Name is "RA." |
 |
Filter the list by typing all or part of the Controller Name. |
| Click the menu icon to display a menu for adding servers, etc. |
Process for JTE when the new server is using a port different than 80/443
When joining a server to the enterprise ("Add subordinate server to
You only have to include the port number if it is a non-standard port
When POA is using port 81 or any port that is not 80 or 443
In the case where the POA is using port 81, the user does not have to do anything as far as appending a port# to the POA server name. The UI already knows the port nbr from the controller.address column and will and will pass the port# 81 in a new property in the JTE action payload. So for user, there is no change when POA is using 81, 82, etc.
Day-to-Day Replication
Day-to-Day (D2D) Replication refers to the sending of data on a regular basis between servers. Unlike initialization, which is typically a one-time operation that sends all available data downstream, Day-to-Day replication occurs on a regular basis, in each direction, and sends only the needed subset of data resources.
D2D replication is carried out by creating one or more profiles that include the desired resources and then linking each profile to the correct connection. When creating profiles for D2D, you select the specific data types needed by the receiving location. This reduces overhead and replication times. Resources that are unlikely to change, like Departments or Vendors, can be excluded, or sent only occasionally. You can use the Advanced Filters feature to apply fine-grained control over the specific records that are replicated.
When a server joins the enterprise, Prism performs a type of mini-initialization and copies a group of resources known as the core resources from the POA to the subordinate system. The core resources are resources that are required for initialization to take place. As a result, when you go into the Profiles area on the Prism Dashboard, you will see a Core Resources profile already exists. The core resources profile is read-only and by default is not included in Day-to-Day replication.
Prism Dashboard - Day to Day Tab
The Day-to-Day tab is split into two sub-tabs: Completed and Pending.
The Completed tab displays a list of the day-to-day replication records for the server. For each resource, you can see the number of records sent, received, and the number of failed records. When you drill down, it shows the messages that have been completed (i.e. put on the message bus).
The Pending tab shows messages that are in the process of being put on the message bus.
If you click a connection (server), it shows summation information of all pending messages in the queue for that server that are Pending and IN Process for delivery to the bus. You can select a server to drill down to the list of resources sent. With a resource selected, you can then drill down to view individual SIDs.
| Element | Description |
|---|---|
 |
Records that have been sent to this server. Click the link to display the list. |
 |
Records that have been sent from this server. Click the link to display a list of the records sent from this server. |
| Errors. Click the link to display the list. | |
 |
When several servers are available, you can filter the list. Type the name of the machine. Click the icon to filter for only servers with errors. |
 |
Click the link to refresh the server list. |
The data in the Identifier and Status columns is a link. The Date is the date of the initialization, not the date the record was created or updated.
If you click in the Identifier link it will take you directly to view the data which was sent. This view will show the last modified date/time for the record.
If you click on the Status link it will simply show the message in the status line. This is useful if there is a long message which cannot be seen completely within the width of the status column.
Sample Day to Day Replication process flow:

Connections
To replicate data between two Prism servers, the servers must establish a TCP/IP connection. Data is replicated according to the instructions specified in the profile assigned to the connection. Each end of the connection can use a different profile when replicating data to the other end of the connection.
How do servers establish a connection?
When adding a server to the enterprise, the user must enter the IP Address or FQDN of the server's POA. The JTE process creates a connection between the server and its POA and copies core resources to the new server.
Linking Profiles to Connections
Connections are listed on the Connections tab of the Prism dashboard. If the Connected Only checkbox is selected, only connections to servers that are up and have a working connection are displayed in the list. To view the profiles associated with a connection, click the connection. The profiles involving that connection (in each direction) are displayed. For data to be sent via a connection, the Linked checkbox must be selected. Selecting the Linked checkbox links the profile to the connection. If you want to stop sending data, clear the Linked checkbox. Note: More than one profile can be linked to a connection in each direction.
Connection Fields
| Field | Description |
|---|---|
| Connected | If selected, indicates the connection is established and currently connected. |
| Active | If selected, indicates the connection is active and available for use. |
| Remote Address | The IP address of the other side of the connection. |
| Remote Description | A description of the other side of the connection. By default, displays the IP address of the server on the other side of the connection, but can be edited. |
| Local Address | The IP address of the user's server. |
| Local Description | A description of the local machine's part of the connection. |
Prism Dashboard - Connections tab
The Connections tab displays the server's connections to other servers. The Remote Description column lists the individual Prism servers installed. The Remote Address column lists the FQDN or IP Address of the machine. You can filter the list by typing a remote name or number into the Filter text field. Each connection must have a profile assigned on both the Send/Receive sides. You can select the Connected Only checkbox to view only servers that are currently connected. Click the Show Un-Linked link to display unlinked profiles.
Filter by Remote Description
You can type the name of a Remote connection in the text box to automatically filter the list of connections. This is especially useful when there is a long list of connections.
Display Connected Only
By default, only connections for connected installations are displayed. If you clear the checkbox, any unconnected installations are displayed, too.
Creating Connections to other (non-POA) Machines
There is no restriction as to the connections you can create. If you have credentials to another system, you can create a connection to it. At a store server, the connection to the POA is all you need to replicate data to other systems in the enterprise.
Profiles
A profile specifies the resources that will be replicated from one end of a connection to another.
| Profile Type | Description |
|---|---|
| Prism to Prism | For sending data from one Prism server to another Prism server. Available on the Prism dashboard |
To replicate data, you must link a profile to a connection. Only linked profiles are used for replicating data. If a connection does not have a profile linked for one or both directions, data will not be sent in the unlinked directions. You can define one profile that specifies the data that is sent from Store 001 to its POA, and a different profile for data sent in the opposite direction, or you can reuse the same profile. You can define as many profiles as needed. The important thing is that you link a profile to each side of the connection.
You can specify which subsidiaries are included in Profiles. You can select any or all Subs. If you select All Subs, then all Subs that currently exist will be selected, AND ANY SUBS ADDED IN THE FUTURE. Selecting this option helps ensure that any new subs added to the company are included when replicating data using the profile. Keep in mind that when this option is selected, any new subs will be added automatically. If this is a concern, then you can select the individual subsidiaries.
You must add the profiles you want to use for initialization and the profiles you want to use for day-to-day.
It is important to select the correct resources for profiles. Make sure you understand the data types you want to replicate so you can include the appropriate resources in the profile.

Copy and Import Profiles
Users can copy an existing profile, create a new profile at the desired location, and import (paste) the contents into the new profile. In early versions of Prism, users had to create profiles at each location. This process was tedious and error-prone. Now, users can copy an existing profile and then import (paste) the contents into a new blank profile at a different location. The only restriction is that the profile being created must be of the same type as the copied profile. This enables a user at a central location to create profiles and then assign the needed profiles to individual locations. This simplifies the profile creation process and helps ensure consistency.
When you display a profile in edit mode, at the bottom of the screen is a Copy button. Click the Copy button to copy the profile's contents to the clipboard.

Next, start a new profile of the same type that was copied. At the bottom of the Create Profile screen is an Import button. The Import button is only available if you are creating a profile of the same type (e.g. Prism-to-Prism).
If you click the Import button, the contents of the copied profile (except the Name) are copied into the new profile.
Enter a Name for the new profile. Make any other needed changes. Save the profile.
Add/edit/delete profiles on Connection Screen
Previously, a technician would use Remote Desktop to go into each individual server to create/edit the profile. This was very time consuming and added significant support costs to Prism deployments.
Profiles can be created, edited and deleted from the connection screen.
| Button | Description |
|---|---|
 |
Create a new profile. This shortcut launches the Create Profile dialog for the type of connection you are working with. |
 |
Select the checkbox to link the profile to the connection. Clear the checkbox to unlink the profile. |
 |
Edit the profile. |
 |
Delete the profile. |
Notes
- When a profile is linked, the delete button is disabled
- Delete and edit functionality are disabled for internal profiles (core resources)
- When creating or editing a profile from the connection screen, the profile type is auto-detected based on the server and connection type
Advanced Filters
Advanced filters allow you to apply logic to return only certain records from the server. The basic syntax for a filter is (ATTRIBUTE,OPERATOR,CRITERIA). The attribute is the name of the attribute to search in, the operator provides the type of comparison, and the criteria is the value to look for.
Sample Advanced Filter:

Available Comparison Operators
The current operators you can use in a filter are as follows:
• EQ - Equal to
• NE - Not equal to
• LT - Less than
• GT - Greater than
• LE - Less than or equal to
• GE - Greater than or equal to
• NL - Is null
• NN - Not Null
• LK - Like
Exceptions
While most of these operators use the pattern mentioned above, there are a couple of exceptions.
• In Inventory, the Active flag is not true false but rather 0, 1. Your filter will therefore need to be modified to say (active,eq,1) not (active,eq,true).
• NL and NN do not accept a criteria element e.g. filter=active,nn
• LK filter uses a as a wildcard. For example s matches all entries starting with s
Resource Filter Examples
Note: The filters are not case- or space-sensitive.
| Example | Description |
|---|---|
| (Active,eq,true) | Send active customers |
| (Active,ne,true) | Send inactive customers |
| (Cost,le,4.50) | Send inventory items with a cost less than or equal to 4.50 |
| (AdjNo,gt,200) | Send adjustment memos with an Adj No value greater than 200. |
Compound Filters
Compound filters can also use AND and OR clauses with parenthesis to establish grouping. e.g. (FirstName,eq,jack)AND(LastName,eq,harkness)
Filtering Documents by Subsidiary
Here's an example of filtering documents by subsidiary for Prism Day-to-Day replication.
- Create a new filter in Connection Manager.
- For the filter, select the Document resource.
- Click the Advanced Filter link.
- Enter a filter for the subsidiary whose documents you want to send. (sbsno,eq,2)
- Click the Back button and then save the profile.

Core Resources
The core resources are resources considered to be core and not necessarily part of the standard day-to-day traffic. Generally they are defined as those resources that would be replicated from the POA to its members, but not necessarily back to the POA from a member. The following are the core resources: Controller, Tenant, Subsidiary, CustomSchema, Transformdesign, Season, TaxArea, PriceLevel, Currency, StoreType, Store
- Core Resources must be selected for Prism Day-to-Day replication
- When creating initialization profiles, the Core resources must be explicitly added if desired
The best and easiest way to correct replication , is to edit your D2D P2P profiles. Add Core Resources, select ALL resources, then uncheck: Controller, Customschema, Store, Subsidiary, Tenant, TransformDesign, Subsidiary, Tenant and Transformdesign. This is because they are already in the un-editable ‘CoreResources' profile.
Core resources replicate in both directions.
You can specify which subsidiaries are included in Profiles. You can select any or all Subs.
If you select All Subs, then all Subs that currently exist will be selected, AND ANY SUBS ADDED IN THE FUTURE. Selecting this option helps ensure that any new subs added to the company are included when replicating data using the profile. Keep in mind that when this option is selected, any new subs will be added automatically. If this is a concern, then you can select the individual subsidiaries.
Pause Day-to-Day Replication
The Connections user interface includes elements that enable users to:
- Pause day-to-day replication for a connection
- Filter connections by description
- Filter connected only servers
- View a server's paused status
These changes help with scenarios like the following:
- A company is rolling out a set of stores. Due to lack of room in the store, the POS workstations are built and initialized in the company warehouse. In between the initialization and when the stores go live, day-to-day messages are generated and remain on the Rabbit MQ buss while the system is shipped to the store.
- A store goes down or loses the Internet connection. In many non-US countries, outages can be lengthy. While the store is down, day-to-day messages are generated.
These scenarios lead to orphaned federated queues and queues bloated with messages, causing issues with RabbitMQ.
Filtering Connections by Description
In the "Filter by Remote Desc" text box, start typing the connection name (defined in each server's Installation Defaults) to dynamically filter the list.
Filtering for Connected Only Servers
Select or clear the Connected Only checkbox to filter the list to include only machines in the enterprise directly connected to the local server.
Sample Admin Console Connection Manager (Connections tab) showing text box to filter connections by description, Connected Only checkbox selected, and the Pause/Resume button showing Not Paused:

Pausing Replication
The third column from the left is labeled Pause/Resume and it has a button in it that the user can click to pause replication to the selected server.
- When the selected server is not paused, the button reads Not Paused.
- When the selected server is paused, the button reads Paused at (Date of pause).
- New records created during time server is paused
- If any items, departments, vendors, documents, customers, or employees are created during the time replication to other servers is PAUSED, those records will not replicate normally after the server is UNPAUSED. Any such items, departments, vendors, documents, customers, and employees created while the connection is paused will need to be edited to replicate; upon editing the records, the records will replicate normally.
Review, Troubleshoot Replication
If any errors occur during initialization, you can correct the problem and then reprocess errors. When it comes to reprocessing errors, you can:
- Reprocess all errors (for entire enterprise or a single connection)
- Reprocess errors for selected resources
- Reprocess a single error
Click a server's link to drill down to the errors for that server.
Sample list of servers with replication errors:

Click the column header to sort the list by the Failed column. This brings the errors to the top of the list.
Sample D2D error list:

Reprocess All Errors (for entire enterprise or single connection)
Clicking the Reprocess Errors button on the main screen opens a modal. The user can click "Reprocess All" to reprocess all errors for all connections or select specific connections and click "Reprocess Selected." (Note: The Reprocess Selected option is disabled if there are no selections and the Reprocess All option is disabled if there are selections.) Reprocessing errors might take a long time depending on the number of connections and errors.
Reprocess Errors for Selected Resources
Go into the resource with the errors. Select the individual elements you want to reprocess and the click the Reprocess Selected button.
Sample details for a resource with errors showing Reprocess Selected button:

Another option is to drill down to the individual error, select it and click Reprocess.
Sample individual error showing Reprocess button:

About the ‘Check Replication Status' Event
Prism 2.5 and later includes monitoring for, and logging of, system events, with the option to send alert messages to specified recipients when a particular event occurs. The Check Replication Status event enables merchants to monitor data replication and be notified about replication problems via alert messages. For example, some merchants have issues with replication where messages are not received (processed) at the destination. This can occur for a number of reasons, but the end result is that the update or document is not received by the subscribers. The Check Replication Status event checks for Day-to-Day replication errors every 15 minutes and logs an event if the error count has increased by 7 or more since the last event was logged. This notifies merchants about problems so they can respond in a timely manner (e.g., by resending data using the Resend Data Tool).
Resend Data Tool in Technician's Toolkit
The Resend Data Tool is now available in Tech Toolkit. This makes it easier to respond quickly to data replication problems.
If Replication, Initialization Fails or is Stopped
If replication services are interrupted (reboot, computer freezes), Day-2-Day replication will resume where it left off. Initialization can take a long time for larger databases and unfortunately, initialization can sometimes fail to complete successfully. If an initialization fails or is stopped for whatever reason, here is what you should do:
Create a new Sender profile that starts from the resource after the last COMPLETED resource. For example, if the initialization was in the middle of the Inventory resource when the failure occurred, the new Sender profile should include Inventory and the rest of the resources to the bottom of the list. Run initialization again using the new Sender profile. When you create a new Sender profile and restart, it may take a while to process the first resource (the resource that was being initialized when the failure occurred). This is because the program must do a slower UPDATE operation on each of the resource's records that are already in the tables. Once the program finishes the updates and reaches the unprocessed records for the resource, it switches to the much faster INSERT operation. There currently is no way to restart a failed/stopped initialization from the specific point of failure. The entire resource in which the failure occurred must be sent again.
Pause/Resume Initialization
You can pause/resume the initialization process. You cannot pause the Sender, but each downstream system that is consuming the resources being sent can be paused and/or resumed.
Cancel or Delete Batch
You can cancel or delete a batch. The buttons to cancel or delete a batch are available on the View Initialization tab. These buttons enable technicians to kill initialization for one or more servers. This saves technicians from having to wait until the entire initialization runs to completion.
- If you cancel an initialization batch, all running initializations will be stopped.
- If you delete an initialization batch, all messages currently in the queue will be lost.
Sent and Received Messages
The Sent Messages and Received Messages area enables you to drill down the replication hierarchy and view replication information by resource or even by individual record. Click a server's link to drill down to view more information. Click the column header to sort the list by the Failed column. This brings the errors to the top of the list.
Next, go into the resource with the errors. Select the individual elements you want to reprocess and then click the Reprocess Selected button.
If you click the link, you can see details about the selected resource.
Adjust Customer History Process for High Volume Locales
If you will be operating Prism in a high-volume environment in which all or most of the customers are defined customers in the database, special configuration is required to ensure that Customer History is processed more quickly than the default setting of once every 15 minutes. In a high-volume environment, when using the default Customer History settings, transactions will accumulate before the next processing. By setting the processing timer to a smaller value, e.g. two minutes or five minutes, customer history will be processed more quickly, preventing the build-up of unprocessed transactions.
Launch Technician's Toolkit. On the top toolbar, click the Scheduler icon.
Navigate to the Schedule Manager area. Locate the Customer History Daily Process.
Right-click in any cell and select Open Form View.
In the displayed Form View, navigate to the Repeat Every (minutes) field. The default setting is 15, which means the process is run every 15 minutes. Change it to a smaller value, such as 2 or 5.
- High Volume POS transactions for CH purposes means transactions with customers that have an account. If half of the transactions are to customers without an account with the store, CH processing ignores those when fetching documents to process - so no impact on memory.
- When setting Repeat Every to a lower number, Days of Run History should be reduced to 2 or 3 so that Prism is not storing needless thousands of run history records.
- These edits can also be made directly in the Scheduled Task grid.
- Default Start & End Times should be tweaked per store business hours. Otherwise CH will run needlessly and create task run records.
Preserve Successful Records setting
By default, the successful records sent during replication are not preserved. This helps keep hard drives from getting filed with the files. However, during troubleshooting and other times, you may want to change this setting so that you can drill down and see individual records. The default value for Preserve Successful Records is False, meaning that successful records are not preserved. Keeping the default value of False is important for customers with large data sets. If set to true, large quantities of unneeded data (sometimes millions of rows) could be preserved.
In TTK > Service Manager, display the Settings screen for the Retail Pro Prism Replication Service (PrismMQService).
1. Edit the PrismMQService.ini file so that the PreserveSuccessRecords setting is set to TRUE.
2. Select the Show Successful Records checkbox.
Sample Settings screen for PrismMQService with Preserve Successful Records setting:

Restart PrismMQ after Deleting Replication Records
The key service involved with replication, PrismMQ, caches records aggressively to improve performance. If the record is in the cache, it is assumed that the record exists and PrismMQ doesn't need to confirm its existence in the database. This is usually not a problem; however, it can become a problem if you have deleted replication-related records (e.g. replication status) from tables while troubleshooting. The record you removed as part of your troubleshooting efforts may still be in the cache. Therefore, you should restart PrismMQ as soon as possible after deleting replication-related records. Restarting PrismMQ will clear the cache.
Invalid Controller Tree
The Prism enterprise hierarchy requires a single ROOT point of authority for the enterprise. The following error can occur when there is ambiguity in the CONTROLLER table over which machine is the ROOT authority. This error message might be displayed when there is a problem during the "join the enterprise" process. If this error occurs, select the proper ROOT authority, and click the check mark. The other controller(s) will be archived. Try joining the enterprise with a new (different) machine.
Sample invalid controller tree error:

Leave the Enterprise
Warning: Extreme caution must be used when leaving/rejoining the enterprise. If a server leaves and then later rejoins the enterprise, the server must rejoin in exactly the same position as it was in before. The Prism controller hierarchy, which provides the way to track all activity within an enterprise, can be easily disrupted by servers leaving and then rejoining the enterprise in a different position. In other words, once the enterprise structure has been set, it shouldn't be rearranged. Therefore, carefully consider the desired server hierarchy before installing servers.
Administrators can leave the enterprise. This sometimes is necessary due to store closings or changes in the corporate hierarchy. Leaving the enterprise will remove records from the POA and local machine. Later, the machine can rejoin the same POA, if desired. This enables retailers to adapt to changing circumstances while maintaining the integrity of the replication hierarchy.
Neither removing or leaving will change the v9 connection. This can be done manually in the Connection manager in AC. Removing a server from the enterprise is intended for the case when a machine is down and will not be brought back online. If a machine will be brought back online then the recommended practice is to bring the machine back online and leave the enterprise.
When a remote leaves the enterprise (or is removed from the enterprise by the POA), care must be taken to avoid errors. We recommend that you disconnect the machine from the network first, and then leave the enterprise at the remote. If the machine is connected to the network, it will try to communicate with the old POA.
Leaving the Enterprise Rules and Notes
The v9 connection is left in place. You must manually remove this connection. If you don't remove the connection, data may continue to be sent from the Prism server to the old POA.
- Unless otherwise noted, all the data from the enterprise remains on both sides of the separation.
- The Controller records for the opposite side of the separation are Archived.
- The Remote Connection records connecting each side are deleted
If a server leaves (or is removed from) the enterprise, the server must be configured for a new POA with which it will communicate. This includes:
- Disconnect the machine from the network first. If the machine is connected to the network, it will try to communicate with the old POA.
- Go into the Prism Technician's Toolkit.
- Select the connection that you want to leave the enterprise.
- Click the Leave the Enterprise button.
- Enter login credentials for this server's POA. Click OK.
- Delete the old POA connection. Add a new connection to the new POA Oracle server.
- Edit the Default Address in the Installation Defaults area of preferences.
Remove Subordinate Server
If a server is forcibly removed (in other words the subordinate is not online for some reason) the proper recovery if the remote system either:
Is brought back up and desires to remain independent of the enterprise (it has no knowledge that it left the enterprise
It is desired to restore the system to the enterprise
(Note: If the system will be offline permanently, no action is needed)
SCENARIO:
1. An enterprise is set up.
2. A subordinate server in the enterprise goes down.
3. At the Root Authority, it is determined that the best course of action is to remove the subordinate (e.g. because the server will be down for an extended time).
ACTIONS:
At the down servers POA, Remove the powered-down Server from the enterprise.
IF DESIRED FOR THAT SYSTEM TO RE-JOIN ENTERPRISE AT A LATER DATE:
At the Removed system, log into TTK, it will show the former enterprise tree (since the system has no knowledge it has been removed from the enterprise)
At the Removed system, log into the subordinate server's former POA (this is required for the next step).
At the Removed system, select the menu icon associated with the local Server (the removed subordinate server) and select Remove. Now the enterprise tree will correctly reflect that this system is not attached to an enterprise.
At the POA which this server will re-join, follow the "Add Former Server" process,
Rejoin the Enterprise
If a server identity file was saved (see previous section), then you can reference the file when reinstalling Prism. Using the Server Identity file ensures that the correct Controller, Subsidiary, Store and Tenant table records can be used.
After reinstalling Prism on the machine using the Server Identity File, launch the Tech Toolkit.
Select the hamburger icon for the desired node and select Re-Join the Enterprise.
Protected Fields
At the ROOT (or POA), certain fields that are important to tracking inventory and customer values can only be modified by documents (cannot be manually edited). This protects the integrity of inventory valuations and customer balances and ensures that the values are not overwritten during Day-to-Day replication. In Prism, we refer to these fields as Protected Fields.
When replicated from a subordinate to a POA DOES NOT OVERWRITE the key fields at the POA.
When replicated from a POA to a subordinate, the files DO OVERWRITE the key fields at the subordinate.
The following tables list the protected fields in inventory and customer records.
Customer table:
| CreditLimit | CreditUsed | StoreCredit |
| FirstSaleDate | LastSaleDate | LastReturnDate |
| LastSaleAmt |
Invn_Sbs_Item table:
| FirstRcvdDate | LastRcvdDate | LastSoldDate |
Invn_Sbs_Price table:
| Price |
Invn_Sbs_Qty table
| Qty | TransferInQty | TransferOutQty |
| SoldQty | RcvdQty | OnOrderedQty |
| ASNInTransitQty | LatOnHandQtyDate | ToInOrderedQty |
| TOInSentQty | ToOutOrderedQty | ToOutSendQty |
| PoOrderedQty | SoOrderedQty | SoSentQty |
Resources
The following table has information about each resource. The "core resources" are only visible if the Core Resources checkbox is selected for the profile.
| Resource | Notes |
|---|---|
| addresstype | The addresstype resource replicates the address types defined in Admin Console > Node Preferences > Data Types. (ADDRESS_TYPE table). |
| adjustment | The adjustment resource replicates adjustment memos (quantity, price, cost). Adjustment memos are typically only sent UPSTREAM, from a store to its POA or from the POA to HQ. Best practice is to not send adjustment memos downstream from HQ to stores |
| allocationpattern | The allocationpattern resource replicates allocation patterns. Allocation patterns specify the relative quantities to be ordered (PO or TO) for each store. The system assigns quantities for individual stores based upon the total order quantity. |
| ammessages | This resource replicates the contents of the AM_MESSAGES table, which contains all messages, both alerts and user-to-user messages. |
| ammonitorevents | This resource replicates the contents of the AM_MONITOR_EVENTS table, which contains an entry for each event. |
| amsystemmonitor | This resource replicates the contents of the AM_SYSTEM_MONITOR table, which lists the events to be monitored. |
| biometrics | Biometrics login information. Two database columns play a key role in biometric login: user_name and empl_name. The Prism RPSODS database EMPLOYEE table includes user_name and empl_name columns. The BIOMETRICS table includes empl_name column.
|
| calendar | The calendar resource replicates the CALENDAR table, which contains the list of calendars. |
| chargeterm | The chargeterm resource replicates the CHARGE_TERM table. Charge terms are defined in the customer record (Payment tab). |
| comment | The comment resource replicates the COMMENTS table. This includes Comment 1, Comment 2 on transactions, PO Instructions, PO Fee Types, Slip Comments, Voucher Comments, Check In/Out and Customer Store Credit. |
| company | The company resource replicates the COMPANY table, which contains the list of companies that can be assigned to customer records. When a new company is entered in a customer record, the company is added to the table. |
| contacttype | The contacttype resource replicates the contact types defined in Admin Console > Node Preferences > Data Types. (CONTACT_TYPE table) |
| controller | The controller resource replicates the CONTROLLER table. This is a core resource. |
| controllerlicense | The controllerlicense resource replicates the CONTROLLER_LICENSE table. This is a core resource. |
| controllerstore | The controllerstore resource replicates the CONTROLLER_STORE table. This is a core resource. |
| country | The country resource replicates the list of countries (COUNTRY table). |
| couponset, couponsetcoupon | The couponset and couponsetcoupon resources replicate the serialzed coupon sets and coupons defined in the Promotions area (COUPON_SET and COUPON_SET_COUPON tables). |
| currency | The currency resource replicates the currencies added or edited in Admin Console > Global Preferences > Currency > General. This is a core resource. |
| customer | Replicates customer information (except UDF, loyalty information, class and store credit, which are handled by separate resources). (CUSTOMER and related tables) An important thing to consider with replication of customer information has to do with the Share Type field in the customer record. The Share Type field in the Customer record controls the subsidiaries and stores where a customer record will be available. The available settings are Not Shared, Local, Global, or Region. If a customer's Share Type field is set to Global, the record will be shared to all stores in all subsidiaries EVEN IF the replication profile uses subsidiary filtering. |
| customerclass | Customer class is way of grouping customers for reporting purposes. |
| customerdocumenthistory | In Prism, certain key data about each transaction and its items is stored as part of the customer record. This data is replicated along with the customer record. If a customer is available at an installation, then the customer history will be available, too, although the full document may not be. If a user wants to view a document that does not exist locally, then the document will have to be viewed at the POA (or the document can be replicated separately). If you want to view a document that does not exist locally, make sure the customerdocumenthistory resource is selected. |
| customerudf | The customerudf resource is used to replicate customer udf fields (CUSTOMER_UDF table). In Prism, define customer udf fields in Admin Console > Node Preferences > Customers > UDF Fields. Note: If there are more than 500 UDF values for a UDF, the data is not replicated. |
| customschema | The customschema resource replicates the CUSTOM_SCHEMA table. This is a core resource. |
| dcs | The dcs resource replicates department information (DCS table). |
| docposflag | The docposflag resource replicates POS flag information defined in Admin Console > Node Preferences > Transactions > POS Flags. (DOC_POS_FLAG and DOC_POS_FLAG_OPTION tables in the Prism DB) |
| document | The document resource replicates transactions (sales, returns, orders). Documents created in Prism BEFORE the profile is linked to the connection ARE NOT replicated. Only documents created AFTER the profile is linked to the connection are replicated. This resource replicates the DOCUMENT and related tables in the Prism DB. |
| documentfeetype | The documentfeetype resource is used to replicate the fee types defined for use at POS. These fee types are defined in Admin Console > Node Preferences > Transactions > Fees/Shipment. DOCUMENT_FEE_TYPE table in Prism DB |
| drawerevent | The drawerevent resource replicates drawer events (DRAWER_EVENT table). The Pop Drawer event is NOT replicated. The Paid In, Paid Out and Cash Drop drawer events ARE replicated. In addition, Z-Out drawer open events are replicated via the drawerevent resource. |
| emailtype | The emailtype resource replicates Email Types defined in Admin Console > Node Preferences > Data Types. (EMAIL_TYPE table in Prism DB) |
| employee | The employee resource replicates employee information (EMPLOYEE table). This is a core resource. |
| employeeudf | The employeeudf resource replicates employee user-defined fields, defined in Admin Console > Node Preferences > Employee > UDF Fields. (EMPLOYEE_UDF and EMPLOYEE_UDF_OPTION fields in Prism DB). Note: If there are more than 500 UDF values for a UDF, the data is not replicated. Having so many UDF values for a single UDF field indicates the field is being used as general data storage rather than as a dictionary-style list as intended. |
| exchangerate | The exchangerate resource replicates exchange rates defined in Admin Console > Global Preferences > Currencies > Exchange Rates. (EXCHANGE_RATE table in Prism DB) |
| fiscaldocument | The fiscaldocument resource replicates fiscal documents (FISCAL_DOCUMENT table) |
| fiscalsequence | The fiscalsequence resource replicates fiscal document sequences (FISCAL_SEQUENCE table) |
| griddata | The griddata resource controls the replication of grid format information (defined in Admin Console > Node Preferences > Grid Formats and stored in GRID_DATA table). Changes to grid formats made at the Corp, Subsidiary, or Store level will replicate with other preferences. Workstation settings will not replicate. Any workstation-specific grid format settings must be made at each individual workstation that needs them. |
| inventory | The inventory resource replicates Inventory information (INVN_SBS_ITEM and related tables). |
| inventorystyle | The inventorystyle resource replicates Inventory style information (INVN_STYLE table). |
| invnlot | The invnlot resource replicates lot number information for inventory items (INVN_SBS_ITEM_LOT, INVN_SBS_ITEM_LOT_QTY tables). |
| invnminmax | The invnminmax resource replicates Min Qty and Max Qty information for inventory items (INVN_SBS_MINMAX and INVN_SBS_MINMAX_QTY tables). |
| invnsbssublocationqty | The invnsbssublocationqty resource replicates sublocation quantities (INVN_SBS_SUBLOCATION_QTY table). Sublocation data and the corresponding resources are spit between the sublocations themselves and their item quantities. At a store, a sublocation can be created or modified, and this will be replicated enterprise wide. But a store's sublocation item quantities are modified by documents. Subsequent stock quantity updates are executed by the documents through replication. Sublocations and their properties are core resources to ensure that the sublocation of a document exists at the document target. Note: The sublocationsegpref resource is part of the "Core" resources and as such it is not displayed in the list of resources. This resource is sent with the other core resources during initialization (or if the profile has the core resources checkbox selected). |
| invnserial | The invnserial resource replicates inventory item serial number information (INVN_SBS_ITEM_SN and INVN_SBS_ITEM_SN_QTY tables). |
| invnudf | The invnudf resource replicates Inventory UDF field information (defined in Admin Console > Node Preferences > Merchandise > UDF Fields). If there are more than 500 UDF values for a UDF, the data is not replicated. Having so many UDF values for a single UDF field indicates the field is being used as general data storage rather than as a dictionary-style list as intended. |
| job | The job resource replicates job titles. You can assign a Job Title on employee records. (JOB table in Prism DB) |
| kitcomponent | The kitcomponent resource replicates kit component item information. Kit components are the individual items that together comprise a kit item (KIT_COMPONENT table). |
| language | The language resource replicates languages added (or changed) in Prism (RPS_LANG table). |
| ltylevel | The ltylevel resource replicates Loyalty Levels defined in Prism POS > Customers > Customer Loyalty area. Loyalty levels are stored in the LTY_LEVEL table. |
| ltylevelprogram | The ltylevelprogram resource replicates loyalty level programs, defined in Prism POS > Customers > Customer Loyalty area. (LTY_LEVEL_PROGRAM table) |
| markdown | Price markdowns are replicated separately from other Inventory information using the MARKDOWN resource and MARKDOWN Adjustments profile. The MARKDOWN resource sends the Markdown list (so basic information about the markdown may be viewed at another location). The MARKDOWN ADJUSTMENTS profile filters for the specific Adjustment memos created by the PPA and sends them to other locations to be processed by the scheduler to perform the price adjustment. Notes
Adjustment memos created by a markdown, when replicated to stores/POA and applied to Inventory through Scheduler, are processed by PrismBackofficeService. This might slow down PrismBackofficeService. For example, a user creates a markdown with 100,000 items and clicks Apply Now. This creates 100 adjustment memos (1000 items per memo) that will be replicated. When the other side of the connection (store) receives the adjustments, 100 scheduled tasks will be automatically created to apply the markdown to Inventory. |
| mediatype | This resource is not currently used in Prism and can be safely omitted from profiles, including initialization. |
| pcppromotion | The pcppromotion resource is responsible for replicating promotions (PCP_PROMOTION and related tables). Add the pcppromotion resource to individual profiles to replicate promotions from one server to another. When you press the Broadcast button, promotions are prepared for replication. Promotions are sent one promotion per message (instead of one large message with all promotions). If the promotion contains a long list of items it will still be a large message, but not as large as before. Also, since promotions are now sent as multiple messages, they can be processed in parallel with multiple day-to-day consumer threads. A field in the PCP_PROMOTION table - PUBLISHED_DATETIME - tracks the date and time when that specific promotion was broadcast. The PUBLISHED_DATETIME is compared to the MODIFIED_DATETIME on the same record and if the MODIFIED_DATETIME is older than the PUBLISHED_DATETIME, the promotion will NOT be sent when you press the Broadcast button. This means that only those promotions edited after the last broadcast will be sent. The Promotions list is created and managed at the headquarters location (or designated central location). The headquarters location then broadcasts the list to stores. Important! When you broadcast promotions, Promotions will be overwritten at the locations that receive the broadcast. The actual promotions that can be used at each individual store will be limited to those promotions assigned to the store itself or to "All Stores." Broadcast Promotions from RA to Stores Currently, any location can broadcast Promotions simply by clicking the Broadcast button on the interface.; however, you should only broadcast Promotions from the RA server down to the child POAs and stores. If stores broadcast promotions back up to the POA, then there is a chance that promotions priority can be duplicated at locations across the enterprise, leading to unexpected results. |
| phonetype | The phonetype resource replicates the Phone Types defined in Admin Console > Node Preferences > Data Types. (PHONE_TYPE table) |
| plugindata | The plugindata resource replicates information about plugins, defined in Admin Console > Customizations. (PLUGIN_DATA table) |
| pricelevel | The pricelevel resource replicates the price levels defined in Admin Console > Node Preferences > Merchandise > Pricing > Price Levels. This is a core resource. (PRICE_LEVEL table) |
| pricerounding | The pricerounding resource replicates price rounding instructions (future release). PRICE_ROUNDING table. |
| printarea | The printarea resource replicates print areas. (PRINT_AREA table) |
| printareavalue | The printareavalue resource replicates the values assigned to print areas. (PRINT_AREA_VALUE table) |
| printertype | The printertype"resource replicates printer types defined in Admin Console > Node Preferences > Hardware > Printer Types. (PRINTER_TYPE and related tables) |
| prismlicensetransmit | The prismlicensetransmit resource replicates Prism licensing information. This is a core resource. (PRISM_LICENSE_TRANSMIT table) |
| puchaseorder | The purchaseorder resource replicates purchase orders. (PO and related tables) |
| purchfeetype | The purchfeetype resource replicates Purchasing fee types defined in Admin Console > Node Preferences > Purchasing > Vouchers > PO/Voucher Fee Types. (PURCH_FEE_TYPE table) |
| purgeresource | The purgeresource resource replicates a list of resources to purge. This is a core resource. |
| reason | The reason resource replicates reasons defined in Admin Console > Node Preferences > System > General for things like discounts. |
| receiving | The receiving resource sends both ASN vouchers and vouchers. Replication of Batch Receiving (Shipping Package Numbers) Shipping package numbers and other batch receiving information replicates as part of the ASN voucher. Special configuration options are available for controlling the replication of ASNs generated from transfer slips. See the section titled "Replication of ASNs generated from Transfer Slips" section of this document. |
| region | The region resource regions created in Admin Console > Global Preferences > Regional Inventory > Corporate Regions. (REGION and REGION_SUBSIDIARY tables) |
| scale | The scale resource replicates grid scale information for Inventory styles. (SCALE and related tables) |
| scalepattern | The scalepattern resource replicates grid scale size/attribute patterns for Inventory styles. (SCALE_PATTERN and SCALE_PATTERN_QTY tables) |
| season | The season resource replicates the seasons defined in Admin Console > Global Preferences > Season. This is a core resource. (SEASON table) |
| shippingmethod | The shippingmethod resource replicates the shipping methods (i.e., carriers like USPS, FEDEX, UPS) defined in Admin Console > Node Preferences > Transactions > Fees/Shipment. (SHIP_METHOD table) |
| store | The store resource replicates store record information. This is a core resource. (STORE table) |
| storetype | The storetype"resource replicates the store types Store types. Stores types are added/edited in the Store record. This is a core resource. (STORE_TYPE table) |
| sublocation | The sublocation resource replication sublocation information. This is a core resource. (SUBLOCATION table) |
| sublocationsegpref | The sublocationsegpref resource replicates information about sublocation segments (i.e., the number and length of sublocation segments). This is a core resource. (SUBLOCATION_SEQ_PREF table) |
| subsidiary | The subsidiary resource replicates subsidiary record information. (SUBSIDIARY table) |
| taxarea | The taxarea resource replicates tax area information, including tax rules created in Admin Console > Node Preferences > Taxes > Tax Areas. This is a core resource. (TAX_AREA table) |
| taxcode | The taxcode resource replicates tax codes (created in Admin Console > Node Preferences > Taxes > Tax Areas). This is a core resource. (TAX_CODE table) |
| till | The till resource replicates till records, defined in Admin Console > Node Preferences > Reporting > X/Z-Out. (TILL table) |
| timeclock | The timeclock resource replicates check in/check out records for employees. (TIME_CLOCK table) |
| title | The title resource replicates the titles (Mr., Mrs., Dr., etc.) that can be assigned to Customers and vendor contact persons. In Prism, define titles in Admin Console > Node Preferences > Data Types. (TITLE table) |
| touchmenu | The touchmenu resource replicates the touch menus defined in Admin Console > Node Preferences > Touch POS. (TOUCH_MENU table) |
| tranfeetype | The tranfeetype resource replicates fee types for transfers, defined in Admin Console > Node Preferences > Transfers > General. (TRAN_FEE_TYPE table) |
| transferorder | The transferorder resource replicates transfer orders. (TORD table) |
| transferslip | The transferslip resource replicates transfer slips. (SLIP table) |
| transformdesign | Document designs. This is a core resource. (TRANSFORM_DESIGN table) |
| transrule | The transrule resource replicates the Transfer Resolution Rules defined in Admin Console > Node Preferences > Transfers > Resolution Rules. These rules dictate how the system will handle discrepancies in the sent/received items and quantities on out slips when compared to the voucher on which the items were received. |
| usergroup | The usergroup resource replicates employee groups. This is a core resource. (USER_GROUP table) |
| userpasswordhistory |
The userpasswordhistory resource replicates passwords between Prism servers. (USER_PASSWORD_HISTORY table) |
| vendor | The vendor resource replicates vendor records (VENDOR table). Vendors are defined in Store Operations > Merchandise > Vendors. |
| vendorinvoice | The vendorinvoice resource replicates vendor invoices. (VENDOR_INVOICE table) |
| vendorudf | The vendorudf resource replications vendor udf options defined in Admin Console > Node Preferences > Merchandise > Vendors > UDF Fields. Note: If there are more than 500 UDF values for a UDF, the data is not replicated. Having so many UDF values for a single UDF field indicates the field is being used as general data storage rather than as a dictionary-style list as intended. (VENDOR_UDF and VENDOR_UDF_OPTION tables) |
| zoutcontrol | The zoutcontrol resource replicates Z-Out reports. Z-Out reports are not replicated between RIL and Prism; however, Z-Out Drawer Open and Drawer Close reports are replicated from Prism store servers to the POA (Prism-to-Prism) and from child POAs to the RA. Z-Outs are replicated via the drawerevent resource. (ZOUT_CONTROL table) |
Preferences overwritten by POA when Joining the Enterprise
When defining preferences, it is important to be aware of the various levels and which level you are changing: Corporate, Subsidiary, or Store (Workstation-level-defined preferences are never replicated). Each of the levels of preferences exist at every Prism installation and can be configured by users. When joining the enterprise, the server will inherit preference settings from the POA (Corp, Sub, Store levels). This is usually the desired behavior. A downside is that if you have configured custom preferences at any level, those custom settings will be overwritten by the POA's settings during JTE.
Replicating Preferences from Prism to Prism (POA to New Server)
Currently if the POA has already been set up and you connect a new system to this POA the preferences are not sent to the new server. The user must make an edit to the POA preferences to have the new system get the POA's preferences. In future versions, users will be able to propagate preferences to from an existing Prism server to a new Prism server (Prism-to-Prism).
Forcibly Removing a Server
If a Server is forcibly removed (in other words the subordinate is not online for some reason) the proper recovery if the remote system either:
Is brought back up and desires to remain independent of the enterprise (it has no knowledge that it left the enterprise
It is desired to restore the system to the enterprise
(Note: If the system will be offline permanently, no action is needed)
SCENARIO:
1. An enterprise is set up.
2. A subordinate server in the enterprise goes down.
3. At the Root Authority, it is determined that the best course of action is to remove the subordinate (e.g. because the server will be down for an extended time).
ACTIONS:
At the down server's POA, Remove the powered-down Server from the enterprise.
IF DESIRED FOR THAT SYSTEM TO RE-JOIN ENTERPRISE AT A LATER DATE:
At the Removed system, log into TTK, it will show the former enterprise tree (since the system has no knowledge it has been removed from the enterprise)
At the Removed system, log into the subordinate server's former POA (this is required for the next step).
At the Removed system, select the menu icon associated with the local Server (the removed subordinate server) and select Remove. Now the enterprise tree will correctly reflect that this system is not attached to an enterprise.
At the POA which this server will re-join, follow the "Add Former Server" process,
Database Tables Related to Replication
| Table | Description |
|---|---|
| AC_PUBLISHER | This table identifies the Administration Console publisher system. |
| AC_SUBSCRIPTION | This table identifies the Administration Console subscription, the resources included, etc. |
| AC_SUBSCRIPTION_GROUP | This table identifies the Administration Console group and has information about the group settings. |
| AC_SUBSCRIPTION_PUBLISHER | This table identifies the Administration Console publisher for a specific subscription. |
| CONSUMER_CACHE | This table contains the messages received from the POA and Prism stores. You can filter and look for messages from a particular connection (from_server) or for a particular message type (resource_name) to determine if the messages are just pending processing. Messages are processed based on the "process_order" value (lowest to highest) and by oldest to newest messages (created_datetime). You can also filter for a specific message (resource_data). If you know what the document SID is or some unique value for that document, you could filter for that document by using a "like" statement. If there is a lot of data here, this could be slow. EXAMPLE: Select * from rps.consumer_cache where resource_data like ‘%123%'; -- where 123 is the sid value |
| CONSUMER_CACHE_ERROR | This table lists the resources that encountered errors when being consumed. |
| INITIALIZATION_STATUS_DETAIL | This table has details about the initialization status. Number of rows expected, number of rows processed so far, current process order. |
| INITIALIZATION_STATUS_HEADER | Identify and monitor the initialization process. |
| INIT_STATUS_CONNECTION | This table has information about a remote connection like the total number of records received and processed and the status of the connection. |
| PRISM_RESOURCE | This table has information about resources used in replication. For example, if the resource is used in day-to-day replication, the resource's position in the overall process order. |
| PRODUCER_CACHE | Producer cache contains the message that each subscriber will get. The producer cache notes if the message is an initialization and the status of that message (whether the message is locked or not). |
| PRODUCER_CACHE_DESTINATION | Subtable that contains the relationship of which queues (stores) the related message will be delivered to. |
| PRODUCER_CACHE_OFFLINE | This table has information about the producer cache offline queue. |
| PUB_DATAEVENT_QUEUE | Staging location for D2D data before messages are posted to the producer_cache table with the message (payload). You can get some idea of how and what is pending by querying the table, to see the messages which are being updated and which are waiting to be published to the rps.producer_cache table. |
| PUB_NOTIFICATION_QUEUE | Information about subscription notification event queue. |
| PUB_SUBSCRIBER | Information about the subscriber related to authentication and connection. |
| PUB_SUBSCRIPTION | Information about a subscription, including heartbeat and data event services. |
| PUB_SUBSCRIPTION_EVENT | Information about subscription events (e.g., create, update, delete). |
| PUB_SUBSCRIPTION_GROUP | Subscription group information, including last process date/time and status. |
| REMOTE_CONNECTION | This table has information about the remote connection, including type (V9 or Prism) and whether D2D replication is paused. |
| REMOTE_CONNECTION_RESOURCE | This table identifies the remote connection subscription. |
| REM_SUSCR_RESOURCE | Remote subscriber resource. |
| REPLICATION_LOCKED_QUEUE | Lists those queues that are locked. |
| REPLICATION_STATUS | Identify and monitor D2D sessions. The Connection Manager UI displays data from this table, including number of messages sent, expected and received. The STATE column can be 0 = canceled, 1 = in progress, 2 = complete, 4 = paused. |
| REP_STATUS_DETAIL | Details about the replication session, including the direction, the source URL and key fields that identify records. |
| REP_STATUS_RESOURCE | Information about the current replication status of a resource, including number of messages sent, expected, and received. |