Physical Inventory
Prism 1.14.7 Physical Inventory PDF
Prism 2.4.1 Physical Inventory PDF
Using Prism's Physical Inventory feature, you can record counts of the merchandise in stock at your store location(s) and use the counts to update the On-Hand quantity of the store's inventory.
Doing regular PIs provides important benefits, including:
- Provides updated, accurate on-hand quantity values for items, helping to avoid unexpected "out-of-stock" situations
- Enables accurate calculation of inventory valuations for accounting purposes
PI Features
- Record counts for an entire store or a particular "zone" (subsection) of the store
- Import physical counts from a text file (e.g. one provided by a physical inventory firm) to a started physical inventory file
- Append counts to a started physical inventory
- Read current On Hand from Inventory and use as the start quantity
- Review and edit counts before updating inventory
- Print physical inventory information
- Export PI information to .csv, PDF, HTML, or XLSX.
- Update on-hand quantity for all items or only those with physical counts
- Integrates with PI Tracker tool in RP Companion, enabling users to scan barcodes and record PI counts using an ordinary iPhone (For info, select Tools > RP Companion from the documentation menu).
- Send PI sheets to another location
Basic Steps for Store PI
1. In Node Preferences - Merchandise - Physical Inventory, make sure the Physical Inventory Type is set to the desired value: Simple Physical or Zones.
2. In Store Operations - Employee Management - Group Management, assign Physical Inventory security permissions to employee groups.
3. In Store Operations > Merchandise > Physical Inventory, create a new PI, with or without a filter. Creating a PI with a filter includes only the filtered items on the PI sheet.
4. (if using zones) Create one or more zones
5. Add counts on the store PI sheet or the zone sheets.
6. Merge counts.
7. When all counts have been entered and merged into the store PI sheet, update the PI.
Preparing Inventory for PI
Before you start a physical inventory, make sure the inventory list is current and complete and that all units of merchandise are available for counting:
- Make sure all units of merchandise that will be counted are retrieved from under counters, from return baskets, customer pickup area, and are available in the counting area
- When you are satisfied that the inventory list is current and correct, click the Update Start Qty button to copy each item's On-Hand Qty value to the Start Qty field in the PI.
PI Security Permissions
You can control employee access to various features of RP Prism Physical Inventory. Refer to the following table for a list of PI-related security permissions. Note: All users can access the Physical Inventory area and view the list of PIs for a store.
| Permission | Description |
|---|---|
| Physical Inventory - Access | Allow group members to access the Physical Inventory area of Store Operations > Merchandise. |
| Physical Inventory - Activate/Deactivate PI sheet | Allow group members to deactivate a PI sheet and re-activate a PI sheet that is currently inactive. |
| Physical Inventory - Create New PI Sheet | Allow group members to create a new PI sheet (with or without a filter). |
| Physical Inventory - Create PI Zone | Allow group members to create zones for zone PI. |
| Physical Inventory - Edit PI Sheet | Allow group members to access the Edit button to edit a PI Sheet Name or Notes. |
| Physical Inventory - Edit PI Zone | Allows group members to edit the Name and Notes field of a PI Zone. |
| Physical Inventory - Modify PI Sheet Counts | Allow group members to modify the counts on PI sheets. |
| Physical Inventory - Modify Zone Counts | Allow group members to modify the counts on PI zone sheets. |
| Physical Inventory - Print PI Sheet | Allow group members to print PI sheets. |
| Physical Inventory - Print Zone sheet | Allow group members to print zone sheets. |
| Update PI Sheet Start Quantities | Allow group members to access the Update Start Qty button for PIs. Selecting the Update Start Qty button will reset the Start Qty for all items to their current OH Qty in inventory at the PI store. |
| Physical Inventory - Zone Merge | Allow group members to merge zone sheets into the main PI sheet. |
| Physical Inventory - Zone Unmerge | Allow group members to unmerge zone counts. |
Access Physical Inventory
- Launch the Prism Proxy and log in.
- Tap or click the Retail Pro button in the lower right corner. Select Store Operations. Click the Merchandise button.

3. Click Physical Inventory.

Change Subsidiaries in Physical Inventory
A Subsidiary dropdown is available at the top of the Physical Inventory Module. This allows a user to switch between subsidiaries to create, perform and complete Physical Inventory in any subsidiary the user has access to.
A Permission "PHYSICAL INVENTORY - CHANGE SUBSIDIARY" supports ALLOW, OVERRIDE, and DENY permission settings.
New PI Sheet
To create a new PI sheet, a user must belong to a group with the "Create New PI Sheet" permission. Each store can only have one active PI sheet. You can create a new PI with or without a filter. Using a filter enables you to limit the PI to a subset of the store inventory. First, let's go through the steps for creating a PI without a filter. After that will be the steps for creating a PI with a filter.
- In the Physical Inventory area, click the New button.
- Type a name for the PI. Add any notes that describe the PI. Click the Create button.

- The PI sheet is added to the list of PI sheets. To work with the PI, click the check mark on the left side of the grid. Click PI Sheet.

- A row of buttons on the top of the grid allows you to work with the PI sheet or zone sheet. Click the Add Counts button to scan quantities.

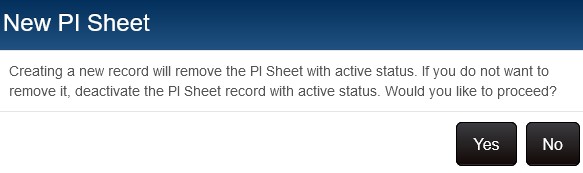
If Active PI Exists
If an Active PI already exists when you click the New button, a warning is displayed, explaining that if you proceed, the current Active PI will be removed. If you want to retain the existing PI, click the No button and then deactivate the active PI. After the existing PI is deactivated, you can proceed with creating a new active PI.
PI Sheet Fields
| Field | Description |
|---|---|
| Active | This field displays "Yes" if the PI sheet is active, or "No" if the PI sheet is deactivated. |
| Name | The name of the PI. |
| Store | The store where the PI was done. |
| Created By | The user who created the PI sheet. |
| Created Dt | The date the PI sheet was created. |
| Modified Dt | The date the PI sheet was last edited. |
| Good Scans | The total quantity of good scans. Good scans are scans for which a matching item was found. |
| Bad Scans | The total quantity of bad scans. Bad scans are scans for which no matching item was found. |
| Start Qty | The total start quantity for all items. |
| Total Counts | The total count (Good Scans - Bad Scans). |
| Total Difference Qty | The total difference between the Start Qty and Scan Qty of all items in the PI. |
| Update Status | Indicates the PI's update status: Not Started, In Progress, Error, or Complete This information can also be found in the PI_SHEET table's IN_PROGRESS column. The IN_PROGRESS column in the database can have the following values: 0 - Not Started. This is the initial value when you create a PI in Prism. It indicates the update has not yet started. 1 - In Progress. Updating a PI can take some time depending on the size of the inventory. If you happen to look at the Update Status/IN_PROGRESS value while the update is in progress, you will see this value. 2 - Error occurred. This indicates an error occurred when trying to update the PI. 3 - Marked for deletion. Indicates the PI is marked for deletion by the Prism TTK Task Scheduler "Cleanup PI Sheet task." 4 - Complete. Indicates the PI update is complete. |
New PI Sheet with Filter
Filtering inventory enables retailers to count only a portion of the store's inventory at one time. For example, a retailer might want to do physical counts on a department-by-department or vendor-by-vendor basis. Click the Create with Filters button when starting a new PI.

When you select the Create with Filter option, a screen is displayed for adding/entering search parameters. In the Search By drop-down, select the field by which you want to filter. The field is added to the Parameters area. Type criteria for the parameter. Repeat to add more filter parameters. If the "Specific Search" checkbox is selected, it means only items that exactly match the entered parameter will be included in the PI. If the "Specific Search" checkbox is not selected, it means that any items that match part of the entered parameter will be included. Click OK when finished.
The parameters that you enter will be applied as a filter to the entire store inventory list (active and inactive items). By default, any records that contain the criteria you enter will be included in the PI.

The following fields can be used to filter the list of items to include in a PI:
Active, ALU, Attribute, Commission Code, Cost, Created Date, DCS Code, Description 1, Description 2, Description 3, Description 4, First Received Date, Item Sid, Last Edit Date, Last Markdown Date, Last Received Date, Last sold date, Max Discount %, Regional item, Size, Store On Hand Qty, Style Sid, Tax Code, UDF Date, UDF Name, UDF3 Value, UDF4 Value, UDF5 Value, UPC, Vendor Code, Vendor Name.
Users can enter multiple parameters of the same type or different types. For example, a user can add two DCS parameters and filter inventory to only include items from those two departments. Similarly, a user can add a DCS parameter and a Vendor parameter to filter inventory for only items by a certain vendor in a certain department.
Add Counts
Use the Add Counts tab to scan items and enter quantities. Think of the Add Counts tab as a type of clipboard where item counts can be entered, reviewed and modified if necessary before merging into the main PI file. Important! The items and quantities entered on the Add Counts tab must be merged into the main PI file before the file can be updated. To add counts, a user must belong to a group assigned the "Modify PI Counts" Permission.
- Access Physical Inventory and select the PI for which you want to enter scans.
- Tap or click the PI Sheet button. A list of items included in the PI is displayed.
- Select the Add Counts tab.
- Place the focus in the UPC field. Scan the item's barcode. By default, items are listed with a quantity of "1." You can modify the Scan Qty, if necessary.
- Scan the next item. (Note: Scanning an item pushes the previous item to the Add Counts list.
Manually Add Counts
When scanning items, a user may encounter items with missing or damaged Retail Pro barcodes. These items are typically placed on the counter or other designated area to be dealt with later. You can use the Add Counts tab to manually enter the UPC for these items with missing or damaged barcodes. Here is the basic workflow that RP Prism uses when a user is scanning items: The user scans the first item. If necessary, the user modifies the quantity. The user scans the second item. Only when the user scans the second item is the first item is entered on the Add Counts list. This pattern continues until the user reaches the last item to be scanned. At the end, since there is no subsequent scan, the user must manually tap or click the Add Counts button to add this last scan to the list.
Add counts
- Launch the Prism Proxy and log in.
- Tap or click the Retail Pro button in the lower right corner.
- Select Store Operations.
- Tap or click the Physical Inventory button.
- Select a PI in the PI list.
- Tap or click the PI Sheet button.
- Tap or click the Add Counts tab.
- In the Item Lookup area, scan the item's bar code (or type the UPC). By default, the quantity that will be entered is "1." Edit the quantity, if necessary. Scan additional items as needed. Important! After scanning the last item, be sure to tap/click the Add count button. Clicking the Add count button is required to add the final item's , the final item's count will not be added.

- Tap or click the Merge button to merge the counts into the PI sheet.
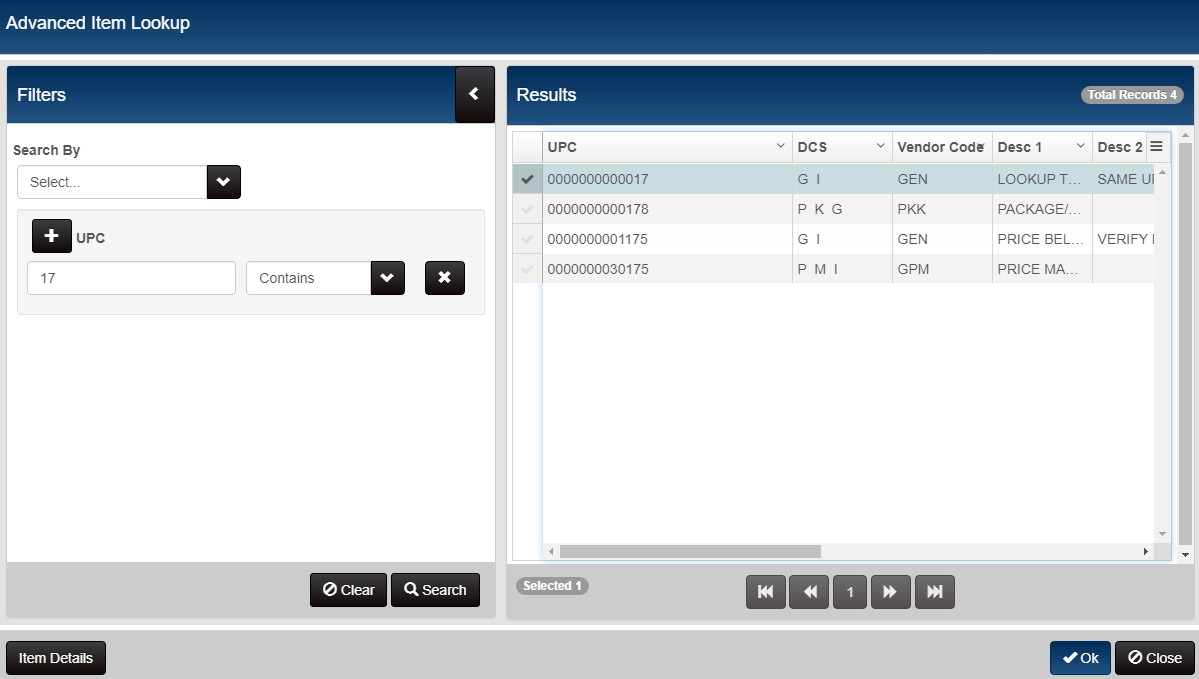
Advanced Item Lookup on Add Counts tab
Click the magnifying glass button to display an advanced lookup screen where you can search for the item(s) for which you want to enter counts. The advanced lookup screen has a Search By field where you can select filter elements and define criteria. You can customize the fields available in the Search By field and the Results pane in Admin Console > Node Preferences > Grid Formats > Select a grid to configure: PI Sheet Filters.
Sample Advanced Lookup available from Add Counts tab:
No Item Found
If no item is found, then RP Prism will display a dialog. If desired, you can click the Adv Item Lookup button to search for the item in inventory.
Update PI Sheet
The final step in the PI process (after all counts are entered and zones merged) is to update the current on-hand quantity in inventory with the quantity value from the physical inventory.
When updating a PI, you have two options: All Counts or Quantities only.
All Counts: If a count is specified on the PI sheet, Prism creates a quantity adjustment memo that updates the item's on-hand quantity to match the count on the PI sheet. If a count is not specified on the PI sheet for the item, the memo sets the item's on-hand quantity to zero. This option is more appropriate if the PI sheet was created with filters. When a PI sheet is created with filters, the user presumably has created a filter that matches the items to be counted and it is likely that items without a count on the PI sheet actually do have an on-hand quantity of zero.
Quantities Only: If a count is specified on the PI sheet, Prism creates a quantity adjustment memo that updates the item's on-hand quantity to match the count on the PI sheet. If a count is not specified on the PI sheet for the item, Prism makes no change. This option is more appropriate if the PI sheet was created without filters. When a PI sheet is created without filters, the PI sheet includes all active items. Using the "Quantities Only" option, only those items with a non-zero count will be updated. Note: "Quantities Only" helps prevent users from accidentally setting an item's on-hand quantity to zero. Often, only a portion of Inventory is being counted. If you were to select All Inventory, then items with a Scan Quantity of zero would have their On-Hand Quantity set to zero. Quantity Only updates those items with a Scan Quantity above zero.
To update a PI, when you are finished counting items, highlight the PI on the main screen and click the Update button. Select All Counts or Quantities Only.
You must select an Adjustment Reason. Add an Adjustment Reason of "PI" or something similar so that adjustments made due to PI update can be easily identified.
A green toast message will announce when the process is finished. Click anywhere on the message to close it.
About Timeout Errors during PI Update
Updating a physical inventory sheet with many items can take a long time, especially when there are many zones. When updating a PI with many items (and especially when there are many zones), it may appear to the user the update has timed out. For example, one or more red "toast" messages indicating a time out may pop up on the screen. In the background, however, the PI update is continuing to run. If the user refreshes the browser, the red toast messages should disappear.
Send PI Sheet
The "Send PI Sheet" option enables users to replicate Physical Inventory sheets to a central location.
By default the "Send PI Sheet" option prompts the user to select another installation in the enterprise to send the sheet to. The sheet will be packaged up for export and sent to the selected destination. The origin installation will have a sheet status of "Exported", which cannot be edited/updated/exported. The destination installation will have the active sheet, which can be worked fully from that location.
The "Physical Inventory Send Destination" preference controls the program behavior when the user clicks the Send PI Sheet button. Using the "Physical Inventory Send Destination" preference, a retailer can choose a specific controller or display a prompt (default). Selecting a specific controller can help prevent user error where the user selects the wrong location in the prompt. (Note: It is possible the destination install will have more than one active sheet per store after receiving an exported sheet.)
In the Physical Inventory area, select an active PI sheet. Click the Options button on the bottom menu.
Sample Physical Inventory area with PI selected and Options button enabled:

Click "Send PI Sheet" and select the desired location.

Import Counts
This section has information about importing counts via a text file. This is accomplished by applying an import map to the text file upon import. An import map defines how the information is arranged in the import text file and specifies what is used to identify items (Item #, UPC, and/or ALU). In an import text file, the item identifier and the count quantity are in the same horizontal positions for every item - one row per item. These can be fixed-length records, in which case the import map specifies the starting character and length of each piece of data in the record, or delimiter-based records that use a comma or other character to separate each piece of data. In both cases, the records must EXACTLY match the import map referenced during the import.
The file used during the import is often provided by a third-party company that has been hired to conduct the physical inventory. The company sends its own worker to the store and counts the items using its own equipment. When finished, the third-party company provides the retailer with the counts in the form of a text file. Copy this file to a location where it can be accessed by the user working with the PI sheet in Prism.
After the system reads an item identifier value in the import file, it checks for a match among every item whose type is selected in the map. For example, if items are identified by either Item # or UPC in the import file, you would select both of those identifiers in the map so that matches could be sought among the item numbers and the UPCs in Prism. If the file uses fixed-length records, the length of the item identifier and item count ‘fields' must be long enough to accommodate the longest possible entry for the field. If necessary, the system will automatically add leading zeros to an item identifier or count quantity to fill the field.
Zone PIs - Import into Single Zone or Multiple Zones
Users can import counts for zones. Importing into multiple zones must be done at the PI Sheet level. Prism will add the counts to the correct zone and create zones if needed. When inside a zone sheet, users can only import into that zone.
Create New Import Map and Import the File
1. Navigate to Store Operations > Inventory > Physical Inventory.
2. Select a PI and then click the PI Sheet button.
3. Click the Imported tab.

4. Click the Import button. A modal for selecting an import map is displayed.

5. Enter a name for the import map and click Continue.

6. A modal for defining the map elements is displayed. Select whether the import map will be fixed length, or comma-delimited (the delimiter can be a comma,
- If comma-delimited then if the imported file contains 1 line per item imported that each line must end with a comma like: 1234567890123,10,
- If fixed length then the NEXT ITEM START field is the next character after the last in a line. If it's continuous stream then that's obvious. If the import file is fixed-length, but 1 item per line, then NEXT ITEM START is the count after the last character in the first line.
7. Define options (Item Start, Length, Count Start, etc.) as needed. The options vary for fixed-length and delimited files.
8. Select the item identifier that the map uses: UPC, ALU, or Item No.

9. Click the Save button. Click Continue.
10. Click the Choose File button. Navigate to the text file and then click Open.
11. With the import file selected, click Import. If the file contents match the specifications of the import map used, the items and counts will be displayed on the Import screen.

12. After importing the counts, use the Merge button to merge the counts into the PI sheet.
Fixed Length Import Maps
The length of the item identifier and item count ‘fields' must be long enough to accommodate the longest possible entry for the field. For example, if in the import map your items are identified by either an Item # or a UPC, the field must be long enough to contain the longest UPC. If necessary, the system will automatically add leading zeros to an item identifier or count quantity to fill the field. Refer to the following table for information about the fields used for fixed-length import maps.
| Field | Description |
|---|---|
| Name | Enter a unique name for the import map when you create it. |
| Item Start | Enter the position at which the item identifier begins. Default = 1 |
| Length | Enter the length of the item identifier segment. Default = 18 |
| Count Start | Enter the position at which the item's count begins. Default = 19 |
| Length | Enter the total length of the count segment. Default = 3 |
| Use Zone Name | (Prism 2.1.1 and above) The "Use Zone Name" flag in the Import map configuration settings indicates whether zones in the import file are identified by zone name or zone number. In an import file, the "zone" is identified by the characters within the range specified by the "Zone Start/Length" settings in the import map configuration settings. If the characters within the "zone" range are numeric, then zones are identified by zone number. If the characters within the range are alphanumeric, then zones are identified by zone name and the "Use Zone Name" flag must be enabled. If the characters contain letters and the flag is disabled, the import will fail. By default, the "Use Zone Name" setting is disabled. Note: The "Use Zone Name" flag is only available when importing at the pi sheet level. When importing at the zone level, it is understood that the import is for the current zone. |
| Zone Start | The position at which the zone starts. Default = 22 |
| Length | The length of the zone identifier. Default = 20 |
| Next Item Start | The position at which the next item starts. Default = 42. If the import file is fixed-length, but 1 item per line, then NEXT ITEM START is the count after the last character in the first line. |
| Lookup Item By | Select the identifier(s) used to locate items. For example, if items are identified by either Item # or UPC in the import file, you would select both of those identifiers in the map so that matches could be sought among the item numbers and the UPCs in Prism. |
Delimited Fields
If importing a delimited file, you need to define the following fields:
| Field | Description |
|---|---|
| Delimiter | Type the character that is used as the delimiter between one column and the next. |
| Items Column | Indicates the column that contains the item identifier. Default = 1 |
| Count Column | Indicates the column that contains the count. Default = 2 |
| Zone Column | Indicates the column that contains the Zone name. Default = 3 |
| Lookup Item By | Select the identifier(s) used to locate items. For example, if items are identified by either Item # or UPC in the import file, you would select both of those identifiers in the map so that matches could be sought among the item numbers and the UPCs in Prism. |
Sample line from fixed-length import map using zone name (alphanumeric); this requires enabling the "Use Zone Name" flag for successful import:

Sample line from fixed-length import map using zone numbers (digits only), which should have the "Use Zone Name" setting disabled:

Import Serial Numbers into PI Sheet
You can import serial and lot number information when importing items onto a PI sheet.
When "Enable Serial Number entry" and "Enable Lot Number entry" preferences are enabled (Admin Console > Node Preferences > Merchandise > PI Sheet), the following fields are available when for a fixed-length import map: Serial Start, Lot Start. The following fields are available for an import map that uses a delimiter: Serial Column, Lot Column.
Sample Import Map with elements to define the start position of serial/lot numbers:

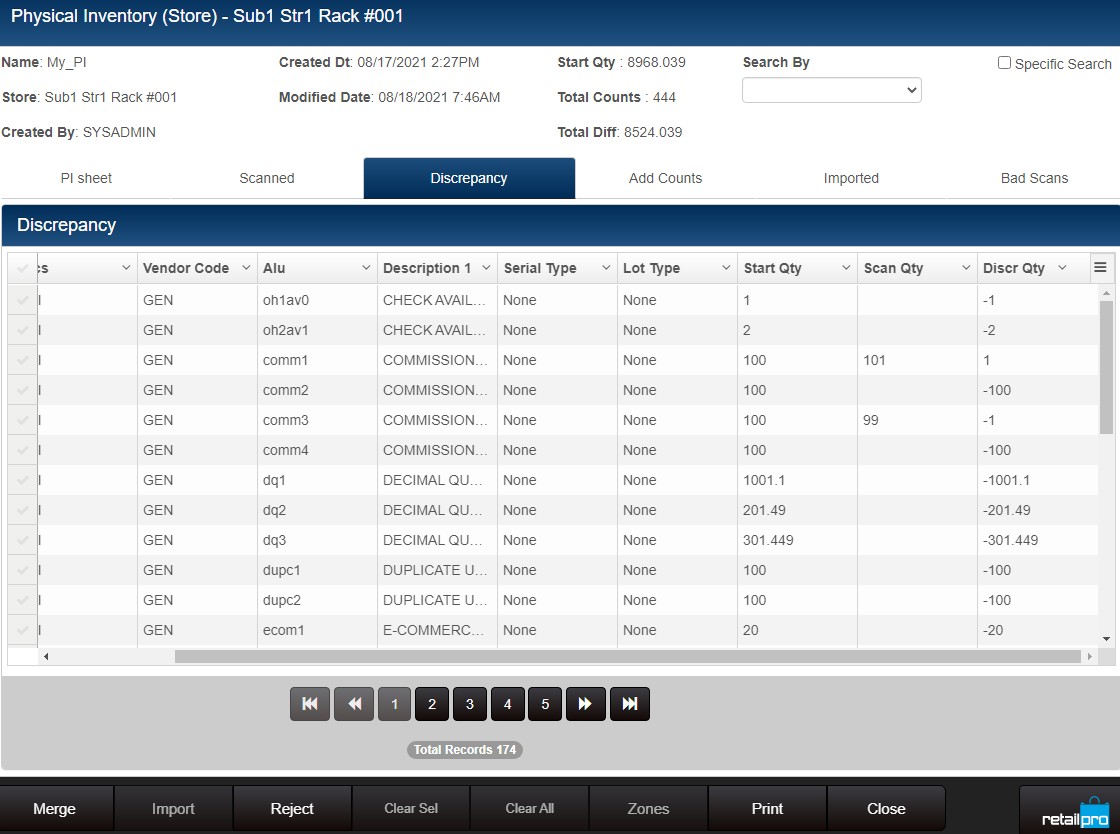
Discrepancies
The Discrepancies tab provides an easy way to review those items that have a difference between the physical count (Scan Qty + Imported Qty) and the Start Qty. This enables you to easily identify such items and print out the list, if necessary. To edit the Scan Qty, a user must belong a group with the "Modify PI Counts" security permission.
- Navigate to the desired PI Sheet and click the Discrepancy tab.
- Review those items with a value in the Discr Qty field. Edit the Scan Qty field, if necessary.
- To print the list of items, tap or click the Print button. Select the desired print design and then tap/click the Print button.
Bad Scans
When importing counts, the import file may contain unrecognizable item identifiers. This will result in a "bad scan" - i.e., a scan whose identifier cannot be matched with an item in Prism Inventory. You cannot update the PI sheet if bad scans exist. On the Bad Scans tab of the PI sheet, you can review bad scans and use Prism's Item Lookup feature to locate the correct item (or add it to Inventory). Alternatively, if the scan cannot be matched with an item in Prism Inventory, you can clear the scan. This removes the scan from the PI.
Bad Scan Warning when Importing Counts
If the import file includes records that cannot be matched with items in Prism Inventory, a toast message is displayed.

Reviewing Bad Scans on PI Sheet
With the PI sheet displayed, click the Bad Scans tab. A list of bad scans is displayed.
Select the check mark for a bad scan.
Click the Item Lookup button. Enter filter criteria and click the Search button
Select an item from the list of returned results. Click Select Item. The item identifier entered for the "bad scan" is updated to the selected item's identifier.
If no item can be associated with the one or more bad scans, click the Clear Sel button to remove an individual scan or click the Clear All button to remove all the scans from the list.
Sample Bad Scans tab:

On the Imported tab of PI sheet and Zone sheet:
- When Bad scans are cleared, the bad scan count decrements
- When bad scans are verified using the item lookup, the bad scans count decrements
- when bad scans are verified using the item lookup, the good scans count increments
- bad scans+good scans= imported
Printing PI Sheets
A separate print design is available for each of the tabs (grids) of the PI sheet. For example, you can print out the list on the Bad Scan tab and use it to find items to so the items can be scanned again.
Printing is controlled by the "Print PI Sheet" security permission.
- Click the check mark for the PI you want to print. The PI menu buttons are enabled.
- Click the Print button.
- Select a Print Design: PI Store, PI Discrepancy, PI Good Scans, or PI Bad Scans
- Select other print settings as needed (Printer, Quantity, Print Order, etc.). Click Print.
Export PI
Users can export the PI sheet from a zone or from the main PI. The export formats are CSV (added in Prism 2.1), XLSX, PDF and HTML. Once the export is complete the user can find the file in the /Downloads directory and open it with the appropriate application.
Notes
- The XLSX export format only shows up if you have Excel installed ON THE SERVER SIDE.
- For CSV export you must create the appropriate "table-like" designs otherwise the output may have unexpected results.
1. On the bottom menu, click the Print button.
2. Select a Print Design and Printer.
3. In the Export Format area, select the desired format.
4. Click Export.
Sample Print modal showing Export Format options:

API Call Information for export options
For api/backoffice call - parameter "PrintMode" extended to
4 - csv
5 - pdf
7 - xlsx
8 - html
Edit a PI Sheet Name or Notes
Users who belong to a group with the "Edit PI" permission can edit the Name or Notes for an existing PI. You can only edit an active PI.
- Select the check mark for a PI in the PI list.
- Click the Edit button. Make any necessary changes to the PI Name or Notes and save.
Update Start Qty
When you start a new PI sheet, the item's current OH Qty in inventory is entered as the Start Qty for the PI. If necessary, you can use the Update Start Qty button to update the Start Qty of all items on the PI. For example, a user might start a new PI and then, before updating, the user creates a few POS transactions. The user can then go back to the PI and clicks the Update Start Qty button. This will update the PI, taking into account the recent POS transactions. To access the Update Start Qty button, a user must belong to a group that is assigned the "Update PI Start Qtys" permission.
- Launch the Prism Proxy and log in.
- Tap or click the Retail Pro button in the lower right corner.
- Select Store Operations.
- Tap or click the Physical Inventory button.
- Select the check mark for the PI for which you want to update start quantities. Tap or click the Update Start Qty button.
- A confirmation is displayed. Tap or click the Yes button to proceed with updating the Start Qty for the items on the PI.
Note: Users can also access the Update Start Qty button via the Options button on the bottom menu of the PI (or Zone) sheet.
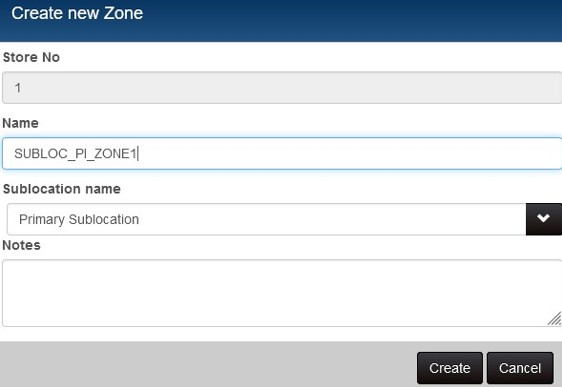
Sublocations on PI Sheets
If the store whose physical inventory is being counted uses sublocations, then the Physical Inventory Type must be set to "Zones" in Admin Console > Node Preferences > Merchandise > PI Sheets. On the PI Sheet, when creating a new zone, select the sublocation to use for the zone. In this way, the zone counts will be used to update the sublocation OH Qty. Serial and lot number items that are entered on a PI as new numbers will all go into the Primary sublocation.
For more information, see the Sublocations on PI Sheets topic.
Sample New Zone modal with Sublocation name dropdown: