Chapter 25. Transfer Slips
Prism 1.14.7 User's Guide Chapter 25. Transfer Slips PDF
Prism 2.3 User's Guide Chapter 25. Transfer Slips PDF
About Transfer Slips
Transfer Slips record the actual movement of merchandise out of the source store's inventory. Users can manually create a new transfer slip or generate a slip from a transfer order. A transfer slip specifies the source store (From Store) and target store (To Store), Transfer Date, Arrival Date, and the items being transferred. When the merchandise arrives at the target store, a user will create a voucher to receive the items into the target store's inventory.
Configuring Transfer Slips
Configuration for transfer slips involves:
- Enabling security permissions groups of users for transfer slips
- Defining preferences related to transfer slips
Transfer Slip Security Permissions
You can control employee access to transfer features using the following permissions:
| Permission | Description |
|---|---|
| Transfer Slip - Allow Edit Received Items |
This permission controls a user's ability to edit received quantities on a transfer voucher. In concept, a receiving clerk generates a transfer voucher from a transfer ASN. |
| Transfer Slip - Allow Hold | Allow group members to hold a transfer slip |
| Transfer Slip - Change Associate on Updated Slips | Allow group members to change the Associate on a slip that has already been updated. |
| Transfer Slip - Change Store | Allow group members to change the store within the default subsidiary on a transfer slip. |
| Transfer Slip - Change Subsidiary | Allow group members to change the subsidiary on transfer slips. |
| Transfer Slip - Copy Former Slip | Allow group members to create a new slip by copying a former slip. |
| Transfer Slip - Create Slip | Allow group members to create a new slip using the New or Copy buttons. |
| Transfer Slip - Edit Former Slip | Allow group members to edit a former slip. |
| Transfer Slip - Print | Allow group members to print a slip. |
| Transfer Slip - Print Held | Allow group members to print a slip that is currently in a Held status. |
| Transfer Slip - Reverse Slip | Allow group members to reverse a transfer slip. |
Transfer Slip Preferences
In this area of preferences, you can define the following preferences related to transfers:
| Preference | Description |
|---|---|
| After Transfer Slip is updated go to: | Select what should be displayed after a slip is updated: New Slip: A new slip form is opened, ready for editing. Former Slip: The Former Slip is displayed. To create a new slip, the user must click the New button. |
| Upon Transfer Slip update generate: |
Select ASN, Vouch or None. (None option added in Prism 2.1) |
| Default Resolution Method: |
The Default Resolution Method defined in preferences is consumed when the user is in Transfer Verification and selects the RESOLVE ALL option. Prism will use the Default Resolution Method and apply the Resolution Rules. |
| Verify Transfers Upon Voucher Update |
If this preference is checked, when a ASN is referenced at the Send To store and the user selects Generate Voucher, once that voucher is updated AND there are no discrepancies, the transfer will be automatically Verified; nothing will display in Transfer Verification for the document. This setting reduces the number of documents that a back-office person would have to go through to reconcile transfers. In other words, if there are no problems with the sending and receiving transfers then Prism will automatically verify the transfer, removing the need for a person to deal with it. |
| Require Comment on Transfer Slips | If selected, a Comment must be selected before a user can update a slip. Note: To select a Comment on a slip, you must first define Comments in Node Preferences > Transfers > Comments. |
| Require Transfer Slips reference Transfer Order |
If selected, a TO Number must be entered on transfer slips. |
| Consolidate like items on Transfer Documents | If enabled, Prism will consolidate line items with the same UPC (or ALU) when added to a transfer slip. If disabled, item quantities items with the same UPC (or ALU) will be listed multiple times if scanned multiple times on the original document. Default = Enabled Note: Line items on transfer orders are always consolidated. |
| Fee Types | Fee Types for transfers must be set at the Subsidiary level. If you are at the global level, first double-click the desired Subsidiary, then the Fee Type UI will be editable. |
By default, Prism will generate an ASN voucher when you update a slip. At the Send To store you can then generate a standard receiving voucher from the ASN. Alternatively, you can configure Prism to generate a voucher. A separate preference, if enabled, will auto-verify the voucher.
Admin Console > Preferences > Transfers > General:

Reasons for Transfer Slips
Define reasons for transfer slips and transfer orders in the following areas:
- Admin Console > Node Preferences > System > Reasons and Notes> Slips
- Admin Console > Node Preferences > System > Reasons and Notes> TO
Reasons are short text to explain why a document was created and provide information for reports.
Transfer Slip Permissions
You can control employee access to transfer features using the following permissions:
| Permission | Description |
|---|---|
| Transfer Slip - Allow Edit Received Items |
This permission controls a user's ability to edit received quantities on a transfer voucher. In concept, a receiving clerk generates a transfer voucher from a transfer ASN. (Note: The Override option is not available for this permission.) |
| Transfer Slip - Allow Hold | Allow group members to hold a transfer slip |
| Transfer Slip - Change Associate on Updated Slips | Allow group members to change the Associate on a slip that has already been updated. |
| Transfer Slip - Change Store | Allow group members to change the store within the default subsidiary on a transfer slip. |
| Transfer Slip - Change Subsidiary | Allow group members to change the subsidiary on transfer slips. |
| Transfer Slip - Copy Former Slip | Allow group members to create a new slip by copying a former slip. |
| Transfer Slip - Create Slip | Allow group members to create a new slip using the New or Copy buttons. |
| Transfer Slip - Edit Former Slip | Allow group members to edit a former slip. |
| Transfer Slip - Print | Allow group members to print a slip. |
| Transfer Slip - Print Held | Allow group members to print a slip that is currently in a Held status. |
| Transfer Slip - Reverse Slip | Allow group members to reverse a transfer slip. |
New Transfer Slip
1. Select Store Operations from the Prism Menu.
2. Click the Transfers button.
3. Click the New Transfer button.
4. Select the To Store from the dropdown. This is the store to which the merchandise will be sent.
5. Navigate to the Item Lookup field. List each item being transferred by scanning the barcode or typing the UPC. Alternatively, you can use the Advanced Lookup button to search Inventory and select slip items.
6. Edit the Qty field for each item to the quantity being transferred.
7. To enter fees, freight or comments, tap or click the Slip Details button.
8. When finished, tap or click the Update Only button.
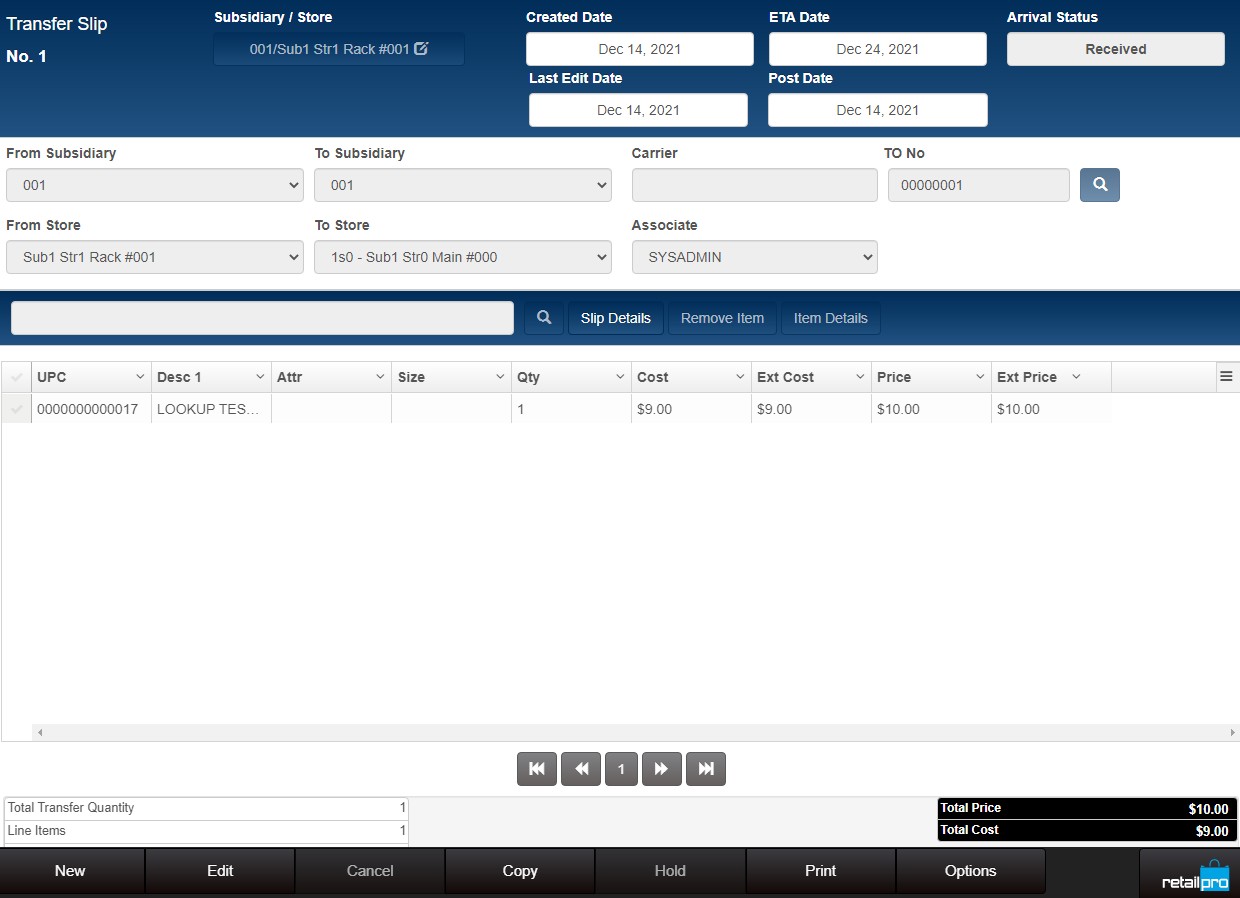
Sample New Slip:

Slip #
The Slip # field is not populated until the slip is saved or updated.
Advanced Item Lookup on Slips
When using Advanced Item Lookup, enter the Doc Qty for each item to be listed on the slip. Click the Add Selected button to bring each item with a Doc Qty to the slip. Note: It is not necessary to select the Check Mark on the side of the grid. Simply enter the Doc Qty for each item you want to list and click the Add Selected button.
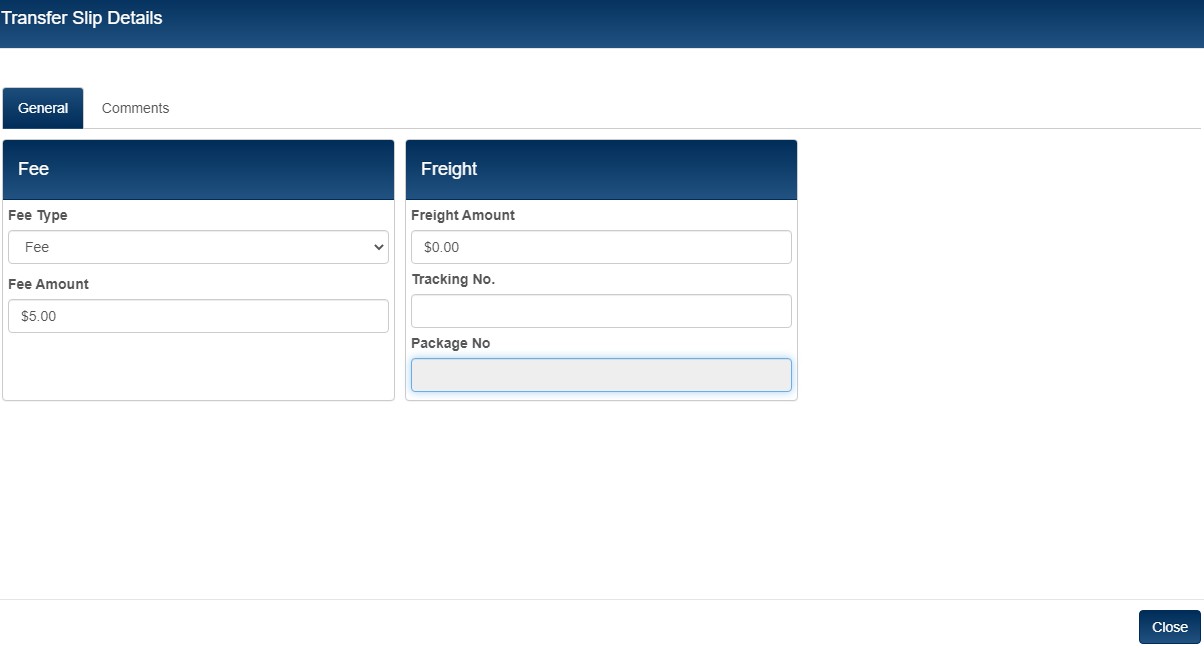
Fees on Slips
Note: When entering a fee on a slip, select a Fee Type. The Fee Type indicates the reason for applying the fee. The Fee types available for selection are defined in Node Preferences > Transfers > General.
1. On a slip in progress, tap or click the Slip Details button.
2. On the General tab, select a Fee Type and enter the Fee Amount.
3. Click the Close button.
Freight on Slips
1. On a slip in progress, tap or click the Slip Details button.
2. On the General tab, enter the Freight Amount.
3. Click the Close button.
Sample Slip Details > General tab:
 Comments on Slips
The Comment field on slips enables retailers to capture information related to the transfer. When entering a comment, users can select from one of the comments defined in Node Preferences > Transfers > Comments or type a freeform comment.
New comments can be added to a slip using the following steps. If you add a comment, the comment is specific to the voucher and is not added to the list of comments defined in Preferences.
1. On a slip in progress, tap or click the Slip Details button.
2. Click the Comments tab.
3. Click the Add button.
4. Select a Predefined Comment from the drop-down.
5. Click the Check mark icon.
6. Click the Close button.
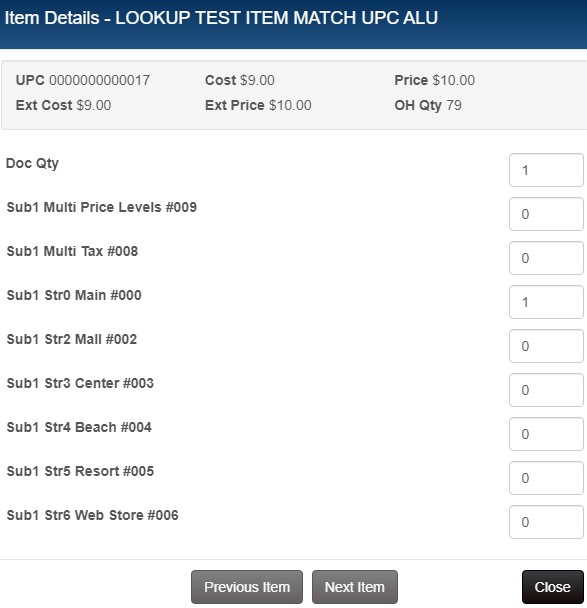
Item Details on Slips
Item Details on transfer slips includes elements for adjusting the transfer quantity of the selected item to individual stores.
In edit mode, select an item on the slip and click Item Details.
The Item Details modal is displayed. The top part of the modal has information about the item like Price, Cost and current OH Qty. The lower part of the modal has a list of stores and the current Doc Qty for each store. Adjust the Doc Qty for individual stores as needed and click Close.
Sample Item Details screen on a transfer slip showing text box for entering Doc Qty for individual stores:
Slip Fields
The following table lists the fields displayed on a new slip.
| Field | Description |
|---|---|
| From Subsidiary | Subsidiary the merchandise is being transferred from. |
| From Store | Store the merchandise is being transferred from. |
| To Subsidiary | Subsidiary the merchandise is being transferred to. |
| To Store | Store the merchandise is being transferred to. |
| Associate | Employee creating the transfer slip. |
| Slip # | Document number assigned to the slip. |
| Ref Doc # | The document number of the document referenced on the slip. |
| Ref Doc Type | The type of document being referenced (e.g. purchase order) |
| TO# | Transfer order number. |
| Created Date | Date/Time the slip was updated. |
| Last Edit Date | Date/Time the slip was last edited. |
| ETA Date | The date the shipment is scheduled to arrive. |
| Post Date | Date/Time the slip updated inventory. |
| Carrier | The carrier used to ship the merchandise. |
Transfer Slip Lookup
1. Click the Retail Pro button in the lower-right corner.
2. Select Store Operations.
3. Click the Transfers button.
4. Click the Transfer Slip Lookup button.
5. Enter filter criteria. Documents that match the criteria entered will be displayed.
| Filter Element | Notes |
|---|---|
| Created Date | Date the slip was created. Users can enter a date range (From/To Date). Click the calendar icon to display a calendar for selecting the desired From/To Date. |
| Created By | The name of the employee who created the slip. Users can select a name (Full Name) from the drop-down. |
| Modified Date | Date the slip was last modified. Users can enter a date range (From/To Date). Click the calendar icon to display a calendar for selecting the desired From/To Date. |
| Modified By | The name of the employee who last modified the slip. Users can select a name (Full Name) from the drop-down. |
| Slip No | The identifying number assigned to the slip. |
| From Store | Source store for the transfer |
| To Store | Target store for the transfer. |
| Package Number | Shipping package number. |
| Slip Type | Normal, Reversed or Reversing. |
6. After entering filter criteria, tap or click the Search button.
7. A list of matching documents is displayed. Select the check mark for the document you want to view and then click the OK button.
Sample Transfer Slip Lookup:

Pending Transfer Slips
1. Select Store Operations.
2. Click the Transfers button.
3. Click the Pending Transfer Slips button.
4. Enter filter criteria. Documents that match the criteria entered will be displayed.
From Date/To Date: Enter a date range. Documents within the range will be included.
Slip Number: If you know the slip number, enter it.
From Store: Select the source store for the transfer.
To Store: Select the destination store for the transfer.
Associate: Select the employee who created the slip from the dropdown.
Type: Normal, Reversal, or Reversed.
Held: If selected, held documents are included in the search.
5. After entering filter criteria, tap or click the Search button.
6. A list of matching documents is displayed. Select the check mark for the document you want to view and then click the OK button.
Slips generated from TO with serial/lot items
If slips are generated from a TO with serial/lot items, the slip is placed on hold.
Use Pending Slip Lookup to find and display the slip.
The pending slip will have a separate line item for each unit that requires a number.
Click Unhold.
If any line items require a serial number, the serial number prompt is displayed.
Scan or look up the number(s) and click OK.
After all required numbers have been entered, update the slip.
When the transfer slip is updated, either an ASN or a Voucher will be auto-generated, depending on how preferences are configured. By default, an ASN is generated.
Document Designs for Slips
Retailers can use RP Prism Document Designer to customize the print design used when printing transfer slips. Navigate to the …\Program Files (x86)\RetailPro\DocumentDesigner folder and launch DocumentDesigner.exe. Select Transfer Slips in the Area dropdown and Slip in the Document dropdown.
Displaying Serial Type, Lot Type on Transfers
Within the Prism database, the SerialType and LotType fields are stored as numbers. This section explains how to configure document designs to display the plain text value on printed documents instead of a number.
To display a plain text value for SerialType or LotType fields, you must add an "onBeforePrint" method for the field(s). Within the method, list each number value that can be assigned and the desired string that you want displayed instead of the number. Within the switch statement, be sure to enter the most common value for the field as the "default" case.
Replication of Slips
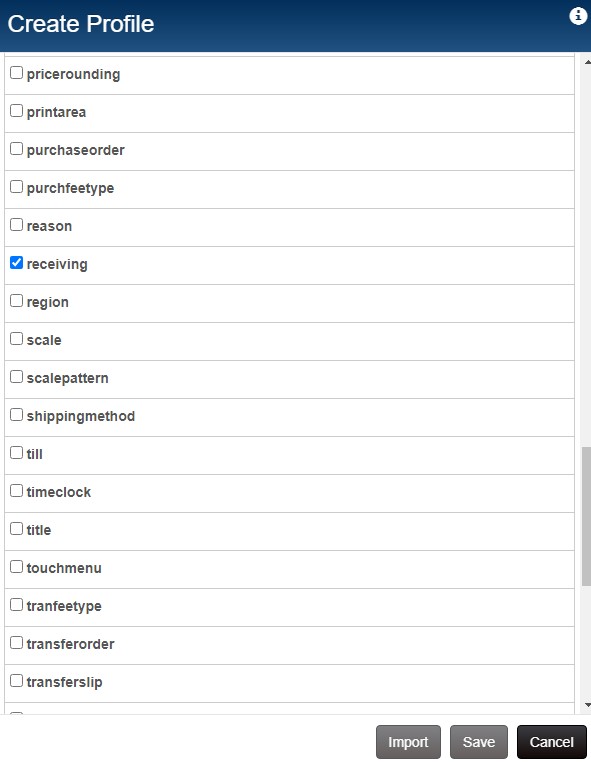
For transfer slips to replicate correctly between a store and its POA and between the POA and RIL, you need to create the necessary profiles and assign the correct resources.
To send transfer documents from a store to its POA, create a Prism-to-Prism profile and only send documents.
To send transfer documents from the POA to RIL, create a Prism-to-RIL profile and only send documents.
Here are the specific transfer-related resources:
- transferslip
- transferorder
- transrule
- tranfeetype
Availability Checking for Slips
Retailers can have Prism perform availability checking on slips. This enables retailers to verify the quantity listed on an out slip is on-hand in the source store's inventory. If the quantity specified on the slip exceeds the current OH Qty in Inventory, Prism will display a warning.
In most cases, stores want to transfer excess inventory. If a store were to transfer out its entire stock of an item, then the source store will end having to place a new order, which negates the benefit of the transfer from one store to another. By enabling the Availability Checking preference, retailers will be alerted whenever the quantity on an out slip exceeds the current OH Qty.
To access the preferences, in the Admin Console go to Node Preferences > Transfers > General. Navigate to the Availability Checking dropdown. If set to Check OH Qty, quantities will be checked whenever an item is listed on a slip. If set to None, no checking is done. By default, availability checking is disabled.
Multi-Store Transfers
On a multi-store transfer, you first create a transfer order that lists the items and the quantity of each item to be transferred to each store. In such a case, when you select Options > Generate Slips from the TO, multiple transfer slips will be generated, one for each store.
You can then go into the ASN Lookup area and find the ASNs. There will be one ASN for each slip. When doing transfer verification, you will see
Multi-Store Transfer: How to tell which ASN is for my store
The Store field on the ASN displays the target store; that is, the store where the merchandise will be received.
Reverse Slips
Reversing a slip "undoes" the effects of the original slip, returning item quantities to the state they were in before updating the original slip. This means that the item quantities are returned to the source store for the slip. If the original document referenced an order document, reversing it also updates the order document's fill status and balances.
1. Use Transfer Slip Lookup to find and display the slip you want to reverse.
2. With the slip displayed, click the Options button.
3. Click Reverse Transfer Slip
4. A confirmation is displayed. Click OK to continue.
5. Select the reason and click OK.
A new document will be created [and not shown to user]:
a) with the same items' quantity but
b) with mirrored From store and To store.
c) initial slip will be referenced document
d) If slip requires comments, then user will be shown a window for entering these;
e) if slip requires a reason, then user will be shown a widow for entering that;
f) the new slip will be auto updated and sent to RIL after update,
g) the initial slip will be updated with information about the new slip as a referenced document and replicated
h) a new transfer voucher will be created and updated for 'Store To' of the initial slip and with type Return
Slip Type for Reversed Slips
The Slip Type used to describe reversed slips differ slightly between Prism and RIL. Refer to the following table. When looking up slips, you can search by the slip types of Reversed or Reversal.
| Prism | RIL | |
|---|---|---|
| Original Reversed Document | Reversed | Reversed |
| New document created to undo the original document | Reversal | Reversing |
Options Button Menu on Slips
Use the Options button on the slip form to go immediately look up a slip, pending slip or to print tags.
| Option | Description |
|---|---|
| Transfer Slip Lookup | Opens the Slip Lookup area. |
| Pending Transfer Slips | Opens the Pending Slip Lookup area |
| Reverse Transfer Slip | Reverses the slip. |
| Print Tags | Opens the Print Tags modal to print tags for the items on the slip. |
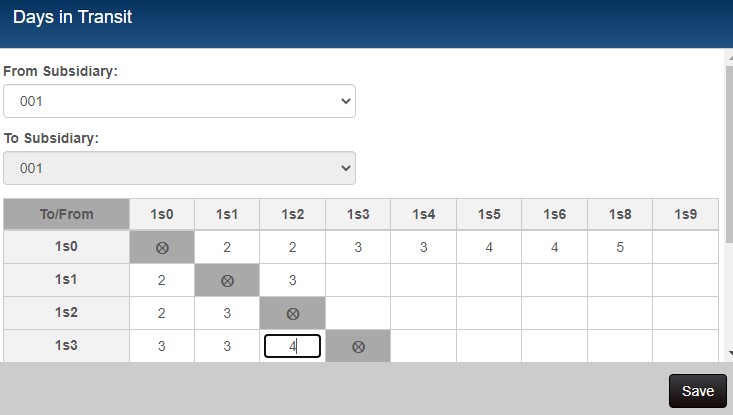
Days in Transit
In Prism Admin Console > Global Preferences > Days in Transit, users can define the default number of days that it takes to complete a transfer between individual store locations.
Sample Admin Console > Global Preferences > Days in Transit:
Updating Days in Transit on Transfer Slips
When a user creates an out slip, Prism will enter the default Days in Transit value on the slip. This enables employees at the destination store to know when the merchandise will arrive and enables more effective monitoring and reporting. The default days of transit defined in preferences for a pair of stores is used to populate the ETA Date field on the transfer slip. If no value is defined in preferences for a store pair, the ETA Date is set to the current date. Once the transfer is complete, Prism will update the transfer documents with the number of days the merchandise spent in transit (voucher Post Date - ASN Post Date, or, if a voucher has not been created, Current Date/Time - ASN Post Date). When you click Resolve All in Transfer Verification, Prism corrects the documents' Days in Transit values to match the actual transfer time (In Slip/Voucher Created Date - Out Slip Created Date).
Status field on Transfer Slips
The Status field shows the current status of the transfer. The Status field can have one of the following values:
| Status field value | Description |
|---|---|
| Scheduled | If a Days in Transit value is defined, then before the voucher is updated, the Status is set to Scheduled. The DIT shows the default value defined in preferences |
| Received | When a transfer voucher is updated but not yet verified, the Status is set to Received. The DIT shows the actual DIT based on the slip and transfer voucher created dates. |
| Verified | When the transfer voucher is updated and verified (per preference setting or Transfer Verification), the Status is set to Verified. The DIT shows the actual DIT based on the slip and transfer voucher created dates. |
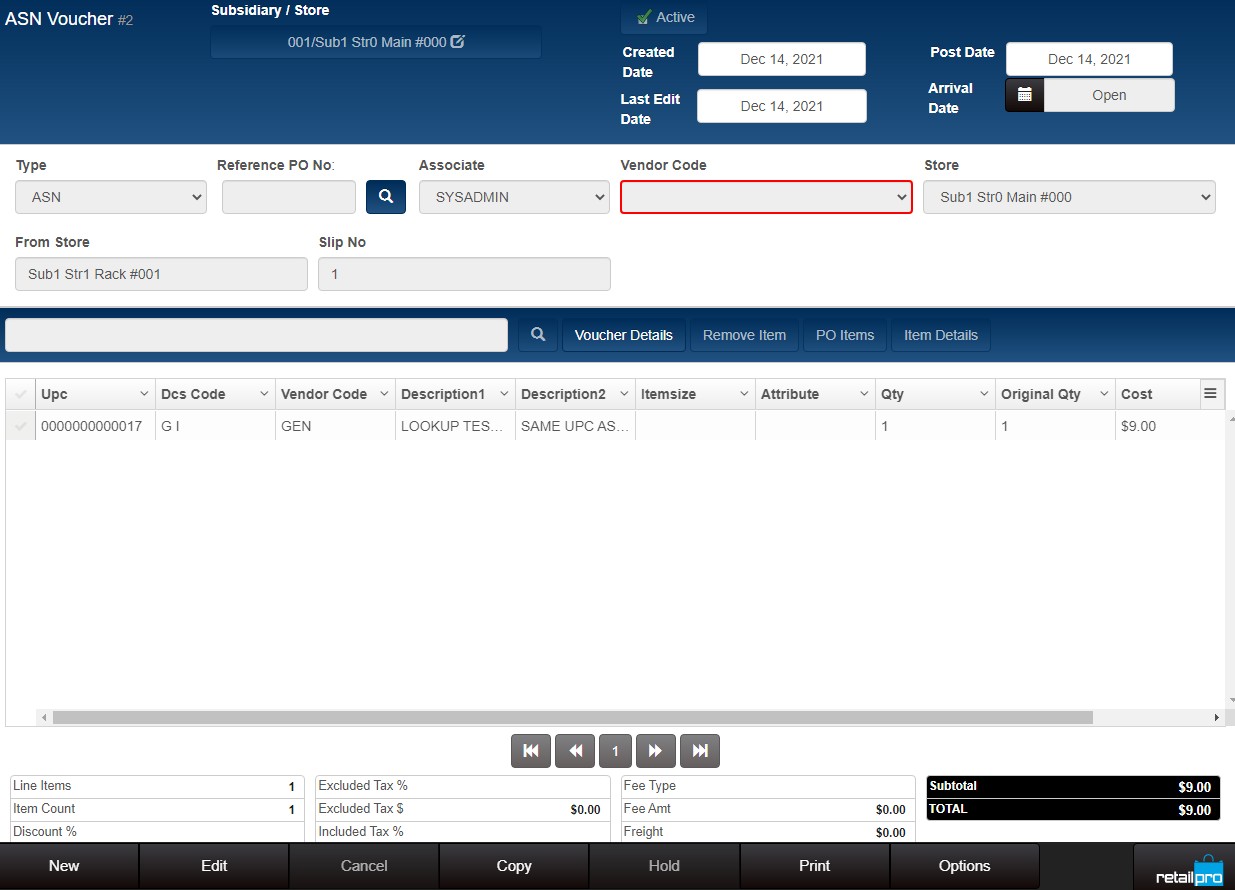
Arrival Date on ASNs
When the slip is updated, by default an ASN voucher is generated (based on preference setting). On the ASN Voucher, the actual Arrival Date is initially set to "Open." Edit the Arrival Date as needed.
Sample ASN showing Arrival Date set to "Open":
Next, the user generates a receiving voucher from the ASN.
After the voucher is updated, the original transfer slip is updated with new information. The ETA Date, being an estimated date, remains based on the value set in preferences. The Transfer Status is set to "Received."
Transfer slip after receiving voucher is updated:
Replication of ASNs generated from Transfer Slips
Background
When a user updates a transfer slip, Prism removes the quantities from the source store's Inventory. The expectation is that a user at the target store will create a voucher to receive the quantities into the target store's Inventory. To facilitate the receiving of merchandise at the target store, users can set a preference in Admin Console > Node Preferences > Transfers > General: "Upon Transfer Slip update generate: [ASN | Voucher | None]". By default, the preference is set to ASN, which means an ASN will be generated upon transfer slip update and prepared for replication to the target store (To Store on the transfer slip).
The following sections have information about two changes in Prism 2.1 that work together to give retailers more control over the replication of reference ASNs.
- ‘None' option added to "Upon Transfer Slip update generate:" preference
- Store Assignments feature added to Tech Toolkit
About the ‘None' option
When set to ‘None,' the installation where the slip is originally created and updated will not generate an ASN. Instead, the slip will be replicated up the enterprise tree until it reaches the controller that is "in charge" of the destination store for the slip. The use case for the ‘None' option is when the retailer wants the reference ASNs for transfers to be generated at an upstream installation, typically the HQ installation.
Sample Admin Console > Node Preferences > Transfers > General showing "Upon Transfer Slip update generate:" setting:

About the Store Assignments feature in Tech Toolkit
A new "Store Assignments" feature in Prism Tech Toolkit enables users to select the installations for which this controller is "in charge" and for which the reference ASNs will be sent downstream.
An ASN will be generated if a transfer slip is received during replication and:
- The slip has no reference document
- The controller where the slip is received is the controller for the destination store (To Store on the transfer slip)
After the ASN is created at the HQ, the ASN will replicate throughout the enterprise unless the appropriate Advanced Filters are created for the receiving resource. In most cases, the desire is to replicate the ASN down the enterprise tree only to the destination store.
To define Store Assignments, log in to the Prism Tech Toolkit. For the desired server (e.g., the HQ server), click the menu icon and select Store Assignments.

Select the checkbox for the individual store locations assigned to this server. A server that does not have a store selected is not designated to a specific store.

Advanced Filters
When using the ‘None' option, it is important to add Advanced Filters to the receiving resource for the appropriate replication profiles. Advanced Filters enable fine-grained control over which records for a specific resource are replicated. In the case of the receiving resource, the Advanced Filters prevent the ASNs generated at the HQ from replicating throughout the enterprise.
To define an Advanced Profile for a resource, add or edit a profile and select the receiving resource.
Next, scroll down to the Advanced Filters area. In the following example, vouchers that have a VouClass field that is NOT EQUAL to 2 (‘cancelled') will be replicated; vouchers with a VouClass of EQUAL to 2 will be filtered (not replicated). This type of Advanced Filter is used to send receiving documents upstream to the POA.

Use an Advanced Filter to indicate the stores where ASNs will be sent. The example below shows an Advanced Filter for the receiving resource that indicates documents that have a Store Number equal to 1 will be replicated. This type of Advanced Filter can be used to send receiving documents (ASNs) downstream to the destination store.

Example
For the example enterprise tree shown, here is how to prevent replication of ASNs throughout the enterprise:
001 -> POA1 has (VouClass,ne,2)
002 -> POA1 has (VouClass,ne,2)
003 -> POA2 has (VouClass,ne,2)
HQ->POA1 has (StoreNo,eq,1)or(StoreNo,eq,2)
POA1 -> 001 has (StoreNo,eq,1)
POA1-> 002has (StoreNo,eq,2)
HQ->POA2 has (StoreNo,eq,3)
POA2->003 has (StoreNo,eq,3)
Sample enterprise tree:

If a transfer slip for a transfer from Store 1 to Store 3 is updated at Store 1, that slip will be replicated up the enterprise tree. When the slip arrives at POA1, that controller is not the controller for the destination store, so no ASN is generated. The slip continues being replicated up the enterprise tree. When the slip arrives at HQ, an ASN is generated from the slip.
The Advanced Filter for the receiving resource defined at the HQ and POA2 (StoreNo,eq,3) will prevent the slip from replicating throughout the enterprise. In addition, Tech Toolkit must be configured so that Store 3 is included in the Store Assignments for the HQ and POA2 servers.