Chapter 9. Item Details
Prism 1.14.7 User's Guide Chapter 9. Item Details PDF
Prism 2.3 User's Guide Chapter 9. Item Details PDF
You can view/edit a variety of information for the individual items on a transaction. Highlight the item in the item list and then touch or click the Details button. Select the desired tab and view/edit information as needed. Touch or click the Save button to save changes.
You can edit the following item information in Item Details:
- Doc Quantity
- Price Level
- Discount
- SO Number
- Shipping Method, Shipping Amount, Tracking No
- Associates and Activity Percentage
- Item Notes
- OH Qty
- Serial No (serial number items only)
- Lot No (lot number items only)
Item Details information that cannot be edited includes
- Item information like Price, Cost, Units/Case, Inventory Type
- Bill To Customer Information (must be modified on main Transaction form)
- On-hand quantity information for the item at stores
Navigating to Previous/Next Item
You can navigate between items while in the Item Details dialog by using the Next Item/Previous Item buttons.
| Topic | Description |
|---|---|
| Item Details | Displays general information about the item (description, price, cost, doc qty). If customer loyalty is enabled, loyalty information (e.g. Points Earned) for the item is also displayed. If the item is a serial or lot-number item, the number is displayed on this tab. |
| Discounts | Apply a discount percentage or amount or a specific price to the item. |
| Shipping | Add Shipping or freight to the item. |
| Associate | Associate information, including Activity % |
| Item Notes | Enter up to 10 item notes for each item. |
| OH/Qty | Display item quantity information at other stores in the subsidiary |
Sample Item Details screen

Item Details
On the Item Details tab, you can edit doc quantity and price level, view (but not edit) Units/Case, Inventory Type, Order Item Type, Store O/H Qty and Price. If the item is a kit, you can break the kit into its components.
Refer to the following table for information about the fields displayed on the Item Details tab:
| Field | Description |
|---|---|
| Doc Quantity | The quantity of the item on the current transaction. |
| Units/Case | read-only) For case-quantity items, the number of units per case. |
| Inventory Type | (read-only) The type of item. The following list shows each Inventory Type and the number that represents the type in the RPSODS database. 0 = No entry (regular item) 1 = Kit Item 2 = Package Item 3 = Gift Card Stored Value 4 = Gift Card Prepaid 5 = Gift Certificate 6 = Central Gift Card |
| Order Item Type | Order Item Type (read-only) Type of order (e.g. Customer, Special, Layaway). |
| Loyalty Earned | The number of points earned when a customer enrolled in the corresponding loyalty program purchases the item. |
| Loyalty Redemption | The number of points subtracted from the customer's loyalty points balance when the item is purchased using loyalty points. |
| Loyalty Gift | If selected, indicates the item is a loyalty gift item. |
| Loyalty Program | The loyalty program for the customer. |
| Store OH Qty | (read-only) The current on-hand quantity at the store. |
| Fulfillment Location | (read-only; used with Send Sale Transactions) Displays the fulfillment location for a send sale order. The Fulfillment Location is selected when the Associate changes an item's type to "Send Sale". |
| Inventory Price | (read-only) The inventory price of the item. |
| Inventory Cost | (read-only) The inventory cost of the item. |
| Price Level | The price level assigned to the item. By default, item's are assigned the same level as the transaction, which is the price level assigned to the Store where the transaction is being created. |
| Serial No | The Serial Number assigned to the item. |
| Lot No | The Lot Number assigned to the item. |
Break a Kit
Breaking a kit returns the individual component items to inventory. When you break a kit in RP Prism, the individual component items desired by the customer can then be sold.
See the "Packages and Kits" section for more information.
Taxes
Prism users can set the sales tax amount for each item on a transaction on an automatic or manual basis in Item Details. Automatic is the default Tax Calculation method. This means that the tax amount for the item is determined by the tax rate assigned to the item's tax code in the current store's tax area. When set to Automatic, you can only select a different Tax Code. When set to Manual, the user can enter a specific Tax Amount or Tax %. If set to manual, then Tax Codes are set to value - ‘OVERRIDE'.
The ability to edit item tax is controlled by the following security permission: POS > Change Item Tax Amount. This permission(allow, override, deny) is applied on selection of the Manual radio button for Tax Calculation.
Sample Item Details - Taxes tab:

Discounts
On the Discounts tab of the Item Details dialog, users can discount the current item by entering a discount amount, a discount percentage, or a specific price.
(Note: You can also enter a line-item discount without entering item details. Simply select the item in the list and click the Discount button.)
Sample Item Details - Discounts tab:

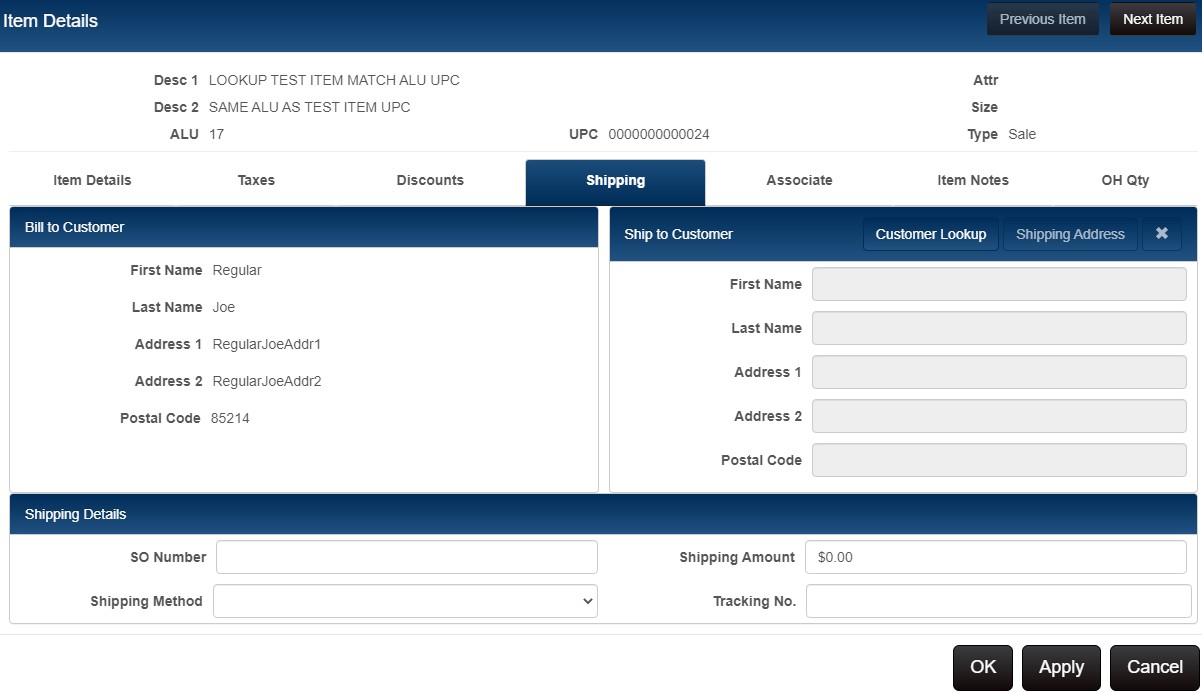
Shipping
On the Shipping tab of the Item Details dialog, you can:
Add or change the ship to customer for an item
Add a shipping fee to an item and optionally apply tax to the shipping fee
Enter the tracking number
To change item shipping information:
1. Display the Item Details dialog and then select the Shipping tab.
2. Enter a Shipping amount and select a Shipping Method. Enter the Tracking # assigned by the carrier.
3. To change the shipping customer touch or click the Shipping Customer button. Use standard lookup procedures to find and select a customer.
4. Touch or click the OK button to save and exit the dialog or Apply to save without exiting.
5. Complete the rest of the transaction and tender.
Refer to the following table for information about the fields on the Shipping tab:
| Field | Description |
|---|---|
| Bill To First Name | (read-only) The first name of the Bill To Customer. |
| Bill To Last Name | (read-only) The last name of the Bill To Customer. |
| Bill To Address 1 | (read-only) The street number and street name of the Bill To Customer's address. (e.g. 123 Main St.). |
| Bill To Address 2 | (read-only) The suite or apartment number of the Bill To Customer's address. |
| Postal Code | (read-only) The ZIP or postal code of Bill To Customer's address. |
| Ship To Last Name | The first name of the Ship To Customer. |
| Ship To Address 1 | The street number and street name of the Ship To Customer. |
| Ship 2 Address 2 | The suite or apartment number of the Ship To Customer. |
| Postal Code | The ZIP or postal code of the Ship To Customer's address. |
| SO Number | The sales order associated the transaction (if any). |
| Shipping Method | The carrier/shipping service used (e.g. UPSP Ground). The list of shipping methods is defined in Admin Console - Node Preferences - Transactions - Fees/Shipping |
| Shipping amount | The amountcharged for shipping. |
| Tracking # | The tracking number assigned to the shipment by the carrier. After the shipping carrier has assigned a Tracking # to the shipment, you can edit the transaction and add the number. |
Sample Transaction Details - Shipping tab:
Associate
Select the Associate tab to view/edit the associates assigned to the item. You can assign up to five Associates on a single transaction and assign an Activity Percentage to each associate. The Activity Percentage represents how much of the item's sale should be allocated to the employee (e.g., for commission calculations).
Changing Associate in Transaction Details
If you change any of the Associate fields in Transaction details, you will be prompted to change the Associate at the item level for any items currently on the transaction. If you list additional items, the new associate will be assigned automatically.
Sample Item Details - Associate tab:

Item Notes
The Item Notes tab of the Item Details dialog has 10 separate item note fields where you can enter information about the item (e.g. item condition or detailed explanations about discounts, fees, etc.).
Select an item note button and then type the note text. To display a virtual keyboard, double-tab in the text field.
Sample Item Details - Item Notes tab:

OH Quantity
The OH Qty tab of the Item Details dialog enables you to see the OH Qty of the item at other stores in the subsidiary. This is useful if a customer wants an item that is out of stock at one location. An Associate can easily determine at which locations, if any, the item is available.
Sample Item Details - OH Qty tab:

Sublocations in Item Details
When an Associate lists an item on a POS Transaction, the item will be pulled from the default sublocation assigned in Node Preferences > System > General. The preferences are set to Primary when the Sublocation feature is enabled and remain set to primary unless changed.
The process for changing the sublocation on a POS transaction is the same whether ordering, selling, or returning the item.
Change Sublocation on POS Transaction
Note: The user must belong to a group assigned the "Change Sublocations - POS Transactions" permission.
Start a new transaction and list the item(s).
Select an item in the item list and click Item Details.
Click the Item Details panel. The Sublocation dropdown shows the sublocation from which the item will be pulled. The Sublocation is the one assigned in preferences. Users with the required security permission can select a different Sublocation. Note: Only sublocations for the current store are available for selection in the Sublocation dropdown.
Availability and On-Hand Checking for Sublocations
Prism Availability and On Hand checking are based on store OH Qty, not sublocation quantity. This means that if the item in the sublocation has an OH Qty of zero or less than the amount being purchased, transferred, etc., no alert will be raised. Define options for availability and on-hand checking in Admin Console > Node Preferences > System > Documents.