Chapter 28. Employees
Prism 1.14.7 User's Guide Chapter 28. Employees PDF
Prism 2.4.1 User's Guide Chapter 28. Employees PDF
Prism uses a role-based security system in which employees are assigned to different security groups depending on the employee's role in the company. Using Prism's security groups, you can easily control employee access to specific Prism features and areas. This helps retailers meet the principle of least-privilege in which users are granted access to only those program areas features necessary to do the user's job.
When a user launches the Prism Proxy to log in to Prism, the user must enter the login name and password entered in the employee record. Store assignments are enforced. This means that users (excluding the SYSADMIN user and employees with the System Admin flag checked) can only create transactions for stores that are assigned to the employee's record.
Basic Steps for employee management
- Create employee groups.
- Create employees.
- For each employee group, edit the permissions assigned to the group to match the security goals of the company.
- Assign individual employees to groups as needed.
- Adjust employee store assignments, if needed.
About Prism Employee Groups
When you first install Prism, a single default employee group called the Administrator group is created. This default Prism Administrator group enables users to log in to Prism the first time and initialize the system (default login credentials are sysadmin/sysadmin).
During initialization, employee groups are copied from the Prism POA to the new server. The default Administrator group is overwritten during initialization. You can add or remove employees from groups or change the group permissions by editing the group record.
Employee Subsidiary and Store Assignments
Prism tracks the subsidiary and store to which each employee is assigned. It is important to assign employees to the correct subsidiary and store. Specifically, employees can only create documents for stores to which the employee is assigned. To edit an employee's subsidiary and store assignments, navigate to the Employee record > Stores tab.
When a new employee is created, by default, the Base Subsidiary for the employee is assigned to the same subsidiary as the user who is creating the employee record; however, users can select a different Base Subsidiary when creating a new employee.
User Password Policies
You can define password policies for things like strong passwords, password history and other options in the Admin Console.
Employee Login
When a user launches the Prism Proxy to log in to RP Prism, the user must enter the login name and password entered in the employee record. Store assignments are enforced. This means that users (including the sysadmin user) can only create transactions for stores assigned to the employee.
Employee Preferences
There are two key areas for employee preferences:
- Node Preferences > Employees > General
- Node Preferences > Employees > Policy
The following table has information about the General settings. See the Password Policy section for information about the Policy preferences.
| Preference | Description |
|---|---|
| Require User to Select Associate | If the "Require user to select an associate on new transactions" check box is selected, users must make a selection in the Associate field when creating a new transaction. If the user tries to tender/update the transaction without selecting an Associate, an error message is displayed. |
| Use Simple Time Clock | RP Prism includes a built-in time clock feature that enables easy check in at start of shift and easy check out at end of shift as well as the ability for managers to create or edit check in/out records that are missing or need correction. The time clock comes in two versions: Standard version that requires employees to enter their user name and password Simple version that automatically creates a record for the currently logged-in user. If this preference is selected, the simple time clock will be used. |
| Display Associate As | Enables retailers to customize how Associate names are displayed in the RP Prism UI: First, Last Name; Last, First Name; User Name |
| Default Associate to use for New Transactions | Select the Associate that should be entered by default on new transactions. By default, the logged-in user is entered as the Associate. This preference enables you to change the default behavior. This preference must be set at the Store level. |
| Automatically Lock Workstation | If selected, workstations for the store will be locked after the specified number of minutes without activity. By default, the lockout period is set to 15, meaning that if there is no activity on a workstation for 15 minutes, the workstation will be locked. When the lockout time is reached, a prompt is displayed in the Retail Pro screen. To unlock the workstation, a user must log in with a valid Retail Pro username/password combination. You must refresh (reload) your browser for the change to take effect. If the same user logs in to the prompt, the user will be in the same location as when the lockout took effect. If a different user logs in, the user will be returned to the RP Prism Point of Sale home screen. |
Node Preferences > Transactions > Discounts
The Transactions area of preferences has a preference that enables users to override the Employee Max Discount setting. When the "Enable Employee Maximum Discount Override" preference is selected, Prism will display an override prompt before reducing the discount. The Employee Maximum Discount is defined in the employee record. The default setting is 100, meaning that employees by default can grant discounts up to 100 percent.
The Employee Maximum Discount field enables you to place an upper limit on discounts that can be given by individual employees. If an applied discount exceeds the employee's Maximum Discount amount, the discount amount is reduced automatically to conform to the max setting.
Security Permissions for Employee Management area
You can control access to the following employee-related features on a group basis.
| Permission | Description |
|---|---|
| Employee Management - Access | Allow group members to access the Employee Management area. |
| Employee Management - Change Till | Allow group members to change the till that is assigned to an employee. |
| Employee Management - Create/Edit | Allow group members to add new employee records and edit existing employee records. |
| Employeee Management - Reset Password | Allow group members to reset passwords for employees (as as his/her own password). |
| Groups - Create/Edit | Allow group members to add new groups and edit existing groups (Name and Description). |
| Groups - Edit Members | Allow group members to add and remove employees from a group. |
Access Employee Management
- Click the Retail Pro button in the lower-right corner of the screen and select Store Operations from the Prism menu.
- Click Employees. Select Employee Management or Group Management.
Group Management
Prism comes with a default set of groups that represent typical key roles in a retail operation; however, you can define as many groups as needed.
For each group, you can:
- Select the employees who are group members
- Select the permissions that group members can use
The employees assigned to each group inherit the permissions assigned to the group. For example, the POS group is restricted to common actions related to creating and updating transactions. The Managers group has more permissions. You can modify the default permissions assigned to each group as needed, You can create as many groups as needed. Each employee must be assigned to at least one group and can be assigned to more than one group if the employee's role in the company warrants it.
When working with groups, you can:
- View/edit groups (group name is read-only)
- View/edit group permissions
- Add/remove group members
- Add groups
View/Edit Groups
Select Store Operations from the Prism menu. Click Employees > Group Management. When you access Group Management, a screen for filtering/searching for groups is displayed. Click the drop-down to select a lookup field.
Filtering the Group List
If you have many groups, you can use the filter feature to find a specific group. In the Group Management area you will see a Search By dropdown and text box where you can type a group name or part of a group name. By default, the search will look for records that have text that equals the search criteria. You can use a different operator, if desired, such as Not Equals, Contains, isEmpty, or isNotEmpty. Click the Search button on the bottom of the screen to start the Search. The Total Records element shows how many records were returned by the Search. You can select to search for Active records only, Inactive records only, or All (both inactive and active).
Edit Group Details
Click the check for the group you want to edit. This will enable the Edit button. Click the Edit button, make any needed changes and then click the Save button at the bottom of the screen. Group Name is limited to 30 characters maximum. The Description field enables you to enter a longer text string to describe the group.
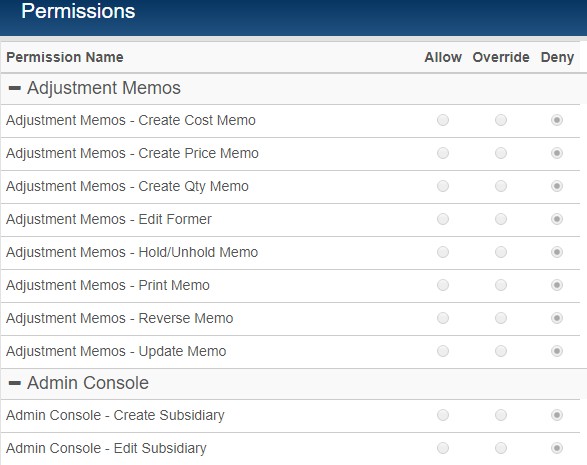
Group Permissions
The permissions assigned to a group define which program areas and features that group members can use. For most permissions, you have three choices: Allow, Override, or Deny. When assigning permissions for a group, you can use the Allow All, Deny All and Override All buttons to quickly select or clear all permissions for an area.
| Selection | Description |
|---|---|
| Allow | Group members have access to the program area or feature. |
| Override | When group members try to access the area or feature, an override dialog is displayed, so that a user who belongs to a group that is assigned the permission can log in and complete the action |
| Deny | Group members do not have permission |
Edit Group Permissions
- Select the group whose permissions you want to edit by clicking the check mark on the left column.
- Click the Details button. The Group Details is split into two panes. One pane is for editing the Group Name and Description. Another pane is for editing the Group Permissions.
- Click the Edit button.
- In the Permissions area, select the appropriate radio button for each permissions you want to Allow, Deny, or apply Override. Use the Allow All, Deny All, or Override All buttons as needed.
- When finished, save the changes.
The list of permissions is grouped by area. To find a permission, you can scroll the list, or type all or part of the permission name in the Search field at the top of the list. When you type all or part of a permission name in the Search box, it lists the matching permission so you can find it more easily.
Overrides
If the employee does not belong to a group with the required permission, a check is made of the "override" permission. If the user belongs to a group assigned the override permission, a login dialog is displayed so that a manager or other user with sufficient rights can log in. After the task is complete, the original user must log back in.
Multiple overrides are not allowed. For example, if an override is made to allow a NEW transaction to be created, a second override is needed to allow discounts to be applied. Only the last override attempt will be recorded.
Assign Employees to Groups
Each employee must be assigned to one or more groups. The group(s) that an employee is assigned to determines the features and areas of Prism that the employee can use. Prism comes with a default set of groups and you can add your own custom groups.
Step 1
In Group Management, find the group want to edit. Click the check mark on the left column.

Step 2. Click the Employee Assignments button on the bottom toolbar.

A screen for selecting individual employees is displayed. Employees who are assigned to the group have the boxes checked. Employees who are not assigned to the group are unchecked. You can filter the list to display only checked or unchecked employees by clicking the buttons. In the upper-right is an All button that can be used to display all employees.
Type the name of an employee and press the Enter key. The list is filtered to show employees that match the filter criteria. When finished, save the changes.

New Group
You can add as many new groups as you need. You should only create Groups on the Prism side if you are operating in a Prism-only environment.
Step 1
Go to Store Operations > Employees and click the click the Groups button. Click the New button on the bottom toolbar.
Step 2
Enter a name for the group. Group names are limited to eight letters. You can enter a Description that gives more detailed information about the group and its permissions. Save the changes.
Step 3.
Assign Employees and Permissions for the group. See the "Assign Employees to Groups" and "Group Permissions" sections for information.
Employee Management
This section has information about working with employee records.
Employee Lookup
Access to employee records is done via a lookup area (Store Operations - Employees - Employee Management). In the lookup area, you can filter the list of employees and then select the employee you want. In the Search By field, select a lookup field. You can choose to look up employees by First Name, Last Name, or Login. You can add more options by editing Grid Format preferences. Notice also that there is a dropdown that says "Equals". This dropdown controls the operator used to get exact match records. By default Equals is selected. If you click the dropdown, you can see the other selections that are available. The other selections are Not Equal, Contains, Does not Contain, is Empty, and is not Empty. You will see a text field where you can type search criteria. If a match is found, it will be displayed. When you are done entering filter criteria, click the Search button.

A list of matching records is displayed. A row of buttons for working with employee records is displayed on the bottom of the screen. To work with an employee record, click the check for the desired record and then click Details to view the record, or Edit to edit the record. Click the New button to add a new employee record. You can use the page navigation buttons to page through the search results. The total number of Search results is displayed in the upper-right corner.
Hide/Show Filter Elements
When working with the Employee Lookup screen, to return to the list of employees, click the left-pointing caret; to redisplay the filter elements, click the right-pointing caret.
New Employee
- Navigate to Store Operations > Employees. Click Employee Management.
- Click the New button on the bottom toolbar.
- A blank employee record is displayed, ready for editing.
- Enter employee information in the fields and save the changes. Username and Password are required fields. (Refer to the "Employee Field List" section for information about the available fields).
- Click the Save button. The record is finalized and saved to the rps.user table.

Employee Fields
| Field | Description |
|---|---|
| Username | This the name the user will type to log in to Prism. The maximum length is 30 characters. This field is not case sensitive. |
| Password Required | Passwords can be a maximum of 30 characters. See the Password Policy section for more information about setting password requirements and changes to Microsoft's guidance and recommendations. |
| Base Subsidiary | Each employee is assigned a Base Subsidiary. Each employee is assigned to a Base Subsidiary. By default, this is the subsidiary where the employee record was created. This field can help managers better understand how employees are distributed and assigned throughout the organization. |
| Home Store | Although an employee may be assigned to multiple stores via the Store Assignment feature, in practice, the employee usually works at one primary store. By assigning a Home Store to employees, you can sort employee records by the Home Store field to view all employees by store, or filter employee records to show only employees assigned to a particular Home Store. Note: Only stores to which the employee is currently assigned are available for selection in the Home Store field |
| Hire Date | The date the employee was hired or started working at the store. Click the Calendar icon to select a date. |
| Job Title | Prism comes with a default set of job titles. You cannot add new job titles. The default job titles available in Prism are: Manager, Assistant Manager, HR, Associate, Cashier, Receiving Officer. Job titles defined in RP 9 are copied to the Prism server during initialization. |
| Till | Each employee can be assigned a cash drawer and a till. When a till is assigned, and the employee's assignment is different than the store default, the employee's assigned till will be entered on the transaction. Define Tills in Local Preferences > Reporting > X/Z-Outs (must be defined at the Store level.) |
| Drawer | Each employee can be assigned a cash drawer and a till. When a Drawer is assigned, and the employee's assignment is different than the store default, the employee's assigned drawer will be entered on the transaction. Define Cash Drawers in Local Preferences > Hardware. |
| Max Disc % | The maximum discount that the employee can give on a transaction. The discount amount on transactions will be reduced to fit within the employee's allowed Max Disc %. |
| POS Cashier | If selected, the employee will be included in Cashier dropdowns. This enables you to filter back-office and/or administrative employees from the dropdowns. |
| POS Associate | If selected, the employee will be included in Associate dropdowns. This enables you to filter back-office and/or administrative employees from the drop-downs. |
| Active | If selected, the employee is active. Only active employees can log in to Prism. |
| Password Never Expires | If selected, and if a Password Policy is defined that requires periodic password changes, this flag will exempt the user from the defined policies for changing passwords. For example, if the policy is to require a password change every 30 days, selecting this flag will exempt the user from having to change passwords. For example, an organization may have individual offices or shops where certain users benefit from not having passwords expire. For example, a special user who only logs in a few times a year, or users with few permissions. |
| Requires Password Change | If this flag is selected, then the employee will be prompted to change password on next login. This flag is especially useful for assigning a default password to new employees. You can assign a default password to the new employee record and then the first time the employee logs in to Retail Pro, the employee will be prompted to change the password |
| System Admin |
This flag grants extra powers to the employee. Because of the wide-ranging powers this flag grants to users, you should only select it for employees who are truly in a system administrator type of role. For most users, the standard employee groups or your custom groups should be used. But for those employees who are in a troubleshooting or administration role, this flag should be used. If the System Admin checkbox is selected, the employee can create sales documents for other stores (stores not included in Store Assignments).
Note: The SYSADMIN user is a default user created when you install Prism. The SYSADMIN user enables you to log in to Prism and join the enterprise, initialize Prism and configure Permissions. After configuring permissions, you should log out and then use regular user accounts to log in. An employee with the System Admin flag selected is distinct and different from the SYSADMIN user. |
Employee Records Tabbed Pages
Each employee record is organized into a set of tabbed pages:
- Contact Fields
- UDF
- Stores
- Groups
- Permissions
Employee UDF/Auxiliary Fields
User-defined and Auxiliary fields enable you to create custom text fields that store whatever information you want them to store. There are a total of eight user-defined fields and 12 Auxiliary fields.
UDF fields are especially useful for adding company- or industry-specific information. When you initialize the Prism server, any Employee UDF fields defined in RP 9 preferences are copied to the Prism server. You can edit the field entry for specific Employee UDF fields; however, you cannot edit the UDF field name or add remove entries in Prism.
Each UDF field has two parts: a field label and one or more field entries.
Field Label: Each UDF or Auxiliary field has a field label that will be the text that users will see on the Prism UI. Each UDF label that you define corresponds to the list of Field Entries that you define.
Field Entries: These are the individual selections that will be available in the dropdown for the corresponding field label. For each UDF field, you can define as many Field Entries as needed.
Define UDF Field Entries
1. Click the Edit button (pencil icon) for the desired UDF field. . A text box is displayed.
2. In the text box, type a new name for the UDF field label. To apply the change, click outside the text box.
3. Save the changes.
UDF Field Labels are blank when Field Name is Blank
You will notice a difference in how Retail Pro 9 and Prism handle blank Field Names for UDF fields. There are 8 UDF fields (UDF1-UDF8) and 12 Aux fields (Aux1 - Aux 12). Each Field Name is assigned to one of the UDF or Aux fields.
Employee Contact Info (Address, Phone, Email)
You can add one or more addresses, phone numbers and email addresses for each employee. This gives retailers greater flexibility when it comes to contacting employees for schedule changes, meetings and other work-related matters. To work with employee contact info, display the employee record and click the Contact tab. In the Contact area, click the plus button for the type of info you want to add (e.g. Address).
| Field | Description |
|---|---|
| Allow Contract | Different companies have different rules about contacting employees outside of their normal work hours. The Allow Contact flag enables you to indicate in the employee record whether or not the employee can be contacted and by which methods. |
| Primary | When an employee has multiple addresses, phone numbers and emails, use the Primary flag to indicate the preferred one. |
| Active | Select the Active checkbox if this address is currently used by the employee. |
| Address 4 through Address 6 | There are a total of six address fields. For most U.S. addresses, only the first three are used. Address 1 corresponds to the House Number and Street (e.g. 123 Main Street). Address 2 is used for a suite or apartment number. Address 3 stores the city and state abbreviation (comma separated). Address 4 through Address 6 are for longer addresses, such as those found in Europe. |
Store Assignments
To create a transaction at a store, the employee must be assigned to that store. In Prism's Employee module, you can easily modify an employee's store assignments. For example, if a manager needs to unassign all assigned employees from a store, instead of finding and unassigning employees one by one, the manager can browse all employees assigned to the store and unassign them directly from the one screen. Similarly, a user can view the employees who are not yet assigned to the store and select the individual employees that will be assigned.
Assign Stores to Employees
You can assign an employee to multiple stores. The employee will be able to create transactions at each store selected. To select all the stores for a subsidiary, click the All Stores link. The link is a toggle that will check/uncheck all a Sub's stores when clicked.
1. Display the Employee Record.
2. Click the Stores tab.
3. Select the check box for each store to assign the store to the current employee.
4. Save the changes.
Home Store
This field is used for reference and reporting purposes only. For example, although an employee may be assigned to multiple stores (for contingency purposes) using the Store Assignment button, in practice, the employee usually works at one primary store. By assigning a Home Store to employees, you can sort employee records by the Home Store field to view all employees by store, or filter employee records to show only employees assigned to a particular Home Store.
Note: Active stores from the Base Subsidiary are available in the Home Store field.
Click the drop-down in the Home Store field to display a list of the stores assigned to the employee. Select the desired store and save the changes.
Assign Employees to Groups
Each employee must be assigned to one or more groups. The group(s) that an employee is assigned to determines the features and areas of Prism that the employee can use. If an employee is assigned to more than one group, and one group is not allowed to do a task while another group is allowed to do the task, then the employee will be allowed to do the task.
- Display the employee's record and then select the Groups tab.
- Select a group from the dropdown. Click the Assign Group button.
- The employee is now assigned to the selected group. After the group is assigned, you can click the Permissions button to view permissions assigned to the group. You can't edit the permissions, but you can view the permissions to confirm the permissions the employee does or does not have.
Viewing Employee Permissions
In the Employee Management area, you can view the permissions assigned to an employee; however, you cannot edit the permission assignments. To change the permissions assigned to an employee, edit the permission assignments for the group the employee is assigned to. Changing an employee's group assignments will also change the assignments.
To view permissions for an employee, click the Permission's tab in the employee record.
Permissions are organized into groups. The radio button position indicates whether the permission is allowed, can be overridden, or is denied. Scroll the list to view the employees allowed permissions for each area.
Password Policies
You can customize the policies that users must follow when creating and changing passwords using the following settings:
| Setting | Description |
|---|---|
| Enforce strong password |
If selected, a "strong" password is required. A strong password includes: |
| Enforce password history for | Enforce password history ensures that old passwords are not reused continually. This setting prevents users from reusing passwords. The default setting of "1" means that users can reuse a password every other password change. If you enter 10, the user must change passwords 10 times before the user can reuse the same original password. |
| Password expires after | Enter the number of days passwords can be used before they expire. If you enter 90, then users must change passwords every 90 days. |
| Prompt changing password before expiration | Users will see a prompt reminding them to change the password. Set the number of days before expiration when the prompt should appear. |
| Lock user account after | This setting limits the permitted number of failed password attempts. This prevents malicious users from trying one password after another in a brute force attack. A common setting is "3," which means that the account will be locked after the third failed password attempt. |
| User account lockout duration | This setting determines the length of the lockout. If set to 30, then when a user's account is locked because of failed password attempts, the account will remain locked for 30 minutes and no one will be able to log in to the account during that time, even with the correct password |
Sample Password Policy settings

General Recommendations
- Don't use a single word (e.g. "princess") or a commonly-used phrase (e.g. "Iloveyou").
- Do make your password hard to guess even by those who know a lot about you (such as the names and birthdays of your friends and family, your favorite bands, and phrases you like to use).
Inactivating an Employee Clears User Name
When you inactivate an employee, the username is cleared from the employee record, freeing that username to be used by another user.
If the user is ever made active again, the username will become a required field that needs to be filled before the changes can be saved and the user becomes active again.
Replication of Employee Information
Employee information includes passwords and other sensitive data; therefore, you need to consider carefully how you want to replicate Employee data across the enterprise.
How Employee Data is Replicated by Direction
| Direction | Description |
|---|---|
| Prism to Prism | Push changes for Employees, User groups and store assignments from HQ or POA to stores. Replicate Group Permissions to another Prism system. Replicate User policy settings to another Prism system. |
Resources
The following resources are available for replicating employee information:
- employee
- employeeudf
- usergroup
- userpasswordhistory