Chapter 15. Vendors
Prism 1.14.7 User's Guide Chapter 15. Vendors PDF
Prism 2.2 User's Guide Chapter 15. Vendors PDF
This topic has information about:
- Vendors and Vendor Codes
- Security permissions for vendors
- Adding a new vendor
- Copying a vendor
- Vendor payment terms
- Vendor contact information
- Vendor currency
- Vendor user-defined fields
- Activating/deactivating vendors
- Alternate vendor information
- Trade discounts
- Replication of Vendor Information
About Vendors
Merchants order merchandise from Vendors. In the Vendors area, define a vendor record for each vendor from whom you order merchandise and then reference the vendor when creating inventory items and purchase orders.
Vendor Code
Each vendor is identified by a unique Vendor Code that can be three to six characters. Each inventory item is assigned a Vendor Code. Assigning a Vendor Code to items enables Prism to track vendor performance as merchandise is ordered, received, transferred, and sold. In addition, each purchase order in Prism must include a Vendor Code to identify the vendor from whom items are being ordered.
Payee Code on Vendor Invoices vs. Vendor Code on Purchase Orders/Vouchers
Vendor Invoice records include a "Payee Code" field instead of a Vendor Code. The Payee Code indicates the company to whom payment is being sent. The payee is often the vendor's own company in which case the Payee Code and Vendor Code are the same, but it can be a third party. Add a vendor record for any third-party payees so they can be referenced on vendor invoices.
Vendor Preferences
In Node Preferences - Merchandise - Vendors - UDF, define user-defined fields for vendors. Vendor user-defined fields enable retailers to capture vendor information that is not available in the other vendor fields that come with Prism. With UDF fields, you define 1) a field label and 2) a list of field values that will be available for selection. Prism provides 14 user-defined fields for vendor records: one date field and 13 text fields.
To add a UDF field entry, in the UDFs Naming area, navigate to the desired UDF field and type a label. Click the Save UDFs button. The UDF label is now available in the UDF Options drop down.
Click the Edit button for the desired UDF field option.
Type the text for the UDF field option and then click the check mark button.
Maximum number of UDFs
The UI allows you to create more than 14 vendor UDF fields; however, only the first 14 UDF fields will be available for use in Prism.
Maximum Number of UDF Values per UDF field
You can define as many UDF values per UDF field as needed; however, during replication of UDFs, the server checks how many UDF values belongs to each UDF. If the list numbers more than 500, the UDF values are not replicated at all. This applies to UDF values assigned to customers/inventory/vendors/employees.
Sample Node Preferences > Merchandise > Vendors > UDF Fields:

Vendor Security Permissions
| Permission | Description |
|---|---|
| Vendor - Access | If the "Allow" option is selected, group members can access the Vendors area. |
| Vendor - Activate/Deactivate | If the "Allow" option is selected, group members can activate and delete Vendors. |
| Vendor - Allow Manual Entry of UDF Values | If selected, allow group members to make edits to UDF values in the vendor record. If disabled, users are restricted to selecting one of the UDF values defined in preferences. |
| Vendor - Change Subsidiary | If selected, allow group members to change the Subsidiary. This can be used to add or edit a vendor for a different subsidiary. |
| Vendor - Create/Copy | If the "Allow" option is selected, group members can create (using New Vendor button) and/or copy Vendors. |
| Vendor - Edit | If the "Allow" option is selected, group members can edit Vendors. |
| Vendor - Edit Regional Flag | If selected, group members can edit the Regional flag on vendor records. When the Regional Inventory feature is enabled, vendors that have the Regional flag selected will be under control of the master subsidiary. |
New Vendor
Select Store Operations from the Prism menu. Click the Merchandise button. Click Vendors.

Click the New button on the bottom menu of the Vendor Search form. A new vendor form is displayed, ready for editing.
Enter the required Vendor Code (three to six characters). Enter information in the other fields as needed (refer to the Vendor fields table).
Save the changes.
Sample New Vendor

Vendor fields
| Field | Description |
|---|---|
| Vendor Code | The unique code to identify the vendor (three to six characters). |
| Vendor Name | The name of the vendor. |
| Title | Title of the vendor contact person (e.g. Mr., Ms., Mrs.) |
| First Name | First name of the vendor contact person. |
| Last Name | Last name of the vendor contact person. |
| Phone Type 1 | The type of the primary phone number (e.g. Home, Work, Cell) |
| Phone 1 | Primary phone number. |
| Phone Type 2 | The type of the secondary phone number. |
| Phone 2 | Secondary phone number. |
| Email Type | Email Type (e.g. Home, Work, Other) |
| The vendor's email address. | |
| Address Type | Address Type (e.g. home, office, or warehouse). |
| Street | The street address for the vendor's address (e.g. 123 Main St.). |
| Unite/Suite | The apartment, unit, or suite number for the street address. |
| City | The city where the vendor's address is located. |
| State/Province | The state, province, or prefecture of the vendor's address. |
| Country | The country of the vendor's address. |
| Postal Code | The ZIP or Postal Code for the Vendor's address. |
Copy a Vendor
When you copy a vendor record, all information except the Vendor Code is copied to the new record. The Vendor Code field will be blank and you must make an entry to save the new vendor.
- Search for the vendor.
- Tap or click the check mark on the side of the desired vendor.
- Tap or click the Copy button.
- Enter a Vendor Code and make any other needed changes. When finished, save the record.
Vendor Lookup
Select Store Operations from the Prism menu. Tap or click the Merchandise button. Click the Vendors button.

The Vendor Lookup form is displayed.
You can search by Vendor Code, Vendor Name or Account Number. To select a search element, click in the Search By drop-down and select the desired search field. In the example below, the user is search by Vendor Code. The operator is set to "Contains." The letter "G" is followed by the wildcard character (*), so this search will return vendors that start with the letter G.
Tap or click the Search button to start the search. By default, only Active Vendors are searched. You can click the Inactive or All button to change.
From the displayed results, select the check mark for the desired vendor and click Details to view the record or Edit to open the record in edit mode.

Vendor Codes and Specific Search
Please note that when using the Specific Search option to search by Vendor Code, you MUST include any spaces in the Vendor Code. For example, if the Vendor Code is "MZC" with a Department of "M", Class of "Z" and Subclass of "C", then users must enter two spaces after the M and the Z (not necessary to enter spaces after the C).
Vendor Detail/Vendor List
When in non-edit mode, you can view the entire vendor list by clicking the Vendor List button. If in edit mode, the button is not available.
Vendor Contact Information
Retailers will often have one or more contact persons at the vendor's company who can answer questions related to merchandise and orders. You can add information for the contact persons to the vendor record.
On a vendor record in edit mode, buttons for adding, editing and deleting vendors are enabled.
Click the "plus sign" button to add a new vendor contact.

In the displayed modal, enter details for the vendor contact person. The Contact Types, Phone Types and Email Types available for selection are those defined in Prism Node Preferences > Data Types.
(Optional) To make this contact the primary contact person, select the check box next to the name and then click the Make Primary button.
Click OK to save the record.
Sample Add/Edit Vendor Contact Person modal:

Vendor Account Number, Payment Terms
You can define default payment terms for a vendor. The default terms that you specify will be suggested on POs and vouchers addressed to that vendor. The only exception to this is if a voucher references a PO with different terms than the vendor file states. In such a case, the PO's terms will override the vendor default terms.
- Click Open Payment Terms (click the Edit button first, if necessary).
- Select a Payment Term Type from the drop-down.

- Enter details for the selected term type. For example, if you selected Days as the term type, enter the percentage discount to be received if payment is made within the specified number of days.
- Save the changes.

| Payment Term Type | Description |
|---|---|
| Days | Enables you to specify the days from the invoice date when payment is due. Optionally you can enter a discount percentage if payment is made within the specified number of days. |
| COD | Cash on delivery |
| Credit | Payment on credit. |
| Replace | Replace the merchandise. |
| Prepaid | Payment in advance |
| Due | Payment due immediately. |
| Payment | Set up payment in stages. |
| EOM | The abbreviation "EOM" means that the payer must issue payment within a certain number of days following the end of the month. Thus, terms of "net 10 EOM" mean that payment must be made in full within 10 days following the end of the month. |
Common Payment Terms
| Term | Description | Effective Interest rate |
|---|---|---|
| net 10 | Payment 10 days after invoice date. | None |
| net 30 | Payment 30 days after invoice date. | None |
| net 60 | Payment 60 days after invoice date. | None |
| 1% 10, net 30 | 1% discount if payment received within ten days otherwise payment 30 days after invoice date | 18.2% |
| 2% 10, net 30 | Take 2% discount if pay in 10 days, otherwise pay in 30 days. | 36.7% |
| 1% 10, net 60 | Take 1% discount if pay in 10 days, otherwise pay in 60 days | 7.3% |
| 2% 10, net 60 | Take 2% discount if pay in 10 days, otherwise pay in 60 days | 14.7% |
| Net EOM 10 | Pay within 10 days of month end | None |
Trade Discounts
A trade discount in Prism is a reduction in price a vendor gives a retailer when the retailer buys an item or group of items. Trade discounts are different from Vendor payment terms:
- Trade discounts are usually given to retailers that order large quantities of a product and/or retailers with a good relationship with the manufacturer.
- Vendor payment terms are defined in the vendor record and are based on payment plans with the vendor with no relation to order quantities.
Basic Steps for using Trade Discounts:
1. In Admin Console - Node Preferences - Purchasing - General: Cost to use on POs and Vouchers, select "Trade Discount."
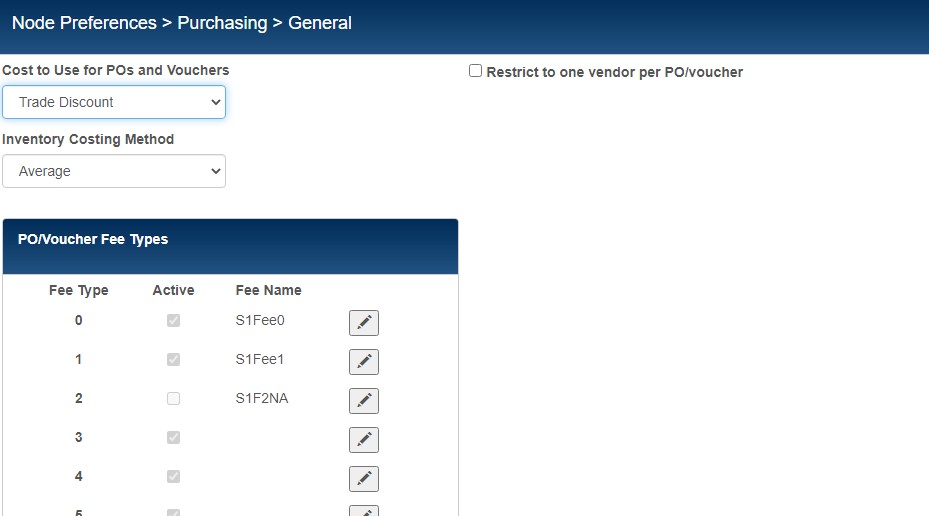
Available settings for "Cost to Use for POs and Vouchers":
| Setting | Description |
|---|---|
| Order Cost | The Order Cost value defined in Inventory will be used as the Doc Cost on purchase orders and vouchers. |
| Inventory Cost | The Cost value in Inventory will be used as the Doc Cost on purchase orders and vouchers. |
| Trade Discount | The Trade Discount % for the item is applied to the Vendor List Cost to calculate the Order Cost, which is used as the Doc Cost on purchase orders and vouchers. |
2. Navigate to Inventory Item Details - Purchasing tab. Edit the Vendor List Cost, Trade Disc %, and Minimum Order Qty fields. The Trade Discount % is applied to each applicable item's List Cost to calculate Order Cost. If using trade discounts, Order Cost is automatically used on purchase orders and vouchers, and vouchers are unable to update an item's Order Cost. The amount of the trade discount varies depending on the item and vendor. By adjusting the "Minimum Order Quantity" the trade discount can be tied to quantity ordered. For instance, a retailer might order 1000 t-shirts from a vendor and receive a 20 percent discount.
Sample Inventory record showing Vendor List Cost, Trade Disc %, and Minimum Order Qty fields:

3. Optional Edit the Trade Discount % in the vendor record. The Trade Discount % entered in the vendor record, if present, is automatically entered for new items for that vendor. When you edit the Trade Discount % field for a vendor record, it has no effect on existing items.
Sample vendor record with Trade Discount % field:

Vendor Currency and Foreign Currency Orders
The items in a retailer's store might include items purchased from a vendor located in a foreign country. In most cases, payment for the items must be made in the vendor's local currency, rather than the retailer's Base Currency. To facilitate these foreign-currency orders, assign a Currency to a vendor record. Select a currency from the drop-down. Tip: Enter an Order Rate for each currency that is separate from the rates used on point of sale transactions.
Add the Foreign Order Cost field to your inventory, purchase order, and voucher screen layouts. Add the Currency field to your inventory, purchase order, vendor, and voucher screen layouts. Assign a currency to vendors and items as needed.
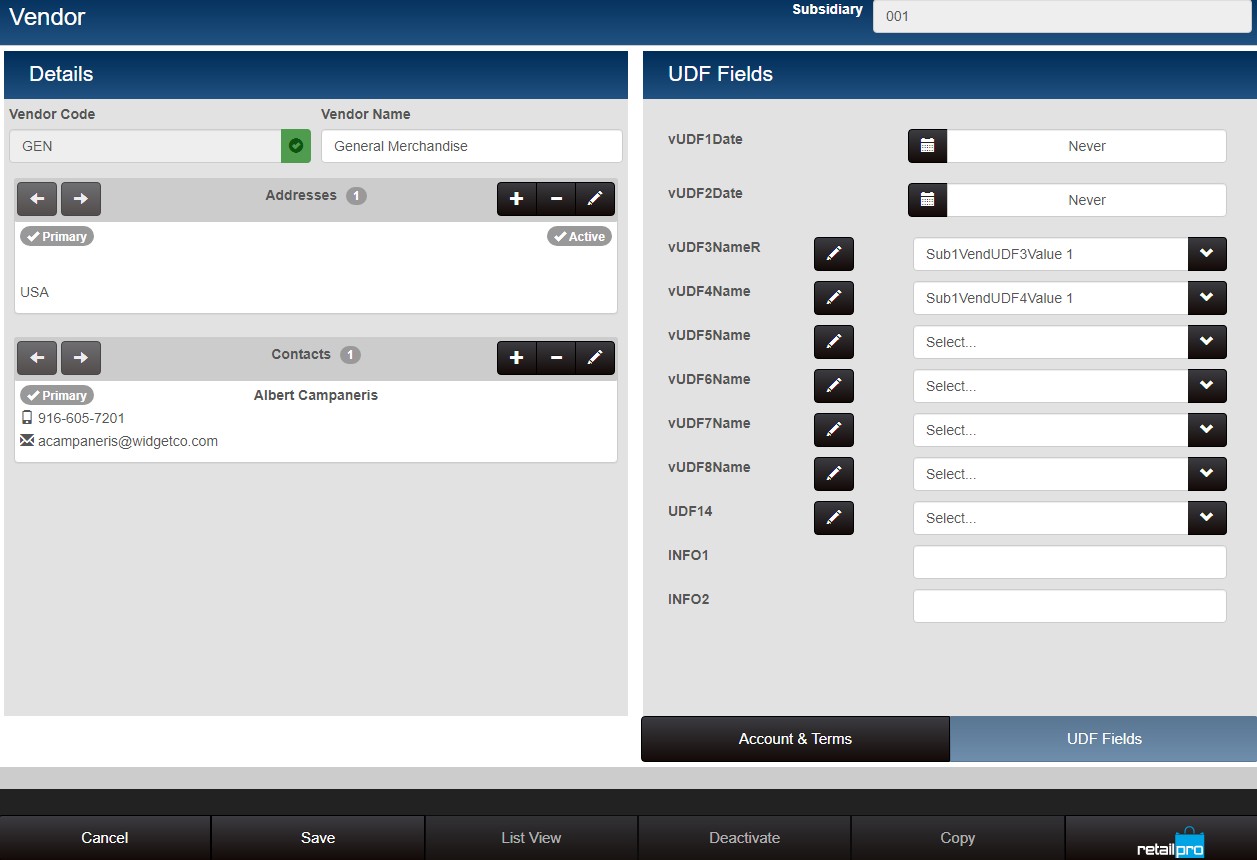
Vendor UDF and Info Fields
Prism provides user-defined fields that can be used to store various information related to the vendor. Each UDF field has a field label and one or more field entries. Define labels and field entries for the fields in Prism Node Preferences > Merchandise > Vendors > UDF. Drill down to the desired Subsidiary.
A list of available UDF fields is displayed on the left side of the screen. To the right of each field is a text box. In the text box, the user can type the desired label for the field. After a label has been added, it can be selected in the UDF Options drop-down.
Select the desired UDF field from the UDF Options drop-down and then add/edit field entries for that field label.
When the user clicks the "plus sign" icon, a new row is added for entering a new field entry for the currently selected label. When the user clicks the edit button, the text for the field entry becomes editable.
Type the desired UDF field entry and then click the check mark icon to save.

After UDF field labels and field entries have been defined in preferences, UDF field entries can be made on vendor records. The right side of the vendor record has two tabs: Account & Terms and UDF Fields. Click the UDF Fields tab.
Sample Vendor record with UDF tab selected and entries selected for two UDF fields:
Activate/Deactivate Vendors
When you deactivate a vendor, that vendor cannot be listed on purchase orders or other documents or assigned to items and styles.
- Search for the vendor.
- Tap or click the check mark on the side of the desired vendor.
- Tap or click the Deactivate button. The button is a toggle button. When viewing a deactivated record, the label changes to "Activate."
Replication of Vendors
There are two resources that control the replication of vendor information:
- vendor
- vendorudf