New Voucher
This section explains how to create a new voucher. In many cases, vouchers are auto-generated from an Advanced Shipping Notice (ASN) associated with a purchase order (PO); however, users can manually create a new voucher to receive merchandise into inventory when needed. If there is a purchase order associated with the order, users can enter the Reference PO No on the voucher and bring the PO items to the voucher.
New voucher:
Navigate to Store Operations - Receiving - New Voucher. Alternatively, click the New button on the bottom toolbar when viewing a voucher (non-edit mode).
The Associate field is set to the current logged-in user but can be edited. The Store is set to the current logged-in user's Default Store.
Sample new voucher form:

If referencing a purchase order, enter the Reference PO number and press the Enter key. Alternatively, click the Search icon and search for a PO. When a Reference PO No is entered, the Vendor Code is entered and the PO Items button is enabled.
Click the PO Items button. To bring all items/quantities on the PO to the voucher, click the All Due button. To only bring some items/quantities, click the check mark for the item and then tap or click the Item Due button.

Sample PO Items modal for selecting items from the purchase order to list on the voucher:
If not referencing a purchase order, the user must manually add the items to the voucher.
Place the focus in the Item Lookup field and scan the barcodes or type the UPC of individual items.
Enter the Qty being received for each item listed.
When all items have been listed, add an fees, freight charges, discounts or tax amounts in Voucher Details.
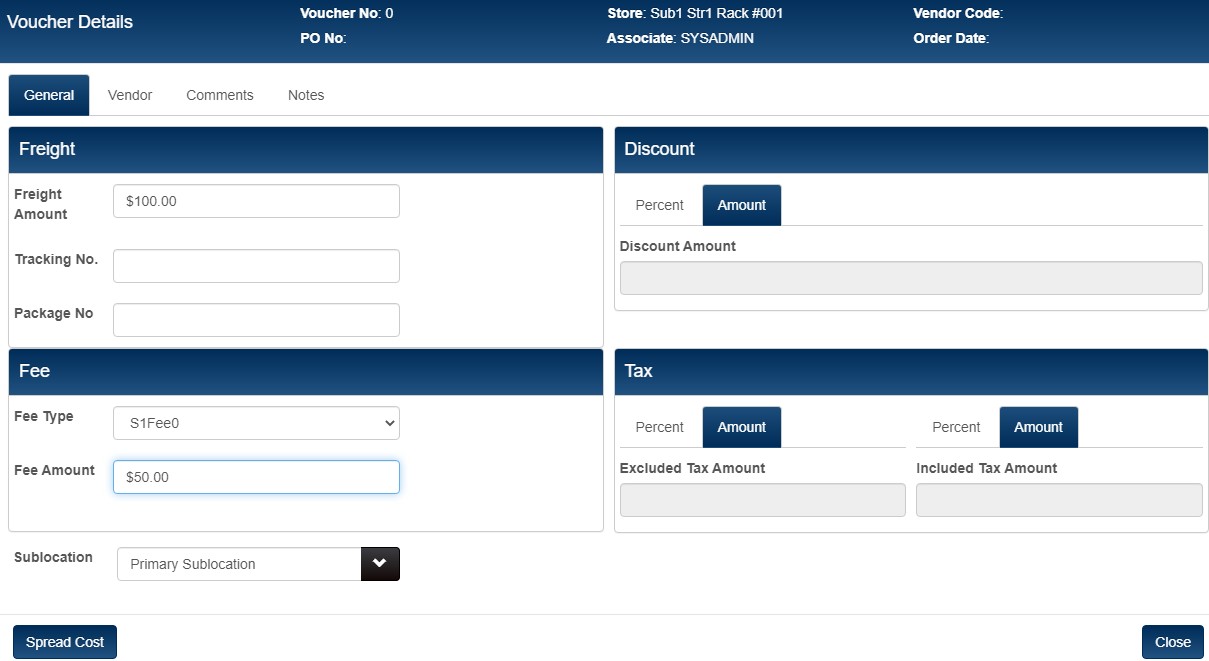
Click the Voucher Details button on the voucher form. Select the General tab and enter Freight, Fees, Discounts or Taxes in the appropriate fields. Click the Close button to save and exit Voucher Details.
Sample Voucher Details - General tab:
When finished, click Print Update or Update Only. The quantities listed on the voucher are added to the store's inventory.
Vendor Code
Each voucher has a Vendor Code. If referencing a PO, the Vendor Code from the PO is automatically entered on the voucher. If not referencing a PO, the Vendor Code is auto-populated with the vendor of the first item you list on the voucher. You can also select a Vendor Code from the drop-down. If the preference "Restrict to one Vendor per PO/Voucher" is selected, then all the items must have the same Vendor Code.
Listing Items on a Voucher
The easiest way to list items on a voucher is by referencing a PO and bringing the PO items to the voucher. Alternatively, you can type or scan an item's UPC to list it on the voucher. Alternatively, you can use the Advanced Item Lookup button to search inventory. When searching inventory, you can filter the inventory list for only items belonging to the vendor entered on the voucher.
- Tap or click the Adv Lookup button.
- Select the Vendor field from the dropdown.
- Enter the name of the vendor.
- Tap or click the Search button.
- Select the check mark for each item that you want to add to the voucher and enter a Doc Qty. Users with the necessary permissions can edit the Doc Cost and Doc Price.
- Tap or click the Add Selected button.
Remove an Item
In the item list grid, select the check mark for the voucher item and then tap or click the Remove Item button.
Listing the Same Item on a Voucher Multiple Times with Different Cost, Price Qty, etc.
It is possible to list the same item multiple times on a voucher, with a different cost, price and quantity for each.
Voucher Type
By default, new vouchers are Regular (receiving) Vouchers. Users with the required Vouchers - Return Voucher security permission can change the voucher type to create a return voucher.
Associate
By default, the current logged-in user is entered as the Associate. Users with the required Vouchers - Change Associate security permission can select a different Associate from the dropdown.
Voucher Dates
At the top of the voucher are the following date fields that track key events in the voucher lifespan.
- Created Date The date the voucher was originally created.
- Last Edit Date The date of the most recent edits to the voucher.
- Arrival Date The date the ordered merchandise is expected at the store.
- Post Date Date/Time the Voucher affected inventory. Note: When the voucher is created, the current system date/time is entered as Post Date. When the voucher is updated, the Post Date is updated.
Store
The Store field is automatically set to the store assigned to the current logged-in user and cannot be changed.
PO Lookup on Vouchers by PO Store, Bill To Store
When creating a voucher and referencing a purchase order, you can search for a PO by the Bill To Store or the PO Store. This is especially useful for multi-store operations.
- Use the Bill To Store filter to search for POs by the store to which the merchandise is allocated (e.g., for drop-ship multi-store or marked for multi-store purchase orders).
- Use the PO Store filter to search for POs by the store where the merchandise will be sent (e.g., for drop ship single-store purchase orders).
Sample PO Lookup on a voucher showing Bill To Store and PO Store filter fields:

Voucher Details
Click the Voucher Details button to display a screen for viewing/editing additional voucher information. The Voucher Details screen consists of four tabbed pages:
| Voucher Details tab | Description |
|---|---|
| General | On the General tab, |
| Vendor | On the Vendor tab, |
| Comments | On the Comments tab, users can select one of the predefined voucher comments or add a custom comment up to 60 characters in length. |
| Note | On the Notes tab, users can enter a long note up to 255 characters in length. |
General tab
Freight
You can enter a freight amount for the voucher. The freight amount is added to the voucher subtotal. The value you enter here can be spread across the voucher items when spreading cost.
Fee
You can enter a fee for the voucher. The Fee amount is added to the voucher subtotal. Select a Fee Type from the drop-down and then type the amount of the fee. The list of Fee Types is the list defined in Retail Pro 9 System Preferences > Local Preferences > Purchasing > General: Fees. The value you enter here can be spread across the voucher items when spreading cost.
Discount
You can enter a discount for the voucher. Tap/click the Percent or Amount tab and then type the desired discount value. The value you enter here can be spread across the voucher items when spreading cost.
Tax
You can edit the Tax Percent or Tax Amount, if necessary. The values entered here can be spread across the voucher items when spreading cost.
- Included Tax Amount: This is the tax amount for those items on the referenced PO that have been entered on the voucher.
- Excluded Tax Amount: If any items on the referenced PO have not yet been entered on the voucher, the tax amount for those items (if any) will be shown here.
Sample Voucher Details - General tab

Voucher Details - Vendor tab
Voucher Payment Terms: You can enter on the voucher the payment terms that have been agreed upon with the vendor. Note: The payment terms you enter on a voucher are informational only. Select the desired Payment Term Type from the dropdown.
Options for the selected payment term type are displayed (will vary by term type). For terms like Net Days, selecting the "+" will add a 2nd & 3rd term. For example, the vendor may give a 15% discount if you pay within 15 days; otherwise full payment (NET) is due in 90 days.
Vendor Account: Select a Payee Code. If an Account No is entered in the Vendor record for the selected Payee Code, the Account No is entered. Alternatively, users can type the Account No.
Vendor Invoice: Vendor Invoice information.

Voucher Details - Comments tab
Voucher comments enable you to record miscellaneous information about the voucher or the shipment. You can select a comment predefined in preferences or add a custom comment for the document.
Sample Voucher Details - Comments tab

Voucher Details - Notes tab
On the Notes tab, users can enter a long-form note up to 255 characters in length.

Negative PO Quantity Items on Vouchers
- When a Regular voucher references a PO with negative qty items (some or all), those items will show as negative due quantities in PO Items. Selecting "Receive Due" will only populate the doc quantities for positive values (positive on PO). Negatives are skipped for this, but can be manually entered (if negatives allowed on voucher).
- When a Return voucher references a PO with negative qty items (some or all), those items will show as negative due quantities in PO Items. Selecting "Receive Due" will populate those items with positive doc quantities. Items with positive PO quantities are skipped for this, but can be manually entered, if desired.