Chapter 24. Transfer Orders
Prism 1.14.7 User's Guide Chapter 24. Transfer Orders PDF
Prism 2.4.1 User's Guide Chapter 24. Transfer Orders PDF
Transfer orders (TOs) are planning documents that do not update inventory quantities. Inventory quantities are updated when you transfer merchandise by making one or more out slips that reference the TO. A TO can plan the transfer of merchandise from one source store to multiple destination stores. Several out slips can reference that same TO, each one recording transfers to a different destination store. The fill status of the TO is automatically updated each time an out slip is made referencing the TO. TOs can be created manually, or generated from POs and vouchers.
Basic Steps for using Transfer Orders
- Assign permissions related to transfer orders to individual employee groups as needed.
- Set the document ordering sequence for transfer orders. You can set the numbering sequence at the subsidiary, store, or workstation level.
- Create a new transfer order. When creating a new TO, specify the store(s) to which the item(s) will be shipped and enter the transfer quantity. Refer to the New Transfer Order section for more information. Modify TO Details, if necessary.
- Generate slips from the TO. Alternatively, you can create individual slips manually and reference the TO on each slip. When you update a slip that references a TO, the TO's fill status is automatically updated.
New Transfer Order
Navigate to Store Operations. Click the Transfers button and then click New Transfer Order.
Enter the TO number.
If the transfer being planned is related to an existing purchase order, enter the Ref PO Number.
List the items being transferred.
Enter the quantity being transferred in the Doc Qty field.
In the Item Allocation grid, enter the quantities of the item being sent to each store.
Save the changes.
Sample new transfer order:

Listing TO Items
The items grid is divided into two panels:
- The top panel displays the items on the TO.
- The bottom panel displays the items but with columns for each store so you can enter the quantity being allocated to each store (of the total Doc Qty).
The bottom panel where items are allocated to stores is divided into two sections:
- The left side displays each of the Sub's stores. Use the horizontal scrollbar to navigate among the stores.
- The right side has three key fields: Assigned, Doc Qty and Difference. The Assigned, Doc Qty and Difference fields are static. As you allocate item quantities, the Difference field will be highlighted green when the Doc Qty has been fully allocated.
If you generated a TO from a Marked For PO, the TO will have the items and quantities listed on the PO. If creating a TO manually, scan or type the item's UPC in the Lookup field and press the Enter key. If you select the Popup Entry checkbox, a popup enables you to enter the desired document quantity for the item (default = 1). Enter the quantity and click Continue. Repeat for each item as needed.
Grid-within-grid for TO Items
When listing items on a transfer order, you will see a horizontal scroll bar within the TO item grid. This grid-within-a-grid enables you to use more fields on the screen without having to add/remove the fields using the designer. If you scroll to the right, additional fields like Price, Extended Price and Status are visible.
Allocate TO Items
If the transfer is to a single target store, simply list the item and enter the Doc Qty. If the transfer is to multiple target stores, assign a portion of the overall Doc Qty to each destination store. The sum of item assignments to all destination stores should equal the Doc Qty of the item. The Difference field shows any difference (negative or positive) between the overall Doc Qty and the sum of the quantities assigned to each destination store.
The Items Allocation grid, at the bottom of the TO screen, enables you to enter an allocation quantity for each item, for each store. The grid below shows how the items have been assigned to each store. To remove the allocation for a store, type a zero in the grid cell.
In Prism 2.4.1 and above, entering allocation quantities on a transfer order will automatically adjust the Doc Qty upward. This makes it easier to allocate TO item quantities among stores. Previously, entering allocation quantities would result in a Difference Qty between the entered allocation quantity and the Doc Qty. Resolving the Difference Qty typically required editing the Doc Qty (default Doc Qty=1).
Prism auto adjusts Doc Qty only when the allocated quantity exceeds Doc Qty (adjust Doc Qty upwards). Prism doesn't auto adjust Doc Qty when the allocated quantity is less than the Doc Qty (adjust Doc Qty downwards) because TOs allow you to save without allocating the full Doc Qty; auto adjusting downwards would take away this ability.
Allocation Patterns for Transfer Orders
You can define and apply allocation patterns for transfer orders (TOs). Allocation patterns for TOs work the same as allocation patterns for purchase orders (POs). You can apply a pattern to a specific item, an entire style or to the entire document.
Allocation patterns specify the relative order quantities for each store. When applying a pattern, Prism assigns quantities for individual stores based on the total quantity ordered. Prism does this by first summing the quantities entered in the allocation pattern for all stores and determining what percentage of the total has been allocated to each store. Prism then multiplies each store percentage by the total item quantity to determine the quantity of that item for each store. If you change the quantity on the TO, Prism recalculates the quantities ordered for each store according to the allocation pattern.
If the Total Order Quantity is a multiple of the total quantity in the pattern, then each store receives the specified relative allocation. If the total quantity ordered is not a multiple of the allocation pattern, the remaining items are allocated to the stores one at a time.
Sample allocation pattern:

Select an Allocation Pattern (or define new pattern)
On a TO in progress, navigate to the Select Allocation Pattern to Apply dropdown and select an existing pattern or New Pattern to define a new allocation pattern.

With the pattern name listed in the dropdown, click the checkmark.

A menu for selecting how to apply the pattern is displayed. When applying an allocation pattern, you can apply the pattern to the selected items, the entire document, or the entire style. To apply an allocation pattern to selected items, first select the check mark icon on the left side of the item grid. To apply a pattern to an entire style, select the check mark icon for any member of the style.

The item allocations are updated according to the applied pattern.
Save the TO.
Pagination on Transfer Orders with many Items
Use the pagination buttons to navigate the list of transfer order items. The number of items displayed in each page will vary based on the screen size and resolution. Transfer Order module has been updated with paging. Number of items per page is now based on screen size. Allocations are now saved when users navigate to another page, not after every entry. Item Details area has been improved.
Associate on Transfer Orders
By default, the current logged-in user is entered as the Associate on a TO. You can select a different Associate, if necessary.
TO Item Detail
To view details for an item on the TO, select an item in the item list and then click the Item Detail button.
The top part of the screen shows the item's description information. The bottom part of the screen shows the item's allocation among stores. You can edit the item quantity that will be transferred in Item Details (in addition to the allocation grid on the TO main screen).
TO Unfilled %
The Unfilled % displays the percentage of units on the TO that have yet to be transferred on slips. As out slips referencing a TO are made and recorded, the TO's fill status is automatically updated. The current Unfilled % of individual items, by store, and for the entire TO can be viewed on the TO form at the top of the screen.
| Field | Description |
|---|---|
| Total Assigned | The total units listed on the TO. |
| Total Due | The total units remaining to be transferred on slips. |
| Quantity Sent | The total units already transferred on slips. |
| Unfilled % | The percentage of units remaining to be sent. |
By default, the Assigned Qty, Due Qty and Sent Qty columns are not included in the UI. To add the Assigned Qty, Due Qty and Sent Qty columns to the TO Item grids, move the fields from the Available list to the Selected list and then select the checkbox in the Default Visible list.
TO Status
The TO Status flag indicates the doc's status for purposes of transfer verification.
0 or Null = No status; 1 = Original Doc; 2 = Replacement Doc
TO Detail
The TO Details button on the main TO form provides access to additional information that does not fit on the main screen (e.g., Notes).
Refer to the following table for a description of the fields on the TO Detail screen:
| Field | Description |
|---|---|
| Tax Area | Select the desired tax area from the dropdown. |
| Use VAT | If selected, indicates the tax area uses VAT. This field is read-only and is based on the setting in Node Preferences > Taxes > General. |
| Notes | Optional note text to provide details about the transfer. For example, you can enter special shipping and handling instructions for the order items. |
TOs and Committed Quantities
Holding a transfer order does not affect Committed quantities. An item's committed quantity consider quantities incoming (based on Purchase Orders and/or Transfer Orders) and quantities outgoing (based on sales orders and transfer orders). Only after you click the Save button on the transfer order will Committed quantities be affected.
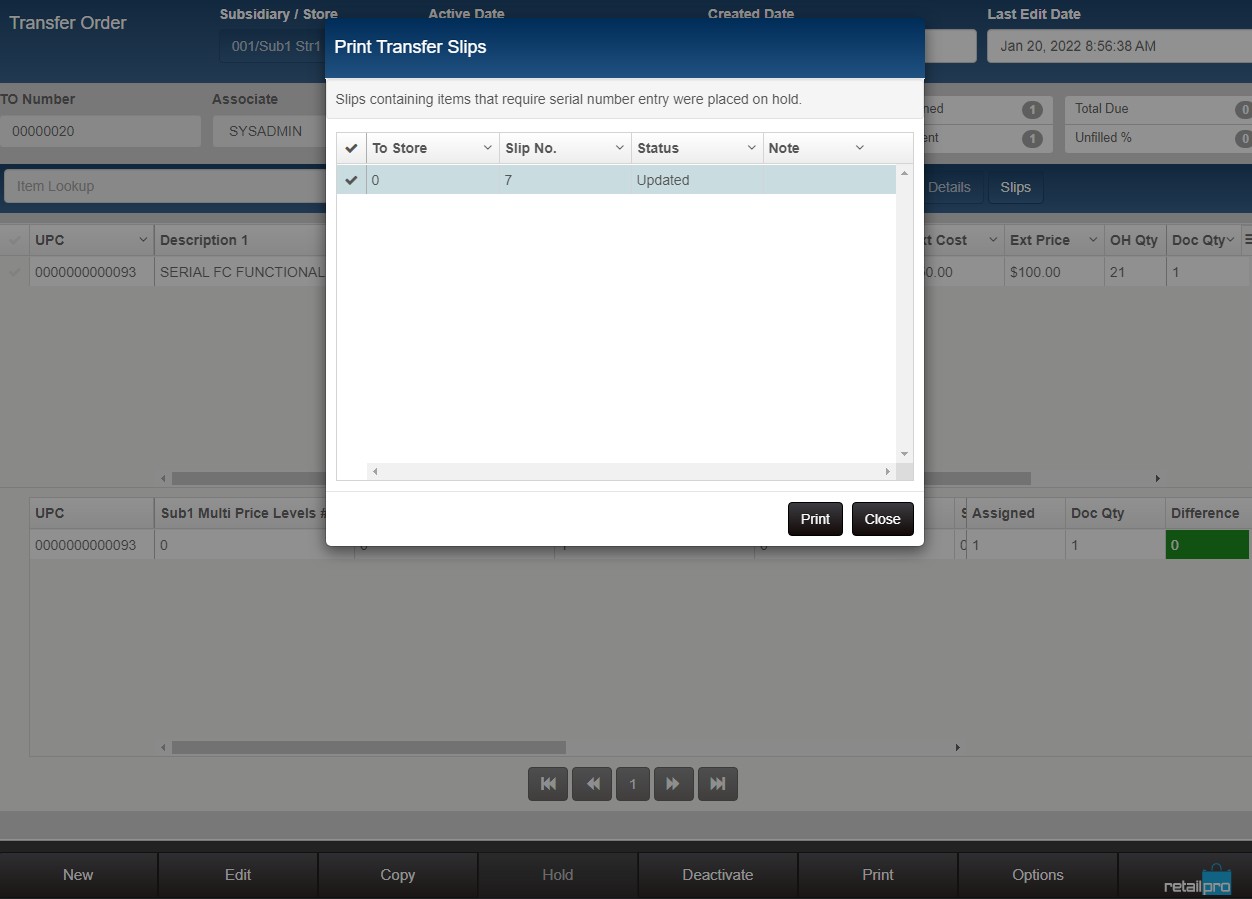
Generate Slip from TO
When the items are ready to be transferred, generate one or more transfer slips from the TO. The transfer slip, when updated, will update inventory quantity at the source store. At the target store, quantities are updated when the transfer voucher is updated. If generating slips from a multi-store TO, a slip will be generated for each store with quantities assigned on the TO. The generated slip has only the items and quantities assigned to the store on the TO.
When you generate a slip from a TO, by default an ASN will be generated (controlled by preference setting). A user at the target store can look up the ASN and generate a voucher from the ASN to receive the items into inventory at the target.
To generate slips from a new TO, first save the TO. Click the Options button.
- Click the Generate Slips button.
- If you select the checkbox for a Subsidiary, all stores will be included. To select individual stores, click the caret icon for a Subsidiary to display the store list.Select the checkbox for individual stores.
- Click the Generate button. Slips are generated for the selected stores.
- A list of the generated slips with slip numbers is displayed.
- Print any or all the generate slips. If you don't want to print slips, click Close.
- By default, an ASN is generated when the slip is updated. You can use ASN Lookup to find the ASN and generate a voucher from it.
Editing Transfer Orders
Transfer orders are planning documents. You can edit a TO as needed before or after quantities have been received. Keep in mind that if you add or remove item quantities, it will affect the Fill Status of the TO. Use Transfer Order Lookup to find and display the desired TO and then click the Edit button.
Referencing a PO on a TO
You can manually enter a purchase order number (PO#) on a transfer order; however, this is for reference purposes only and does not allow you to list the PO items and quantities on the TO. If you don't know the PO #, click the PO Lookup button to do a search.You can reference a purchase order on a transfer order.
1. Start a new transfer order. In the PO # field, click the Search icon.
2. Enter search criteria (e.g. Date Range or select a Vendor) and then click the Search button.
3. Select the check mark for the desired purchase order.
4. Click the Select button. The PO # is entered on the TO. Complete the rest of the transfer order.
Transfer Order Lookup
Use Transfer Order Lookup to find a previously saved document. Once you find the TO, you can display the document and edit it, if necessary, or generate slips.
Select Store Operations > Transfers from the Prism menu.
Click the Transfer Orders Lookup button.
Enter search criteria:
Date Range: Click the From Date and To Date buttons to select a start/end date range for the document search.
TO#: Enter a specific document number.
Associate: Select the Associate who created the document.
Active/Inactive: By default, only Active documents are included in the search. You can select to include Held documents, or search for inactive documents, if needed.
Click the Search button. A list of matching documents is displayed. Click the check mark for the desired transfer order.
Click the View button.
Sample transfer order lookup:

Viewing Slips for a Transfer Order
The transfer order form includes a "Slips" button. When a user clicks the Slips button, a list of slips is displayed of any slips generated from the TO or that reference the TO. Users can select a specific slip and print, if needed.
Click Close when finished.
Sample transfer order showing associated slip:
Reasons for Transfer Orders and Transfer Slips
Define reasons for transfer slips and transfer orders in the following areas:
- Admin Console > Node Preferences > System > Reasons and Notes> Slips
- Admin Console > Node Preferences > System > Reasons and Notes> TO
Reasons are short text to explain why a document was created and provide information for reports.
Viewing Dates on Transfer Orders
You can view the following key dates for a transfer order by clicking the Dates button in the upper-right corner of the TO form. When you click the button, you will see Created Date, Last Edit Date and Active Date (date the TO was activated).
| Date Field | Description |
|---|---|
| Created Date | Date the transfer order was created (saved). |
| Active Date | Date the TO is to become active. This field enables you to create a PO ahead of time but prevent the generating of slips until the Active Date. |
| Last Edit Date | Date the TO was last changed. |
Transfer Grid Formats
You can customize the grids displayed when working with transfers by configuring Grid Format preferences.
- Transfer Order Items
- Transfer Orders Lookup
Transfer Order Items Grid Formats
| Column | Type (size) | Notes |
|---|---|---|
| Altalu | String (20) | ALU for the item from the alternate vendor. (Used with items that can be ordered from multiple vendors). |
| Altcost | Number (16,4) | Cost for the item from the alternate vendor. (Used with items that can be ordered from multiple vendors). |
| Altupc | Number (18) | UPC for the item from the alternate vendor. (Used with items that can be ordered from multiple vendors). |
| Altvendcode | String (6) | Vendor Code for the item from the alternate vendor. (Used with items that can be ordered from multiple vendors). |
| AltVendor# | Number (5) | Vendor number for the item from the alternate vendor. (Used with items that can be ordered from multiple vendors). |
| ALU | String (20) | Alternate lookup identifier. |
| Assigned Qty | Number (10,3) | Doc Qty that has been assigned to stores. |
| Attribute | String (8) | Item attribute (e.g. color or second size). |
| CreatedBy | String (30) | Employee who created the document. |
| CreatedDateTime | Timestame with Time Zone | Date and time the document was created. |
| DCSCode | String (9) | Department code. |
| Desc1 to Desc4 | String (30) | Item description fields. Desc 1 is the Primary description field. |
| DocQty | Number (10,3) | Document quantity. |
| DueQty | Number (10,3) | Quantity remaining to be sent out on slips. |
| ExtCost | Number (16,4) | Extended cost (Qty x Cost) |
| ExtPrice | Number (16,4) | Extended price (Qty x Price) |
| FCCost | Number (16,4) | Foreign currency cost. |
| Itemnote1 - Itemnote10 | String (50) | Item note fields. |
| ItemSize | String (8) | Item size. |
| KitType | Number (5) | Kit Type 0 = No Entry, 1 = Kit, 2 = Package, 3 = Gift Card Stored Value, 4 = Gift Card Prepaid, 5 = Gift Certificate, 6 = Fee, 7 = Gift Card Central |
| LotType | Number (5) | Lot number type. |
| ModifiedBy | String (30) | Employee who last modified the document. |
| ModifiedDateTime | Timestamp with Time Zone | Date the document was last modified. |
| OHQty | Number (10,3) | Item on-hand quantity for the item at the user's store. |
| PostDate | Date | Date the document was posted to the database. |
| Price | Number (16,4) | Item price. |
| SentQty | Number (10,3) | Quantity of the transfer that has already been sent. |
| SerialType | Number (1) | Serial type of the item: Partial or Full Control. |
| Source Subsidiary # | Number (5) | Source subsidiary number. |
| Status | Number (1) | Document status: 1 = changed, 2 = cancelled, 3 = normal (default), 4 = finalized. |
| TaxArea | String (11) | Tax area. |
| TaxArea2 | String (11) | A second tax area (used in multi-tax environments). |
| TaxPercentage | Number (16,4) | The tax percentage for the item for the user's store. |
| TaxPercentage2 | Number (16,4) | The tax percentage for a second tax area (used in multi-tax environments). |
| Udfvalue1 - Udfvalue4 | String (60) | User-defined fields for the item (taken from inventory UDF). |
| UPC | Number (19) | Universal product code |
| VendorCode | String (6) | Three- to six-character code that identifies the vendor. |
Transfer Orders Lookup Grid Formats
| Column | Type (size) | Notes |
|---|---|---|
| Activate Date | Date | Date the transfer order was activated. |
| Active | Number(1) | Activated status. 0 = Inactive, 1 = Active. |
| Associate | String (30) | Associated who created the transfer order. |
| Created By | String (30) | Employee who created the transfer order. |
| Created DateTime | Timestamp with TimeZone | Date and time the transfer order was created. |
| Created By Employee | String (3) | Identifies the employee who created the transfer order. |
| Doc Status | Number (1) | Planning document status: 0 = None, 1 = Changed, 2 = Normal, 3 = Completed |
| Document Reason Name | String (20) | The reason for the transfer. |
| Document Reason Type | Number (5) | Reason type |
| Due Qty | Number (10,3) | Quantity due for the transfer. |
| From Store | Number (5) | Source store for the transfer |
| From Store Name | String (30) | Name of the source store for the transfer |
| From Store # | Number (5) | From Store number. |
| Held | Number(1) | Held status. 0 = Not Held, 1 = Held. |
| Line Items | Number (5) | Number of line items on the transfer order. |
| Modified By Employee | String (30) | Employee who last modified the transfer order. |
| Modified Datetime | Timestamp with Time Zone | Date and time the transfer order was last modified. |
| Note | String (255) | Long-form note field. |
| Notes 1 - Notes 2 | String (30) | Optional notes. |
| PO # | String (20) | Purchase order number. |
| Subsidiary Name | String (20) | Subsidiary name. |
| Subsidiary # | Number (5) | Subsidiary number of the store where the transfer order was created. |
| Tax Area | String (11) | Tax area for the store where the transfer order was created. |
| TO # | String (10) | Transfer order number. |
| TO Type | Number (1) | Transfer order type. 0 = Single subsidiary, 1 = Multi subsidiary |
| Total Ext Cost | Number (16,4) | Total extended cost of the items on the transfer order. |
| Total Ext Price | Number (16,4) | Total extended price of the items on the transfer order. |
| Total Order Qty | Number (10,3) | Total quantity ordered on the transfer order. |
| Total Sent | Number (10,3) | The total number of items sent out on the slip. |
| Unfilled % | Number (16,4) | The percentage of the items ordered that have yet to be transferred. |
| Verified | Number (1) | Verified status. 0 = Not verified, 1 = Verified |