Chapter 11. Customers
Prism 1.14.7 User's Guide Chapter 11. Customers PDF
Prism 2.3 User's Guide Chapter 11. Customers PDF
In Prism's Customers area you can lookup, view and edit customer records as well as add new customers.
In Prism, you can:
- Add new customers on the fly at POS
- Capture and manage customer information across all subsidiaries and stores
- Customize user-defined and auxiliary fields to enter customer preferences (favorite color, designer, etc.)
- Track contact information, such as name, addresses, phone numbers
- Assign a discount percentage for purchases by a customer
- Define default charge terms
- View purchasing history
- Assign a tax area
- Assign a price level to be suggested whenever the customer makes a purchase.
- Assign the customer to a specific subsidiary and store
- Work with customer loyalty levels
- Select the tender types the customer is allowed to use
- Add an image file
- Set accounts receivable status to send information to the accounting software
- Assign an associate to be the primary associate for the customer
Sample Customer record:

Customer Permissions
| Permission | Description |
|---|---|
| Customers - Activate/Deactivate | Allow group members to activate and deactivate customers. |
| Customers - Allow Manual Entry of UDF Values | Allow group members to type an entry in a customer UDF field. |
| Customers - Change Price Level | Allow group members to change the price level assigned to customers |
| Customers - Change Subsidiary | Allow group members to change the subsidiary on customer records. |
| Customers - Create/Copy Customer | Allow group members to add a new customer by clicking the New button or the Copy button. |
| Customers - Deactivate with Store Credit Balance | Allow group members to deactivate customers who have a store credit balance. |
| Customers - Edit Charge Balance | Allow group members to edit customer charge balances |
| Customers - Edit Charge Limit | Allow group members to edit customer charge limits |
| Customers - Edit Customer | Allow group members to edit customer fields that aren't controlled by other permissions. |
| Customers - Edit Customer Contact info | Allow group members to edit customer addresses, phone numbers and email. |
| Customers - Edit Info and Mark Fields | Allow group members to edit the Info and Mark fields. The Info 1-2 and Mark 1-2 fields are legacy fields used in Retail Pro 8. For retailers who use these fields, this permission can be used to prevent accidental editing of these fields. |
| Customers - Exceed Charge Limit | Allow group members to exceed customer charge limits at POS |
| Customers - Select UDF Values | Allow group members to edit UDF fields on customer records. |
| Customers - Set Accounts Receivable | Allow group members to edit the AR flag on Customer records. |
Customer Preferences
The following table lists the preferences available in the Customers - General area. There are also loyalty-related preferences available in Customers - Loyalty.
| Preference | Description |
|---|---|
| Allow duplicate customer IDs | Allow two or more customers to have the same Customer ID. |
| Append Installation ID to customer ID | If selected, when Retail Pro assigns a Customer ID to a new customer, the Installation ID is appended to the Cust ID (next available sequential number). If not selected, the next available sequential number is assigned as the Cust ID. If the preference is disabled, the installation ID will not be added to the custid. Instead 0's will be prepended to create a custid with a required length of 9 digits. The Installation ID can be viewed in the Store records in preferences in RIL |
| Default Customer Share Type |
Prompt: RP Prism will prompt the user to select a Customer Type if the user tries to save the record before entering a Customer Type. |
| Apply Customer Tax Areas for | Bill To Customer: If selected, when a Bill To Customer with an assigned tax area is entered on a transaction, a prompt is displayed asking if the tax area should be changed to the Bill To Customer's tax area. Ship To Customer: If selected, when a Ship To Customer with an assigned tax area is entered on a transaction, a prompt is displayed asking if the tax area should be changed to the Ship To Customer's tax area Bill To and Ship To Customer: If selected, whenever a Bill To Customer or a Ship To Customer with an assigned tax area is entered on a transaction, a prompt is displayed asking if the tax area should be changed to the customer's tax area. Example: Customer A and Customer B are each assigned a tax area in the customer record. Customer A is entered as the Bill To Customer on the transaction. A prompt will be displayed to change the tax area. Customer B is entered as the Ship To Customer. Another prompt will be displayed. |
| Customer Required Fields | Select the fields that must have an entry to save a new customer record. When creating a new customer record, if any of the selected fields are missing an entry the user will receive an error when trying to save. |
Sample Customers > General Preferences

Access Customers
Click the Customers button on the main POS menu. You will see two buttons: Customer Lookup and Loyalty Lookup. The Loyalty Lookup is disabled unless you have the Customer Loyalty feature enabled.

Click the Customer Lookup button to search for an existing customer or create a new customer.
Search for existing Customer
On the Customer Search screen, you can search for customers by Company, Customer ID, Email Address, Full Name, Info1, Info2, Mar1, Mark2, and Phone. First Name and Last Name fields in the UI are concatenated to the Full Name. You can select to search only Active or Inactive customers. Depending on the search criteria selected, you can further fine-tune the search by selecting an operator like "Equals" or "Contains." (Note: CONTAINS is not available for fields like Customer ID that store integers. Under the hood, the lookup will always search for an exact match using EQUALS query).
To select the lookup criteria to use, click the down arrow in the Search By drop-down. In the example below, "Full Name" was selected. Within the Full Name search area, a first name of "regular' is entered and the operator is set to "Contains". When the user clicks the Search button, a single result was returned. If a single match is found, the customer is entered on the transaction. If multiple matches are found, the list of matches is displayed immediately below the lookup field.
Click the Details button on the bottom menu to view the record or click Edit to display the record in edit mode.
To clear the filter criteria, touch or click the Clear button.
Navigating the List of Results
If many results are returned, you can use the navigation buttons at the bottom of the grid to move between the pages of results. When you find the desired record, click the check mark and then click the Details or Edit button. If you are unable to locate the customer's record using the Customer Lookup dialog, you can touch or click the New button to create a new record.
Sample Customer Search:

Customer Lookup Search Rules when Centrals is Enabled/Disabled
Prism uses different rules for customer lookup when centrals is enabled or disabled.
Centrals enabled: Searches are always done using a CONTAINS query (Note: users will see the entry "EQUALS" in the drop-down; however, the search always uses CONTAINS).
Centrals disabled (default): Users can select an operator in the Customer Lookup area; however, at POS when searching for a customer to enter on a transaction the search always uses the EQUALS operator.
When Centrals is Enabled but Offline
If the Centrals server is offline, the lack of partial matches and wildcards mean you will need to be more specific in your search criteria. For example, normally entering "worth" would find entries like "Woodsworth" and "Worthington" (because of partial match behavior). However, when the centrals server is down, only "Worth" would be found ("worth" or "WORTH" because case-insensitive).
Note: When centrals are enabled but the server is down, when looking up a customer you will see a yellow toast message to warn you about the situation.
The following tables summarize the customer lookup search rules:
| Customer Lookup with Centrals Enabled | |
|---|---|
| CONTAINS | When Centrals are enabled and there is a connection to the server, in the Customer Lookup area the operator is hard-coded to CONTAINS. The search rules are: Case insensitive Partial matches No wildcard characters (Note: When Centrals is enabled but offline, the operator is hard-coded to EQUALS. The search rules are no wildcards, exact matches only and case sensitive) You cannot do a CONTAINS query for Customer ID. Under the hood, the lookup will always search for an exact match (EQUALS query). |
| Customer Lookup with Centrals Disabled | |
|---|---|
| EQUALS | Case Sensitive Exact Match No Wildcard Characters |
| DOESNOTEQUAL | Case Sensitive Exact Match No Wildcard Characters |
| CONTAINS | Case Insensitive Partial Match No Wildcard Characters Note: You cannot do a CONTAINS query for Customer ID. Under the hood, the lookup will always search for an exact match (EQUALS query). |
| ISEMPTY | N/A |
| ISNOTEMPTY | N/A |
| POS Lookup with Centrals Disabled | |
|---|---|
| EQUALS | (hard-coded) Case insensitive Wildcard lookup |
Customizing Customer Lookup Grid Formats
In Admin Console > Node Preferences > Grid Formats, you can select which columns are displayed in the Customer Lookup grid.
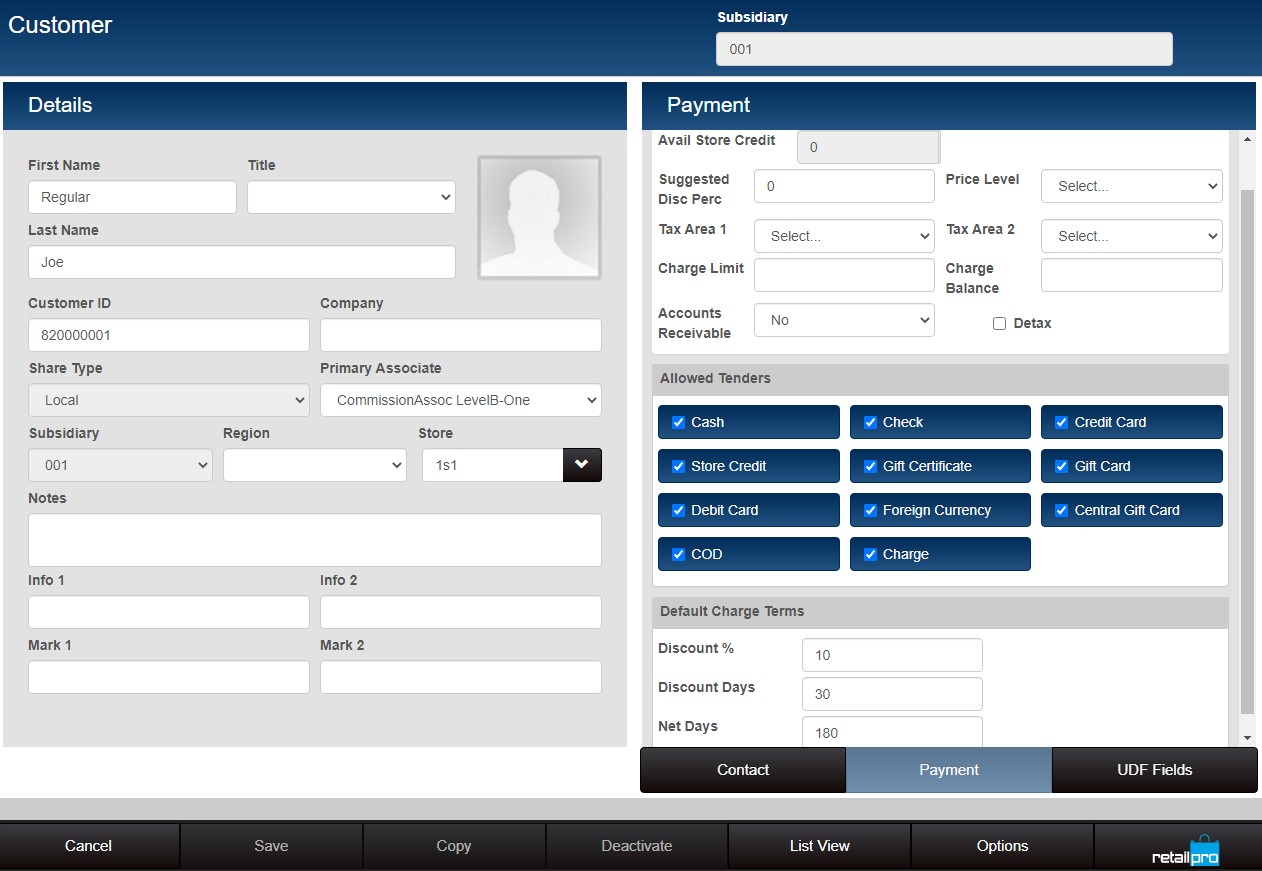
Customer Record
The Customer record is divided into two panes: the left pane has general information like name, Customer ID, Subsidiary and Store; the right pane displays Contact, Payment or UDF Fields information, depending on the tab selected. In the example below, the Contact tab is selected.
Customer record tabs
| Tab | Description |
|---|---|
| Contact | Click the Contact tab to view or edit customer addresses, phone numbers and email addresses. |
| Payment | Click the Payment tab to work with store credit, discount %, tax area(s), charge information, allowed tenders and loyalty. |
| UDF | Click the UDF tab to work with user-defined fields for customers. UDF fields enable you to store customer information not handled by Prism's built-in fields. |
Edit Customer
Click the Edit button on the bottom menu of the customer record. Make any needed changes in the editable fields. Certain fields, like Subsidiary, are not editable.
Click the Save button on the bottom menu to save the changes.
New Customer
You can create a new customer from a POS transaction in progress, from the Customer Lookup screen, or from an existing customer record.
| New Customer Creation Method | Notes |
|---|---|
| POS Transaction in progress | The POS transaction form includes a UI element for entering a customer's name. Directly beneath the text box where the customer name is entered is a New button. Click the New button to display a new "quick customer" record in edit mode. The "quick customer" screen enables an Associate to enter basic details about the customer and save the record without interrupting the POS workflow. |
| Customer Lookup screen | The Customer Lookup screen has a menu on the bottom of the screen that includes a New button. Click the New button to display a new customer record in edit mode. |
| Existing customer record | While viewing an existing customer record in non-edit mode (e.g. before making changes or after saving changes) the menu on the bottom of the screen has a New button. Click the New button to display a new customer record in edit mode. |
Customer Fields
Refer to the following table for a description of the fields available for new customer records.
| Field | Description |
|---|---|
| Title | For example, Mr., Mrs., Ms., The titles available for selection are those defined in Node Preferences > Data Types. |
| First Name | Customer first name. |
| Last Name | Customer last name (family name). |
| Customer ID | A unique number to identify the customer. When a new customer is created in RP Prism, the customer will be assigned the next number in the sequence, as defined in Prism Preferences. By default, Customer IDs must be unique. If the "Allow Duplicate Customer IDs" Preference is selected, duplicates are allowed. If the preference is not selected (default), when a user tries to edit the Cust ID field to a number that would be a duplicate, an error message is displayed. |
| Company | Customer Company. |
| Primary Associate | The customer's preferred associate. This field is for informational purposes only; it does not change the behavior of Prism. For example, some companies use this field to track the Associate or employee with whom a customer regularly engages. |
| Subsidiary | The subsidiary where the customer was created. |
| Region | (future release) |
| Store | The customer's assigned store. By default, this is the store where the customer was created. Customers with a Share Type of Local will be available at the other stores in the subsidiary. Customers with a Share Type of Not Shared, this is the only store where the customer will be available. |
| Notes | Optional notes to provide additional information about the customer. |
| Info1-Info2 | The Info 1-2 and Mark 1-2 fields are legacy from previous versions of Retail Pro. |
| Mark1-Mark2 | The Info 1-2 and Mark 1-2 fields are legacy from previous versions of Retail Pro. |
New Customer Required Fields
In Node Preferences > Customers > General select the check box for each field that will require an entry when creating a new customer record. If any of the selected fields are left blank when you create a new customer, Prism will display an alert explaining which fields must be completed to save the record.
The following fields are available for selection as required fields for new customer records: Address 1 - Address 6, Address Location Type, Postal Code, Customer ID, Customer Image, Email, First Name (default), Last Name (default), Info 1-2, Mark 1-2, Notes, Phone, Company, Name or Company.
About Company and Name or Company Required Fields
Company works the same as the other required fields. If it is selected, then when creating a new customer record, the Company field requires an entry. Name or Company is dynamic. If First Name, Last Name, or Company are enabled, then Name or Company is disabled. If First Name, Last Name, and Company are all disabled, then Name or Company can be enabled. Enabling Name or Company disables First Name, Last Name and Company. The Name or Company selection helps retailers in some countries (e.g., Spain) comply with fiscal laws that require the company name when issuing an invoice to a legal entity, (First Name, Last Name when issuing an invoice to a person). In the Name or Company field, the Associate can enter First Name, Last Name, or Company name.
Copy Customer
You can create a new customer record by copying an existing customer. This can speed up the customer creation process. Simply copy an existing customer and make any needed changes for the new customer. This can often be faster than adding a new customer from scratch. This is especially useful if customers have similar properties as an existing customer. For example, when creating records for employees of the same company or members of the same family. To copy a customer, use Customer Lookup to find the customer and then click the Copy button. Edit the customer's name, address, Cust ID, etc., as needed and then save the changes.
The following fields are not copied: SIDs (new SID is created), Customer ID (new customer id is created), Store Credit, Charge Balance, AR Flag, Loyalty Balances, System Based Dates, Customer Statistics, Active Status (default to active), Customer image.
Customers on Transactions
You can easily add a customer to a transaction. By default, customers are search for by Full Name. You can select the down arrow to select different a different filter element (e.g. Customer ID).
Using the Full Name filter, type the customer's first name and/or last name and press the Enter key.

If the customer is found, the customer is entered on transaction form. If multiple matches are found, a pop-up shows the matches. Click the desired match.
If the customer is not found, you can click the Search button to do a more advanced search or click the New button to create a new customer record.
Search for Customer on POS Transaction
Click the Search button. The Customer Lookup screen is displayed. Entered search criteria as described in the Customer Lookup section of this topic.
New Customer (Quick Customer)
When creating or editing a transaction, if the customer is not yet in the database, you can create a new customer record directly from the transaction form with no need to put the transaction on hold. Touch or click the New button (Quick Customer button on the Standard Shipping layout). Enter basic customer information in the displayed form and save. The customer is entered on the transaction and the record is saved to the RP Prism server. The form has an Add Image button at the top. If you have a connected camera at POS, you can quickly and easily add the customer's image to the record.
Sample Quick Customer:

Bill To and Ship To Customers
A single transaction can have two customers: A Bill To Customer and a Ship To Customer. The Bill To Customer is the person paying for the transaction. The Ship To Customer is the person to whom the item(s) will be shipped.
When using the Standard Shipping Layout, users can add a billing and a shipping customer on the main transaction form. When using other layouts, the shipping customer must be entered using Item Details.
Active vs. Inactive Customers
By default, all new customers created in RP Prism are Active. To inactivate a customer, search for the customer in Customer Lookup, highlight the customer and then click the Deactivate button. When looking up customers, you can search only active customers, only inactive, or both.
Customer History
In Prism, certain key data about each transaction and its items is stored as part of the customer record. This data is replicated along with the customer record. If a customer is available at an installation, then the customer history will be available, too, although the full document may not be. If a user wants to view a document that does not exist locally, then the document will have to be viewed at the POA (or the document can be replicated separately).
To access customer history:
Find and display the customer record. Click the Options button on the bottom menu.
Click Customer History.

A screen for entering filter criteria is displayed. Click the caret and select a "Search By" filter element.
The element is added to the UI. Start typing filter criteria. For example, you can search for an item by its description, size, type, or Doc Price or by the Subsidiary/Store where the sale was made. As you type the element type, if you press the Enter key, the element is added to the UI. With the element added to the screen, you can enter search criteria and click Search.
A list of matching items purchased by the customer is displayed. To view the transaction associated with any of the listed items, select the check mark and then click Go To Transaction.

Replication of Customer History
To replicate customer history between Prism stores, create a Prism Day-to-Day profile that includes the customerdocumenthistory resource.
Grid Formats preferences Customer History
The Grid Formats area of preferences has an area for configuring the Customer History grid.
Updating of CUSTOMER_DOCUMENT_HISTORY table
By default, the Prism Scheduling service updates the CUSTOMER_DOCUMENT_HISTORY table every 15 minutes. This means that a newly-created sales transaction will show up in customer history within 15-16 minutes. You can configure the update interval as well as settings for customer history initialization (e.g. daily begin and end times and which days to run).
Customer Statistics
Click the Customer Statistics button on the bottom menu in Customer History to view summary information about the customer's purchasing history. The fields on this tab are all read-only. From Customer Statistics, click the Customer History button to return to the main customer history screen.
Sample Customer Statistics:

Customer Statistics Fields
| Customer Statistics Field | Description |
|---|---|
| Customer Since | The date the customer was first entered on a transaction (updated transaction; held or pending transactions do not update this field). |
| First Sale | The date of the first sale for the customer. |
| Last Sale | The date of the most recent sale for the customer. |
| Last Return | The date of the most recent return for the customer. |
| Last Order | The date of the most recent order for the customer. |
| Total Transactions | The total number of transactions for the customer. |
| Avg Discount Amount | The average discount amount on transactions for the customer. |
| Total Discounts | The total amount of discounts on transactions for the customer. |
| Sold Qty | The total number of units purchased by the customer. |
| Return Qty | The total number of units returned by the customer. |
| MTD Sales | The total amount of the customer's purchases for the current month from the first of the month to the current date. |
| YTD Sales | The total amount of the customer's purchases from January 1 of the current year to the current date. |
Customer Address, Phone, Email
On the Contact tab, add or modify addresses, phone numbers and emails. You can define types for these settings in Admin Console > Node Preferences > Data Types.
Customer Addresses - Add an address
In edit mode, click the Contact tab.
In the Addresses area, touch or click the plus sign icon.
Enter information for the address in the displayed dialog. Click the OK button to close the dialog. Click the Save button for the customer record.
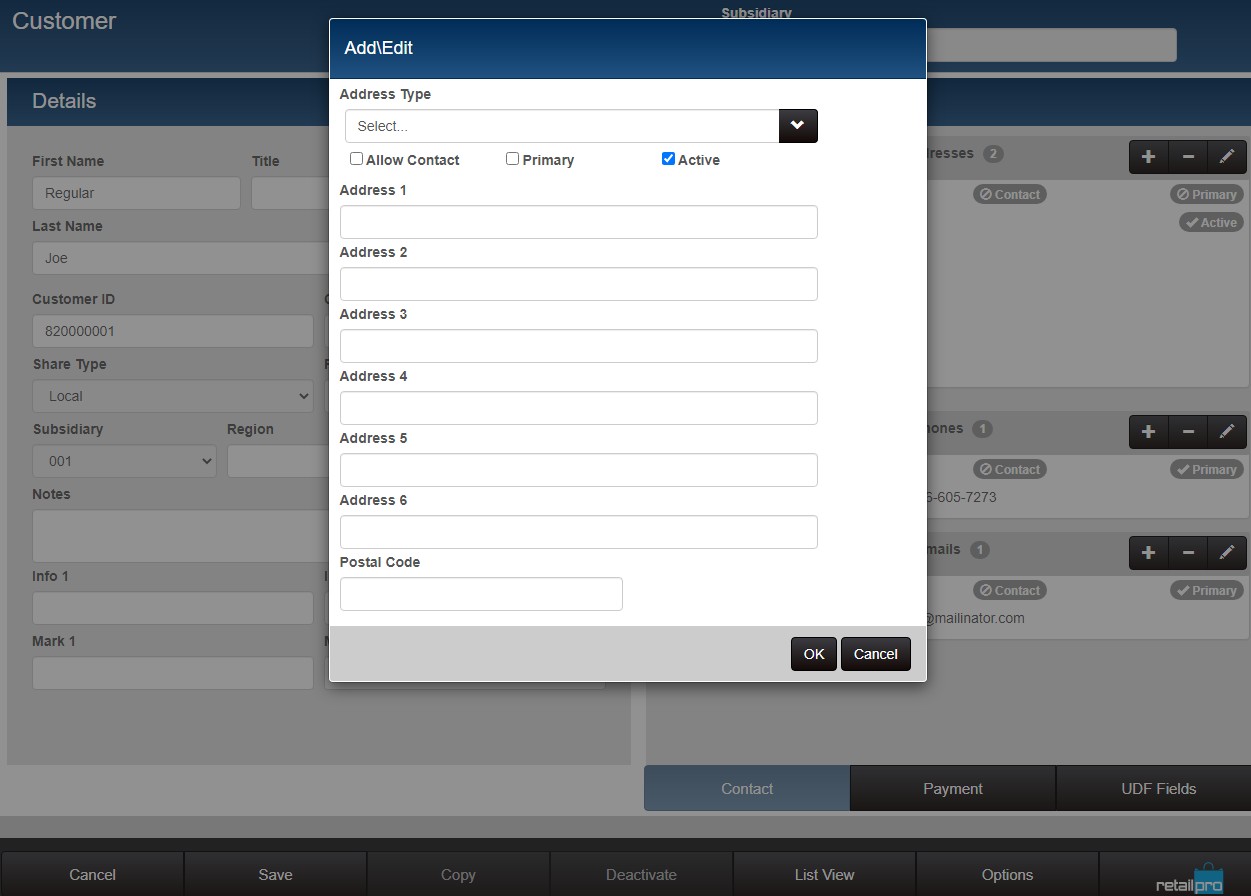
Customer address fields
| Field | Description |
|---|---|
| Address Type | Select the type of address: Home, Office, Vacation, Other, or None. |
| Address | Street number and street name (e.g. 123 Main St.) |
| Address 2 | Suite or apartment number |
| Address 3 | City and State |
| Address 4, Address 5, Address 6 | Extended address fields used for foreign addresses, etc. |
| Postal Code | ZIP Code or postal code for the address. ZIP Code Lookup: If you have enabled the ZIP Code Lookup feature in Node Preferences > System > General and populated the database with ZIP Code data, then entering a Postal Code will automatically populate the City and State into the Address field selected in preferences. |
| Allow Contact | If selected, indicates the address is the preferred address to use for contacting the customer. |
Edit address:
1. Display the customer record and click the Edit button.
2. In the Addresses area, select the address you want to edit and click the pencil icon.
3. Make any needed changes in the displayed modal.
4. Click the OK button to close the modal.
5. Click the Save button for the customer record.
Customer Payment Data
The Payment tab displays information about credit, discounts, tax area and other details related to payments. You can enable/disable specific tenders. The following table lists the fields on the Payment tab:
| Field | Description |
|---|---|
| Avail Store Credit | The customer's current store credit (or central store credit) balance. |
| Cust Discount % | The discount percentage to be used on sales to the customer. |
| Max Discount % | The maximum discount percentage that the customer can receive from all discounts on a single transaction. |
| Price Level | The price level to be used on transactions for the customer. If the transaction has a customer listed and that customer is assigned a price level, then when you go to change the price level, a warning message will be displayed. Click Yes to continue. In the current release of RP Prism, removing a customer with an assigned price level does not recalculate transaction totals and amount due. If users need to remove a customer with an assigned price level from a transaction, as a temporary workaround, users should instead cancel the transaction and start over. |
| Tax Area | The tax area to be used on transactions for the customer. |
Viewing Store Credit
1. Use Customer Lookup to find and select the customer.
2. Click the Payment tab.
3. The Avail Store Credit field shows the amount of store credit available.
Purchase Store Credit
1. Use Customer Lookup to find and display the customer's record.
2. Click the Options button.
3. Select Purchase Credit.
4. Enter the amount of credit to purchase.
Click Tender
5. Click Tender Transaction.
6. Take payment and update the transaction.
Customer Discount
If a customer has a Discount % assigned in the customer record and is listed on a transaction, that discount is automatically applied to all items on the transaction. You can also define a Maximum Customer Discount % for customers. This is the maximum discount percentage allowed for the customer: customer discounts, line item discounts and global discounts.
1. Use Customer Lookup to find and display the customer's record.
2. Select the Payment tab.
3. Touch or click the Edit button.
4. Touch or click the Edit Credit Profile button.
5. In the Cust Discount % field, enter the desired discount percentage, without the percentage sign.
6. Touch or click the Save button to close the dialog.
7. Touch or click the Save button for the customer record.
To confirm that a customer discount was applied at POS, display the transaction, select the item and then click the Details button. In Item Details, select the Discounts tab. You will see "Cust" entered as the Discount Reason.
Changing the Customer when Discounts are Present
If item discounts have been applied and you enter a customer with a Cust Discount %, a prompt is displayed, explaining that the item discounts will be cleared.
Customer Price Level
Customer price levels are useful for things like giving special pricing for Employees, VIPs, or other groups of customers. The price levels available for selection are those defined in Admin Console > Node Preferences > Merchandise > Pricing > Price Levels.
When the customer has a price level that is different from the store's default price level, a prompt is displayed, asking if you want to change to the customer's price level. Touch or click Yes to use the customer's assigned price level.
Customer Tax Area
You can assign a Tax Area to a customer record. This enables retailers to always apply the same tax rate to a customer's purchases, regardless of which store or tax locale the purchases are made. When a customer with an assigned tax area is entered on a transaction, Prism will display a prompt so that the Associate can apply the customer's assigned tax area. InPrism Preferences, you can specify whether to display the prompt when the Bill To customer is entered, when the Ship To customer is entered, or when either Bill To/Ship To customer is entered. By default, when a Bill To Customer with an assigned tax area different from the store's tax area is entered on a transaction, Prism displays a prompt to ask if the tax area should be changed. You can configure Prism preferences to customize when the prompt to change tax area is displayed. In Node Preferences > Customer, navigate to the "Apply Customer Tax Areas For" setting.
The following options are available:
| Option | Description |
|---|---|
| Bill To Customers | (default) When a Bill To Customer with an assigned tax area is entered on a transaction, a prompt is displayed asking if the tax area should be changed. |
| Ship To Customers | When a Ship To Customer with an assigned tax area is entered on a transaction, a prompt is displayed asking if the tax area should be changed to the Ship To Customer's tax area. |
| All Customers | When a Bill To Customer or a Ship To Customer with an assigned tax area is entered on a transaction, a prompt is displayed asking if the tax area should be changed. |
Tax Area Prompt when removing Customer from Transaction
If the transaction was using the customer's tax area and customer is removed, a prompt is displayed asking if the user would like to restore the default tax area for the transaction. Touch or click Yes to restore the defaults, or No to continue using the removed customer's tax area.
Accounts Receivable
The Accounts Receivable field on customer records indicates whether the customer record should be exported to the accounting system (e.g., via Accounting Link).
Sample Customer record, Payment tab with Accounts Receivable field set to default value of No:

In the Prism database the CUSTOMER.AR_FLAG field can have the following values: 0-No, 2-Yes, 3-Export.
The AR_FLAG field can be added to grid formats for customer lookup. For each accounting customer record, select either Export or Yes in the AR field. Both flags indicate that any receipts involving the customer should be read for later posting to the customer's A/R account.
The following table explains the difference between the settings.
| Setting | Description |
|---|---|
| Export | Select this option if you want to establish an A/R account for the customer in your accounting software. The Export flag indicates that the customer record is to be exported to your accounting software during the next Accounting Link Customer Update. Once exported, the flag on the customer record changes to Yes. |
| Yes | Select this option to indicate that the customer has an A/R account in your accounting software. Receipts involving an A/R customer and containing an A/R tender will be read for later posting to both the G/L and A/R accounting modules (A/R tenders are defined in Accounting Link preferences). |
| No | This is the default option. Select this option to indicate the customer should not be exported to the accounting software. |
Customer Allowed Tenders
You can control which tenders specific customers can use. For example, you may want to allow only certain customers to tender payment by Check. Assign specific tenders to each customer in the "Customer Allowed Tenders" area. Only those tenders selected in the record will be available on the tender screen. By default all tenders are selected.
Note: To be available at point of sale, the tender must also be enabled in Admin Console > Node Preferences > Transactions > Tenders > Tender Requirements. That is, if a tender is selected in the customer record but is NOT selected in enabled in Tender Requirements preferences, the tender will be unavailable.
Enforcing Customer Charge Limit at POS
A permission controls the ability to set a Charge Balance that is larger than the Charge Limit. If the permission "Customers - Exceed Charge limit" is set to DENY and the preference for the Charge tender: Check Available Charge Limit is checked, then when a charge limit is encountered (and permission is set to Deny) a partial charge, up to the available limit will be suggested and the rest must be tendered by some other method.
Loyalty as a Tender not available in Prism
The option to use Customer Loyalty as a POS tender is not currently available in Prism (the option is only in RIL).
Customer UDF Fields
User-defined fields enable retailers to capture customer information that is not available in the many predefined customer fields that come with Prism. With UDF fields, you define a field label and a list of field values that will be available for selection. A typical use case is to create a field called "FavBrnd" or "FavTeam" with available selections for individual brands or individual teams. In this way, you can make targeted recommendations to the customer. In Prism, the UDF3-UDF8 and Aux1-Aux12 fields are available (The UDF1-UDF2 fields, which are date fields, are not available). If you have defined field labels and field entries in RIL, those values will be copied to Prism during initialization. You can select a default entry for individual customer UDF fields in Admin Console > Node Preferences > Customers > UDF. You can define your own field labels and field entries in preferences. In the customer record, you can select a different field entry for individual UDF fields.
UDF Field Entries
In the UDF Naming area, click in the desired UDF field and type the desired label for that UDF field. In the example below, a label named "Fav Activity" has been defined for the UDF1 Name field. Press the

Customer IDs
The Customer ID is an important field for tracking customers.
Define starting Cust ID sequence number in Prism preferences (sub, store, or WS record)
A preference enables retailers to use duplicate Customer IDs
The Customer ID field in customer records can be edited
When a new customer is created in RP Prism, the customer will be assigned the next number in the sequence, as defined in Prism Preferences.
"Allow Duplicate Customer IDs" Preference
This preference is located in Node Preferences > Customers, If selected, duplicate Customer IDs are allowed. If the preference is not selected (default), when a user tries to edit the Cust ID field to a number that would be a duplicate, an error message is displayed.
Editing Customer ID
If necessary, you can edit the Customer ID field for individual customers. This might be necessary to prevent a duplicate, for example.
1. Use Customer Lookup to display the record.
2. Click the Edit button.
3. Click in the Customer ID field and change it to the desired number.
4. Save the changes.
Require Customer for Sales, Returns, Manual Discounts
A set of preferences that enable retailers to require a customer be entered on sales and return transactions, and on transactions that have a manual discount. To access these preferences, go to Node Preferences > Transactions > General. These preferences help ensure that proper business practices are followed and helping to reduce fraudulent returns. If selected, when a user tries to update a sale or return transaction without a customer, a warning dialog like the one below is displayed.
Customer Grid Formats
Customer History columns
| Customer History Column | Description |
|---|---|
| ALU | Alternate Lookup. Maximum length = 20 characters. |
| Attr | Attribute (e.g. color or second size). Maximum length = 8 characters. |
| Currency Name | Currency name. Maximum length = 20 characters. |
| Description 1 - Description 4 | Item description fields. Maximum length = 20 characters. |
| Doc No | Document number. Maximum length = 10 characters. |
| Doc Price | Document price. |
| Doc Qty | Document quantity. |
| Item Price by Tax | Item price with tax. |
| Item Type | Item Type. 1 = Sale, 2 = Return, 3 = Order, 4 = Exchange |
| Loyalty Earned | Number of loyalty points earned from purchasing the item. |
| Price in Points | Item price in terms of Loyalty points. |
| Quantity per Case | Quantity per case. |
| UPC | Universal Product Code. |
Customer Lookup Columns
| Column | Description |
|---|---|
| Accept Checks | 0 = checks not accepted, 1 = checks accepted. |
| Accounting System Id | Identifies the accounting system in use and to which the customer information will be sent. |
| Active | Active status. 0 = inactive, 1 = active |
| Address 1 - Address 6 | Customer Address Fields |
| Allowed Tenders | A concatenated string listing the customer's allowed tenders. |
| AR Flag | Accounts Receivable flag. (used to indicate the customer record should be sent to accounting link). 0-No, 2-Yes, 3-Export |
| Company | The name of the customer's company. |
| Created By | Employee who created the customer record. |
| Created DateTime | Date and time the customer record was created. |
| Credit Limit | The maximum amount of credit allowed for the customer. |
| Credit Used | The amount of the customer's credit that has already been used. |
| Customer Id | Identifies the customer. Note: By default, Customer ID must unique, but a preference can be set to allow duplicate Customer ID. |
| Detax | Detax status. |
| Email Address | Identifies the customer. Note: By default, Customer ID must unique, but a preference can be set to allow duplicate Customer ID. Max Length = 100 characters. |
| First Name | Customer first name. Maximum length = 30 characters. |
| First Sale Date | The date of the customer's first purchase. |
| Household Code | Household code. This enables retailers to identify, for marketing purposes, customers who are part of the same family or group. |
| Info 1 - Info 2 | Legacy fields from previous versions of Retail Pro. |
| Last Name | Customer last name. Maximum length = 30 characters. |
| Last Order Date | The date of the customer's most recent order. |
| Last Sale Amt | The amount of the customer's most recent sale. |
| Loyalty Accumulated | The total amount of customer loyalty points awarded to the customer (point-based programs). |
| Loyalty Balance | The customer's currently loyalty points balance. |
| Loyalty Enrolled Date | The date the customer enrolled in the customer loyalty program. |
| Loyalty Locked | If selected, indicates the customer's loyalty level and opt-in status are locked. Only a user with the required permissions can unlock and make changes. |
| Loyalty Opt In | Customer's loyalty opt-in status: Enrolled or not enrolled. 0 = not enrolled, 1 = enrolled. |
| Mark 1, Mark 2 | Legacy fields used in previous versions of Retail Pro. Maximum length = 8 characters. |
| Modified By | Employee who last modified the customer record. Maximum length = 30 characters. |
| Modified DateTime | Date and time the customer record was most recently changed. |
| Order item count | Total number of units ordered by the customer. |
| Phone | Customer primary phone number. Maximum length = 30 characters |
| Post Date | Date the customer record was posted to the RIL database. |
| Postal Code | The ZIP or postal code for the item. Maximum length = 10 characters. |
| Region | (future release) Regional customers are communicated to all sub\store locations for that associated region. |
| Non Shared | Any customer that is marked Non-Shared will not be communicated to any other store locations. |
| Return Item Count | The total number of units returned by the customer. |
| Sale Item Count | The total number of units purchased by the customer. |
| Security lvl | The security level assigned to the customer in RIL. Note: Customer security levels are not currently available in Prism. |
| Share Type |
Global: Global customers are communicated to all active sub\store locations. |
| Shipping Priority | Shipping priority (Low, Medium, High) |
| Station | Single character station identifier. Example "A" |
| Store Code | The store code of the store where the customer was created. Maximum 5 characters. Example: 001 |
| Store Credit | The customer's store credit balance. |
| Store Name | The name of the store where the customer was created. Maximum Length = 40 character. |
| Store Number | The store number of the store where the customer was created. |
| Subsidiary Name | The name of the subsidiary where the customer was created. Maximum Length = 20 characters. |
| Subsidiary Number | The subsidiary of the store where the customer record was created. |
| Suggested Disc Perc | In the Customer Lookup area, the label will display "Suggested Disc Perc"; however, in the customer record, the field is Discount %. This is the discount amount that the customer will receive, by default (provided it is not overridden by other factors). |
| Tax Area Sid | Identifies the tax area assigned to the customer. |
| Title | Title (e.g. Mr., Mrs., Ms., Dr.). The Title field. Maximum length = 15 characters |
| Total Transactions | Total number of transactions. |
| UDF String 1 - UDF String 18 | Customer UDF fields. |
| Ytd Sales | Year-to-date sales. |
Customer Default Charge Terms
Users can add default charge terms for customers in the Customer record on the Payment tab and those terms will be automatically entered on the tender screen when the customer is listed on a transaction that uses Charge as the Tender Type. Previously, charge terms had to be entered manually at POS. Being able to define default terms that are automatically applied at POS makes it easier to manage things like business-to-business (B2B) transactions.
The following fields for charge terms are available in the customer record:
| Field | Description |
|---|---|
| Discount % | The discount percentage to apply when the customer pays in full within the specified number of Discount Days. Integer or null. |
| Discount Days | The number of days when, if full payment is made, the Discount % is applied. Integer or null. |
| Net Days | The number of days when full payment is due (discount or no discount). Integer or null. |
Sample Customer record showing Default Charge Terms:

If the customer is entered on a transaction and the user select Charge as the Tender Type, the default terms are automatically entered.
Customers with Held Transactions
When viewing a customer record, if the customer has held transactions, an information button is displayed at the top of the customer record.
Sample customer record for a customer with held transactions; the button at the top provides access to the list of held transactions:

When the user clicks the Held Transactions button, the list of held transactions is displayed. To edit or work with a held transaction, select the transaction and then click Go to Transaction.

Add Customer Image
In edit mode, click the image placeholder.
The Upload Image modal is displayed.
You can upload an image file or take a picture if a camera is attached to the workstation.
Upload Image File
Click "Choose file to upload."
Navigate to the desired folder, select the image and click Open.
Click Upload.
Save the changes.
Take a Picture
You can attach a web camera to the computer and use this feature to take a quick snapshot of a customer and add it to the customer record (make sure the web cam is plugged into the computer's UCB port).
Click the Take Picture button. The user's webcam launches. Align the customer's face in the viewfinder. When ready, click the Capture button.
The image you took is displayed in the bottom pane. Click the Accept button to accept the image. (If necessary, you can retake the picture).
Click Upload.
Save the changes.
Detax Status
Detax is the full removal of a tax for special groups of customers who are exempted from the tax. Detax updates the transaction total.
Detax is typically only used with certain customers who are legally exempt from paying tax (e.g., diplomats). To mark a detax customer, select the Detax flag. To use Detax, you must configure Prism preferences to enable the feature. Detax will occur automatically if the customer has the Detax flag selected in the customer record. Merchants can manually detax a transaction that does not have a customer; however, by configuring preferences and customer records correctly, detax will occur automatically when the customer is entered.
To detax a transaction, enter the customer and list the items being purchased and enter any fees or shipping charges as needed. If configured for automatic detax, the transaction is automatically detaxed when an eligible customer is entered. If configured for manual detax, in Transaction Details select the Taxes tab and click the Detax button.
Tender the transaction and update.
Reference: See the Detax topic.
Primary Associate
You can select a Primary Associate in the customer record. The selection does not change the behavior Prism. The Primary Associate field is information-only and is used by some companies to track the Associate or employee with whom a customer regularly engages.