Chapter 21. Vouchers
Prism 1.14.7 User's Guide Chapter 21. Vouchers PDF
Prism 2.4.1 User's Guide Chapter 21. Vouchers PDF
Vouchers record the items and quantities received from a vendor (or being returned to a vendor). Updating a voucher adds the quantities received into inventory for the receiving store and optionally updates inventory Cost (based on Costing Method in preferences). Vouchers are often automatically generated from an Advanced Shipping Notice (ASN) which in turn is generated from a purchase order (PO) sent to a vendor. If the voucher references a PO, the voucher updates the PO fill status.
Updating a voucher does the following:
- Adds the quantities received into inventory for the receiving store
- Optionally updates inventory Cost (based on Costing Method in preferences)
- Updates the Last Received date in inventory for each item received
- Enters the First Received date in inventory for each item that does not yet have a First Received date
- If the voucher references a PO, updates the PO fill status.
- Advances the voucher numbering sequence by one
Note: The following basic steps do not include advanced receiving features like shipping packages and batch receiving.
Receiving Basic Steps
- Configure permissions and preferences as needed.
- Start a new voucher.
- If referencing a purchase order, enter the PO # and then click PO Items to select the PO items to bring to the voucher.
- Make any necessary changes to discounts, fees, or freight. Note: Permissions control the ability to edit various parts of a voucher.
- (Optional) If spreading costs, spread costs.
- Update the voucher.
Voucher Permissions
See the Vouchers Permissions topic.
Voucher Preferences
See the "Purchasing - Vouchers" topic.
Return Vouchers
Return vouchers are used to return damaged or unneeded items to a vendor. Users with the required security permission can change the Voucher Type to Return.
Cost on Vouchers
This section has information about the Voucher Cost field on vouchers. Voucher Cost is an important value because of its potential impact on Inventory Cost and ultimately on the inventory valuations that are entered on financial reports.
There are two primary questions that need to be answered regarding Voucher Cost:
1. How is the Voucher Cost field populated?
2. What happens if I receive items into Inventory at a Voucher Cost different from current Inventory Cost?
Cost to Use for POs and Vouchers
Admin Console > Node Preferences > Purchasing > General
The Cost field in the item's Inventory record is the main field for tracking cost. However, there is also an Order Cost field in the item record. The Order Cost field provides an additional field for tracking cost and is used with the Trade Discounts and Foreign Currency Orders features. So which field will be used to populate PO Cost when a user creates a PO (or Voucher Cost when a user creates a voucher)? That will be determined by the "Cost to Use for POs and Vouchers" preference. The default setting for the preference is to use Order Cost on POs and Vouchers. However, the default value for Order Cost field is 0.00; therefore, unless you are doing something special with the Order Cost field, like using Trade Discounts or Foreign Currency Orders, the Order Cost field will be actually be populated from the Cost field.
The following table lists the available options for the "Cost to Use for POs and Vouchers" preference.
| Preference | |
|---|---|
| Cost to Use for POs and Vouchers | Order Cost: The Order Cost value defined in Inventory will be used as the Doc Cost on purchase orders and vouchers. Inventory Cost: The Cost value in Inventory will be used as the Doc Cost on purchase orders and vouchers. Trade Discounts: The Trade Discount % for the item is applied to the Vendor List Cost to calculate the Order Cost, which is used as the Doc Cost on purchase orders and vouchers. |
Inventory Costing Method
Admin Console > Node Preferences > Purchasing > General
This preference determines how Inventory Cost will get updated when the cost from the vendor is different than the Inventory Cost. The available choices are Average, Leave, and Overwrite.
The following table lists the available options for the "Inventory Costing Method" preference.
| Preference | |
|---|---|
| Inventory Costing Method |
Average: (Default) The quantities received at the new cost are averaged with the existing quantities at the old cost. For example, Voucher A receives into inventory a quantity of 10 at a unit cost of 10.00. The item's Cost is 10.00. Next, Voucher B receives into inventory a quantity of 10 at 5.00. The item's Cost is now $7.50. |
Spreading Costs
Many retailers also like to include freight, discounts, and taxes when calculating cost. Users have the option of spreading these values on vouchers, distributing the amounts proportionally across the voucher items.
New Voucher
This section explains how to create a new voucher. In many cases, vouchers are auto-generated from an Advanced Shipping Notice (ASN) associated with a purchase order (P0). When creating a new voucher manually, users can enter a Reference PO Number to associate the voucher with a PO.
Navigate to Store Operations > Receiving > New Voucher. Alternatively, click the New button on the bottom toolbar when viewing a voucher (non-edit mode).
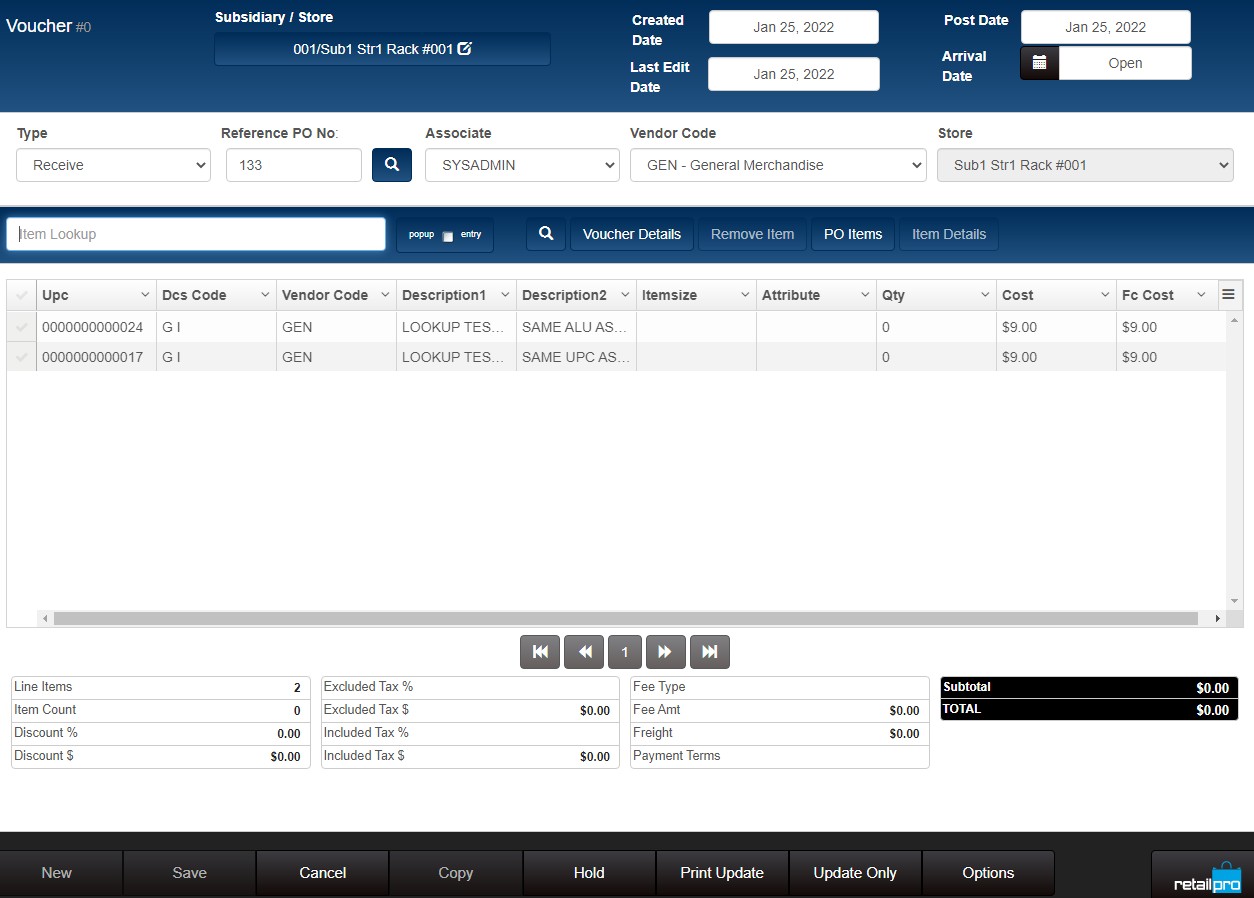
The Associate field is set to the current logged-in user but can be edited. The Store is set to the current logged-in user's Default Store.
Sample new voucher form:

If referencing a purchase order, enter the Reference PO number and press the Enter key. Alternatively, click the Search icon and search for a PO. When a Reference PO No is entered, the Vendor Code for the PO is also entered, and the PO Items button is enabled.
Click the PO Items button. To bring all items/quantities on the PO to the voucher, click the All Due button. To only bring some items/quantities, click the check mark for the item and then tap or click the Item Due button.
If not referencing a purchase order, the user must manually add the items to the voucher.
Place the focus in the Item Lookup field and scan the barcodes or type the UPC of individual items.
Enter the Qty being received for each item listed.
When all items have been listed, add an fees, freight charges, discounts or tax amounts in Voucher Details. Click the Voucher Details button on the voucher form. Select the General tab and enter Freight, Fees, Discounts or Taxes in the appropriate fields. Click the Close button to save and exit Voucher Details.
When finished, click Print Update or Update Only. The quantities listed on the voucher are added to the store's inventory.
Vendor Code
Each voucher has a Vendor Code. If referencing a PO, the Vendor Code from the PO is automatically entered on the voucher. If not referencing a PO, the Vendor Code is auto-populated with the vendor of the first item you list on the voucher. You can also select a Vendor Code from the drop-down. If the preference "Restrict to one Vendor per PO/Voucher" is selected, then all the items must have the same Vendor Code.
PO Lookup by Bill To Store, PO Store
When creating a voucher and referencing a purchase order, you can search for a PO by the Bill To Store or the PO Store. This change is especially useful for multi-store operations.
Use the Bill To Store filter to search for POs by the store to which the merchandise is allocated (e.g., for drop-ship multi-store or marked for multi-store purchase orders).
Use the PO Store filter to search for POs by the store where the merchandise will be sent (e.g., for drop ship single-store purchase orders).
Negative PO Qty Items on Vouchers
When a Regular voucher references a PO with negative qty items (some or all), those items will show as negative due quantities in PO Items. Selecting "Receive Due" will only populate the doc quantities for positive values (positive on PO). Negatives are skipped for this but can be manually entered (if negatives allowed on voucher).
When a Return voucher references a PO with negative qty items (some or all), those items will show as negative due quantities in PO Items. Selecting "Receive Due" will populate those items with positive doc quantities. Items with positive PO quantities are skipped for this, but can be manually entered, if desired.
Copy Received Quantity from Original Quantity on ASN Voucher
This section has additional details about the "Copy Received Quantity from Original Quantity on ASN Voucher" preference (Admin Console > Node Preferences > Purchasing > Vouchers). This preference determines how the "Qty" (Received Quantity) field on the voucher is populated. When generating a voucher from an ASN, by default the Original Quantity on the ASN is copied to the Received Qty field on the voucher. The Original Qty is the same as the Doc Qty entered on the ASN.
Below is a sample ASN showing the Original Qty for a group of items.

When the preference is at its default setting and a voucher is generated from the ASN, the ASN Original Qty is copied to the Received Qty ("Qty") field on the voucher.
Below is a sample voucher where the Original Quantity from the ASN has been copied to the Received Quantity (Qty) field on the voucher:

If the "Copy received quantity from original quantity on ASN Voucher" preference is disabled, the ASN Original Quantity has no effect on the voucher Received Quantity. The user must manually enter the Qty (Received Qty) for each item on the voucher.
Reverse a Voucher
You can reverse a receiving voucher using the "Reverse Voucher" button on the Options menu. Reversing a receiving voucher creates a copy of the voucher, but the copy is a return voucher that removes from Inventory the received quantity from the original Voucher.
You can only reverse receiving vouchers; you cannot reverse transfer vouchers.
A permission called "VOUCHERS - REVERSE VOUCHER" controls the ability of employee group members to reverse receiving vouchers.
In the VOUCHER table, the REVERSED_FLAG indicates if the voucher was reversed (0=not reversed, 1=reversed).
To reverse a voucher, search for and display the voucher and click the Options button.
On the Options button menu, click Reverse Voucher.
Voucher Options menu showing Reverse Voucher button:

A confirmation is displayed explaining the Return Voucher created cannot be reversed. Click OK to proceed.
(Optional) Enter a comment. Click OK.
Transfer Vouchers
This section has information about:
- Transfer voucher workflow
- Differences in functionality between transfer and receiving vouchers
- DB Columns related to transfer vouchers (to distinguish transfer vouchers from receiving vouchers)
- TRANSFER SLIP - ALLOW EDIT OF RECEIVED ITEMS permission
Transfer voucher workflow
1. A user at one store (From Store) creates a transfer slip to transfer merchandise to one or more destination stores (To Stores).
2. The Prism preference "Upon Transfer Slip update generate: [ASN | Voucher | None]" controls what happens next. By default, Prism will generate an ASN. The ASN lets the destination store know a shipment is coming.
3. When the transferred merchandise arrives at the To Store(s), a user will generate a voucher to receive the merchandise into inventory.
4. Complete transfer verification to match the slip with its voucher.
Differences in functionality between transfer and receiving vouchers
- You cannot reverse a transfer voucher.
- When creating receiving vouchers, users can enter a PO number and then click PO Items to bring the items and quantities from the PO to the voucher. There is no similar functionality for transfer vouchers.
Database Fields for Transfer Vouchers (VOUCHER table)
The following table lists the database columns in the VOUCHER table that relate specifically to transfer vouchers.
| DB Column | Description |
|---|---|
| SLIP_FLAG | This flag is set to 1 (TRUE) for transfer vouchers. |
| SLIP_SBS_SID | Identifies the outgoing subsidiary (FROM SUB) for a transfer voucher. |
| SLIP_SBS_STORE | Identifies the outgoing store (FROM STORE) for a transfer voucher. |
| TRANS_REASON_ID | Identifies the reason for the transfer. |
TRANSFER SLIP - ALLOW EDIT RECEIVED ITEMS permission
This permission controls a user's ability to edit item information (including quantities) on a transfer voucher. (Note: The Override option is not available for this permission.)
About Voucher Arrival Date
Upon voucher update, if the Arrival Date is null, it is populated with the current date/time. This is true for receiving vouchers, transfer vouchers and transfer verification. Note that the Arrival Date is not updated on the ASN voucher (different from V9).
Voucher Lookup
Use the Voucher Lookup feature to find a previously updated voucher.
1. Navigate to Store Operations - Receiving.
2. Click Voucher Lookup.
3. In the Filters area, add filter elements as needed. In the example below, Created Date has been added as a filter.
4. Click the Search button. A list of records matching the filter criteria is displayed in the grid on the right.
5. Select the desired voucher by clicking the checkmark in the leftmost column of the grid.
6. Click OK.
Filter Voucher/ASN Lookup for Transfer vs. Receiving Vouchers
You can filter Voucher/ASN Lookup to display documents created for transfers or those created for receiving merchandise from a vendor. This makes it easier to find the desired documents.
Add the following filter elements to Grid Formats and search ASN/Voucher Lookup using a combination of the fields.
| Column | Description |
|---|---|
| Class | The Class indicates the type of voucher: 0=Voucher, 1=Pending Voucher, 2=ASN |
| Slip | True=The ASN/Voucher was created from a transfer slip. False=The ASN/Voucher was not created from a transfer slip. |
| From Store Name | The source store name. |
In Admin Console > Node Preferences > Grid Formats, select Voucher/ASN Lookup from the drop-down. In the Allow Search By and Show Columns areas, move the Class, Slip and From Store Name columns from the Available to the Selected list and reposition if needed.
The Allow Search By selections determine the filter elements available for selection in Voucher/ASN Lookup.
The Show Columns selections determine the columns used to display Search results.
Foreign Currency Fields in Voucher Lookup
For orders from foreign currency vendors, you can view the voucher subtotal, voucher total and the foreign currency code in Voucher Lookup. This enables merchants to see the cost of received merchandise in the foreign currency.
Add the following fields to Grid Formats preferences for Voucher/ASN Lookup:
- Foreign Currency (three-letter currency code abbreviation)
- Voucher Subtotal FC
- Voucher Total FC
In Voucher/ASN Grid Formats preferences in the Show Columns area, move the foreign currency fields from the Available list to the Selected list. Reposition the fields if needed.
After adding the fields to grids, in Voucher Lookup if the voucher has a vendor that is assigned a Currency, then the foreign currency fields will show the voucher subtotal and total for that currency.
VOUCHER table STATUS, VOU_CLASS and VOU_TYPE
STATUS
The status indicates where the voucher is in its lifecycle. Vouchers can have one of the following status values: 0=None, 1=Changed, 2=Cancelled, 3=Normal, or 4=Completed.
VOU_CLASS
In the Prism database VOUCHER table, the VOU_CLASS column can be 0 (regular voucher) or 1 (return voucher).
VOU_TYPE
The VOU_TYPE column can be 0 (Voucher), 1 (Pending Voucher), or 2 (ASN).