Cash Drawers
To use a cash drawer with Prism, connect the cash drawer to the workstation and then define the necessary workstation HAL settings and node preferences. You can manage up to two cash drawers. Prism provides support for both OPOS and Windows drivers. If you use a "pass-through" cash drawer, you can configure the necessary kick code and other settings that enable the pass-through drawer to be connected to a receipt printer (see the steps for pass-through drawers at the end of this topic).
Basic steps for working with cash drawers
- Install drivers and connect cash drawer to workstation
- Make sure you install the correct drivers for the cash drawer and connect the drawer to the Prism workstation.
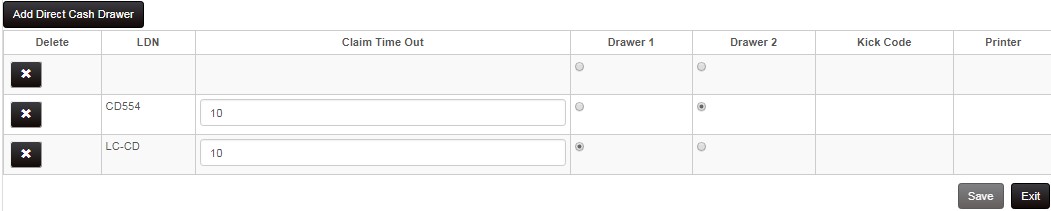
- To configure HAL for cash drawers, access the Workstation record, select the HAL Settings tab, and then select the Cash Drawers tab. Enter a time out value for each drawer and then select Save.
- Assign a cash drawer to individual employees in the employee record.
HAL cash drawers screen:
In Prism Preferences & Settings > Transactions > Tenders > Requirements, users can select which tenders will cause the cash drawer to open using the Drawer Open button.
If needed, you can also pop the cash drawer manually using the Pop Cash Drawer button (e.g. to give a customer change).
Open Cash Drawer Prevents New Receipt
In Preferences & Settings > Transactions > General, there is a preference called "Open Cash Drawer Prevents New Receipt." If selected, users are prevented from starting a new transaction if the cash drawer is open. This preference requires that users also select the Cash Drawer Status Enabled preference (Node Preferences > Hardware > General).
Cash Drawer Status Enabled
For the "Open cash drawer prevents new receipt" preference to work, the checkbox "Cash Drawer Status Enabled" must be selected. The Cash Drawer Status Enabled checkbox is located in Preferences & Settings > Hardware > General and is selected by default. If a user clears the Cash Drawer Status Enabled checkbox, then even if "Open cash drawer prevents new receipt" is selected, the program will allow a user to create a new receipt if the cash drawer is open.
"Claim at Startup" setting for Cash Drawers
Multiple proxies can access the same cash drawer on a POS workstation via the "ClaimAtStartup" setting in the OPOSConf.ini file.
Example:
[CshDrwr1]
LDN=A798-1
ClaimTimeout=10
Actv=1
ClaimAtStartup=1
If the ClaimAtStartup value is 1, the Proxy claims the cash drawer at proxy startup time, and holds it until the proxy terminates. This allows faster response to drawer open and status requests. If this value is 0, or the field is not present (as in the field for current users), the Proxy claims the cash drawer at each drawer open or status request and releases it again when the action is complete. This allows multiple proxies to access the same cash drawer, if required. Note: You must manually edit the OPOSConf.ini file (under the CASH DRAWER section) to include this option and parameter.
Kick Codes (Pass-through Cash Drawers)
A "pass-through cash drawer uses a special type of connection for power. Instead of connecting to the workstation via a USB cable, a pass-through cash drawer connects to a receipt printer via a RG-12 telephone line cable. When the workstation updates a receipt and sends a command to open the cash drawer, the signal passes through the printer and continues on to the connected cash drawer, triggering the drawer to open.
To use a pass-through cash drawer with Prism, Prism must send a kick code to your printer. The printer will then send an impulse to the cash drawer to pop it open. You need to define the correct kick code for the device. You can find the kick code by looking in the printer's manual, or by calling the printer's manufacturer. The Kick Code (or Open Drawer Code) is a value composed of one or more integers, typically five. Each integer in the Kick Code string in Prism should be represented by a slash followed by exactly three digits. Integer values below 100 need to be padded with leading zeroes.
Examples of Kick Codes
| Printer Name | Open Drawer Code | Kick Code |
|---|---|---|
| Star TSP-100 | 7 | /007 |
| Epson T88iiiP / TM-U200D | 27,112,0,64,240 | /027/112/000/064/240 |
Basic Steps
- Install the printer's drivers and connect the printer to the Prism workstation and to the cash drawer. When using a pass-through cash drawer, the printer is usually connected to the cash drawer via a RJ-12 phone jack that provides power.
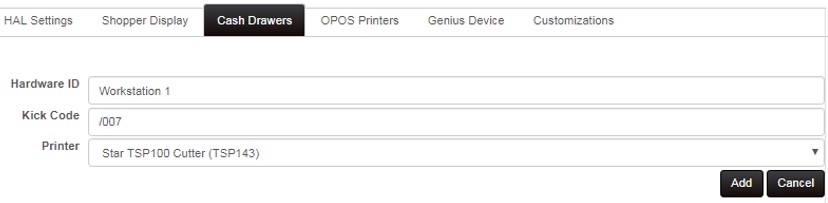
- Navigate to Workstation Preferences > HAL for the workstation. Select the Cash Drawers tab.
- Click Add Direct Cash Drawer.
- Enter the Hardware ID, Kick Code and select the Printer. Save the changes. The Printer you added is now displayed in the list.
Sample HAL Cash Drawer configuration screen