Chapter 10. Orders
Prism 1.14.7 User's Guide Chapter 10. Orders PDF
Prism 2.4.1 User's Guide Chapter 10. Orders PDF
About Orders
An order is a planned purchase of merchandise by a customer. Orders can be used in variety of POS situations. Some retailers like to create an order first for each transaction. Other retailers only create orders when an item is out of stock, or if a customer wants to place a special order for items not typically carried by a store.
All orders in Prism require a Bill To Customer. Depending on your preference settings, the customer may be required to make a minimum initial deposit. Additional deposits can be taken at any time until the order is filled. Fulfill the order when a customer is ready to pay off the balance and receive the items. Fulfilling an order records the sale and deducts the items from inventory.
When creating a transaction, you can include both sale and order items. When tendering the transaction, the initial deposit amount required for the order (if any) is added to the transaction subtotal. Additional deposits can be taken at any time until the order is filled. Fulfill the order when a customer is ready to pay off the balance and receive the items. Fulfilling an order records the sale and deducts the items from inventory.
There are three different order types available in Prism:
| Order Type | Notes |
|---|---|
| Customer Order | This is the "standard" order type and by default is the only order type enabled in preferences. |
| Layaway | Use layaway orders when customers will pay for the item(s) over time. For example, using a layaway the customer can spread the purchase amount over three equal monthly installments. |
| Special Order | Special orders enable customers to order items not normally carried in inventory, (e.g. "one-off" orders) or to order a special shipment of an item that already exists in inventory.A new item can be added to Inventory for listing on a special order. |
In practice, there is not much difference between a customer order and a layaway. Both order types enable you to take one or more deposits against the order. The distinction is more a logical one, in which a customer order is used to order out-of-stock merchandise or merchandise not normally carried, and a layaway is used to allow a customer to pay for the purchase over time.
When creating an order, often the item(s) being ordered will be the only items on the transaction; however, by default you can include both sale and order items on a single transaction. When tendering the transaction, the initial deposit amount required for the order (if any) is added to the transaction subtotal.
| Topic | Description |
|---|---|
| New Order | Create a new customer order or layaway order, list the items and take the initial deposit. |
| Order Deposits | Take additional deposits for an order. |
| Fulfill Order | How to take payment for the order balance so the order is fulfilled (completed). |
| Edit Order | Edit an existing order. |
| Close Order | Close orders that are no longer active or that the customer wants to cancel. Any deposit balance will be refunded. |
| Fees and Shipping on Orders | When fulfilling only part of the order, the user must specify the portion of shipping and fees to use. |
Preferences
You can define a minimum percentage that will be due when creating each type of order. This preference is in Node Preferences > Transactions > Orders.
Sample Node Preferences > Transactions > Orders:

If a minimum percentage is defined and an item's type is changed to "Order", the required deposit amount is added to the transaction Total. Users can modify the initial deposit amount, if necessary, when tendering the transaction. If no minimum percentage is defined, then the deposit dialog will still be displayed; however, users are not required to make an entry.
Restrict Order Item Rows to Single Quantities
The "Restrict Order Item Rows to Single Quantities" preference (Node Preferences > Transactions > General), when enabled, ensures that when a user lists an order item on a transaction, that order item can only have a quantity of 1. The "Restrict Order Item Rows to Single Quantities" preference is a child setting to "Restrict transactions to a single item type" and is only available when "Restrict transactions to a single item type" is enabled (by default, "Restrict transactions to a single item type" is disabled).
A use case for the "Restrict Order Item Rows to Single Quantities" is to avoid having partially fulfilled orders that could result in mismatches between the tax rate on the original order and the tax rate at a later point.
For example, an order is created that has one or more items and a full deposit is taken. After the order is finalized, the customer wants to increase or decrease item quantity. However, in the interim, the tax rate has changed. If the existing order item has been partially fulfilled and the tax rate has changed since the order was created, it may not be possible to change the tax rate on the order item.
In this type of situation, if the "Restrict Order Item Rows to Single Quantities" preference is enabled, the order item quantity can only be fulfilled or changed to zero; it can never be partially filled (assuming no decimal quantities).
When "Restrict Order Item Rows to Single Quantities" is enabled:
- If using Item Lookup to add an item as an order item, the item will not consolidate with existing rows.
- If the quantity of an order item is manually edited, the row is automatically split into single quantity rows.
Permissions
You can control employee access to the following orders-related features:
| Permission | Description |
|---|---|
| POS - Allow Negative Order Deposits | Allow group members to update a transaction that results in a negative order balance for the customer. Entering a negative deposit amount enables the Associate to easily refund a deposit in the original tender. For example, if a user made a $5.00 deposit but later wants to close the order, the user can click Order Details > Take Deposit and then enter -5.00 (negative five dollars) as the Deposit Amount and refund the money to the customer. |
| POS - Allow Order Fee | Allow group members to add an order fee to a transaction. |
| POS - Change Order Fulfillment Store | Allow group members to fulfill an order at a store different from the store where the order was created. |
| POS - Close Orders | Allow group members to close orders. If not selected, the Close Order button is disabled when viewing order details |
| POS - Order Item | Allow group members to change an item's type to Order |
| POS - Send Sale Add Item | Allow group members to change an item's type to Send Sale |
| POS - Send Sale Close | Allow group members to close send sale orders. |
| POS - Send Sale Fulfillment | Allow group members to fulfill a Send Sale order. |
| POS - Special Order Add Item | Allow group members to add items to special orders. |
| POS - Special Order - Close | Allow group members to close a special order. |
| POS - Special Order - Fulfill | Allow group members to fulfill a special order. |
New Order
- Start a new transaction. Enter a customer and list the item(s).
- Select an item. Click the Item Type button and then click Order. Select the type of order: Customer Order or Layaway Order.
- Select Tender Transaction.
- The Order Deposit dialog is displayed. Enter a Deposit that meets or exceeds the Minimum Deposit. You can enter a specific % or Amount, or use the Minimum Balance or Balance buttons. Touch or click the OK button.
- Take payment and then print/update. When the customer is ready to pay off the balance and pick up the merchandise, fulfill the order.
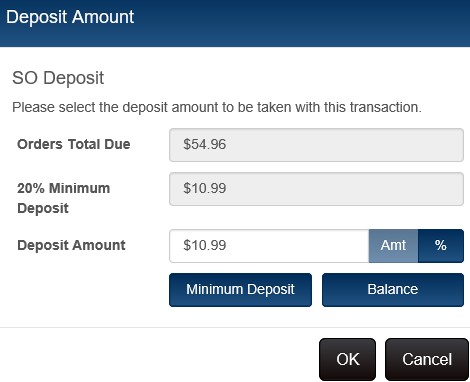
Order Deposit Amount:
Shipping Customer
By default, the Billing customer entered on the order is also the Shipping Customer. On most layouts, you must go into Item Details to enter a shipping customer. The exception is the Standard Shipping Layout, which includes elements for entering a Shipping Customer on the main transaction form.
About Orders
Orders can be used in variety of POS situations. Some retailers like to create an order first for each transaction. Other retailers only create orders when an item is out of stock, or if a customer wants to place a special order for items not typically carried by a store.
All orders in Prism require a Bill To Customer. Depending on your preference settings, the customer may be required to make a minimum initial deposit. Additional deposits can be taken at any time until the order is filled. Fulfill the order when a customer is ready to pay off the balance and receive the items. Fulfilling an order records the sale and deducts the items from inventory.
When creating a transaction, you can include both sale and order items. When tendering the transaction, the initial deposit amount required for the order (if any) is added to the transaction subtotal. When the transaction is sent to RIL Oracle database, a receipt is created for the sale items and a sales order is created for the order items.
Deposits for Orders
If preferences are configured to require a minimum deposit, then a deposit must be taken when the order is created. (Note: There are differences in how deposit taken amounts for RP Prism documents are handled on X/Z-Out reports in RIL Prism Management vs. X/Z-Out reports in RP Prism)
The minimum deposit amount is automatically calculated and reflected in the amount due for the transaction. When the user clicks the Tender Transaction button, the Order Deposit dialog is displayed. The user can adjust the deposit amount; however, the amount must remain above the minimum percentage specified in preferences.
Order Deposit dialog:

Take Additional Deposits
- Use Transaction Lookup to find and display the transaction that has the order item(s).
- Touch or click the Order Details button.
- Select Take Deposit.
- Enter a Deposit Amount or percentage. The Minimum Deposit, if any, is displayed. Use the Minimum Deposit or Balance button to enter the minimum or remaining amount due.
- Select OK to return to the transaction.
- Complete the transaction and tender.
Entering Negative Deposit when Closing Order
Beginning with Prism 2.1.2, associates can enter a negative deposit amount (e.g., to refund a deposit when closing an order). Previously, only positive non-zero amounts were allowed. Entering a negative deposit amount enables the Associate to easily refund a deposit in the original tender. For example, if a user made a $5.00 deposit but later wants to close the order, the user can click Order Details > Take Deposit and then enter -5.00 (negative five dollars) as the Deposit Amount. Previously, users had to close the order, accept the deposit refund as store credit, then make a second transaction to take the store credit and give the amount back in the form of the original tender.
Using Deposit when Fulfilling Order
When fulfilling an order, if there is a deposit amount associated with the order, the user is prompted to use the deposit as payment. Click Yes to use the available deposit amount or No to use a different tender.

Deposit History
Users can view the deposit history for orders. Go into Order Details. The Deposit History button is enabled whenever one or more linking deposit transactions exists for the order.
1. Use Transaction Lookup to find and display the order.
2. Click Order Details.
3. Click Deposit History.
A list of the order's deposits is displayed. To view details, click the check mark for a deposit and then click Go To Transaction.
Sample Deposit History modal showing a negative amount for deposits used:

Return Deposits by Closing the Order
If a customer wants a refund of a deposit, you must close the order. When you close an order, the entire deposit amount is returned to the customer.
Edit Orders
- Use Transaction Lookup to find and select the transaction you want to edit.
- Touch or click the Edit button.
- Tap/click the Order Details button. Make any needed changes and then save the document or tap/click the Order Details button. Make any needed changes to the order and then save the document or tender the transaction.
When editing orders, users can:
- Add items
- Add item quantities
- Remove item quantities (provided the quantity has not yet been fulfilled)
- Apply discounts
- Change price information for items or the transaction
- Add Tracking information to any item
- Take additional deposits
- Change shipping information
User cannot:
- Discount items greater than the line item max discount or customer max discount limit allows
- No Sale/Return/Send/Sale can have Price, Cost or Qty information updated (No financial affecting details on these items can be modified on a former transaction)
- Spread Fee can only be done if all items on the transaction are order items and no fulfillment has been done.
Refunding Deposit while Keeping Order Open
Retailers can refund an order deposit while keeping the order open. A deposit refund is entered as a negative number on the deposit dialog. Therefore, to refund an order deposit while keeping the order open, the employee must belong to a group that has the "POS - Allow Negative Order Deposits" security permission. Note: The amount of the deposit refund cannot exceed the deposit balance on the order.
Edit Order Quantity
You can change the order quantity of unfilled items on an order. Items cannot be removed from an order but by changing the item quantity to zero, a user will "void" an order item.
Display the order using Transaction Lookup.
Click Edit.
Select or highlight the desired item and click the Quantity button.
Type the desired quantity and click the check mark.
Save the changes.
Fulfill Order
When a customer is ready to receive the merchandise, fulfill the order. When fulfilling an order, you can fill any or all remaining items. When you fulfill an order, a new sales transaction linked to the original order is created so the customer can pay the balance for the items being filled.
To fulfill an order:
Use Transaction Lookup to find and display the transaction you want to fulfill.
Click the Order Details button. Click Fulfill Order.

Select a fill option:
Fill All Due: Fills the Due Quantity for all order items on the transaction
Fill Item Due: Fills the selected item's remaining due quantity
Fill Item Qty: Fills a specified quantity for the selected item.

If you selected Fill Item Qty, enter the quantity to be filled and then click OK.
Click OK to close the Fulfill Order dialog.
Click Tender Transaction.If a deposit is available, a prompt is displayed. Click Yes to use the deposit.

Click the Take button to tender the deposit. Take additional tenders, if necessary and Print/Update.
Upon transaction update you will first see a prompt asking if the order should be closed.

Clicking Yes displays a second modal where users can click Confirm & Print to close and print the order or click OK to close the order without printing.

Deposit Available when Fulfilling Order
When you fulfill an order and click the Tender Transaction button, if a deposit has been taken, a prompt will show the deposit amount available. Click Yes to use the available deposit. Click No if the deposit will be used later (when fulfilling any remaining items).
Global Discounts on Orders
Currently there is no way to bring a transaction discount to the fulfilling document when fulfilling an order (send-sale or regular order fulfillment). There are two workarounds for send-sale: DO NOT enter global discounts on send-sale orders (unless they spread the global discount to the items manually), or turn on auto-spreading of order global discounts in Preferences.
Change Fulfilling Store of Customer Order
You can fulfill an order at a different store than where the order was created. This enables a customer to order an item at one location and then pay for and pick up the item at a different location (e.g. the store in the customer's own hometown). This is especially useful if the item is difficult to transport. Previously, orders had to be fulfilled at the store where the order was created.
Limitations:
- The user must have the POS > CHANGE ORDER FULFILLMENT STORE permission.
- The only stores available for selection are those to which the Associate is assigned in Store Assignments.
- All order items on the document must be set to the same fulfillment store.
- If any of the order items have been fulfilled (or partially fulfilled), the Change Fulfillment Store button is disabled.
To fulfill an order using a different fulfillment store:
Use Transaction Lookup to find and display the order. Click the Order Details button on the transaction form. Click Fulfill Order.
If you have the permission enabled and are at a different store than the original fulfillment store, you will be able to proceed.
Close Order
Closing the order enables retailers to:
- Cancel the ordering of the item(s)
- Gracefully return the deposit balance to the customer
- Prevent future editing of the order
To close an order:
- Use Transaction Lookup to find and display the original order transaction.
- Touch or click the Order Details button.
- Touch or click the Close Order button.
- If When you close an order that has an unused deposit amount, the Deposit Refund dialog is displayed. Select a Tender Type, click the Give button, and then click either Confirm and Print or OK.

Security Permission
Only employees who belong to a group that is assigned the Close Orders permission will have access to the Close Order button.
Choose Tender when Returning Order Deposits
The tenders that are available when closing an order are those tenders that have the Deposit Refund checkbox selected in Tender Requirements preferences. By default, Store Credit is the only tender selected; however, you can select other tenders in preferences as needed (except for certain tenders like debit card).
Refund Deposit to Credit Card or Gift Card
When closing an order, users can return deposit amounts to a credit card or gift card.
Notes:
- This feature does not check if the card to which the refund is made is the same card used for the deposit (if the deposit was made by credit card).
- Keyed entry is disabled when refunding a deposit to a card. Card information must be entered by swiping the card.
- The refund deposit to card feature is ONLY supported for Genius 1.0 users when not configured for Store & Forward. For Genius 2.0 users, the refund deposit to card feature is available with or without Store & Forward.
To configure Tender Requirements preferences:
Navigate to Admin Console > Node Preferences > Transactions > Tenders > Tender Requirements. For the Credit Card and/or Gift Card tenders, select BOTH the checkbox for "Return" and the checkbox for Deposit Refund.
Save the changes.
Sample Tender Requirements preferences showing Take/Give/Return and the Deposit Refund checkbox selected for the credit card tender:

When preferences are configured to allow deposit refunds by credit card and a user tries to close an order that has deposits, a modal is displayed for selecting the desired tender for the deposit return.
Select Credit Card or Gift Card in the Tender Type drop-down, enter card information and click Give.

The tender is added to the transaction. Click OK to complete the deposit refund.

When fulfilling and closing an order, you can print the order at the same time. Previously when fulfilling or closing an order, users were returned to the default New Transaction form upon transaction update, at which point they had to use Transaction Lookup to find the order and print it if desired. This change saves time and makes it easier to print fulfilled orders.
When fulfilling an order, upon transaction update you will first see a prompt asking if the order should be closed.
Clicking Yes displays a second modal where you can click Confirm & Print to close and print the order or click OK to close the order without printing.
Sample Close Order modal with Confirm & Print button:
View Original Order on a Sale and Vice Versa
The following changes make it easier to cross-reference order documents and sales transactions created when fulfilling orders.
- Sales transactions include the Order Ref Number, Date and tax information.
- The Order Details modal includes a Fulfill History button. Clicking Fulfill History displays sales transactions for the order.
These changes make it easier to find and view orders and associated sales transactions. Previously, there was no way to easily cross reference orders and transactions.
Sample Transaction Lookup showing the Customer Order Number (Order Ref Number):

Sample Order Details modal with Fulfill History button:

Clicking Fulfill History displays a list of transactions created when fulfilling the order. Select the desired document and click Go To Transaction.
DOCUMENT.REF_ORDER_SID
REF_ORDER_SID (used on a fulfillment sales transaction to reference the order document to fulfill)
Fees and Shipping on Orders
Order fees and shipping charges are typically applied at the transaction level. When you display the Transaction Details dialog, you will notice that there are separate areas for Sales and Order Fees and Sales and Order Shipping. Be sure to enter any fees or shipping charges for order items in the Order Fee or Order Shipping area, not in the Sales Fee or Sales Shipping area.
When fulfilling the order, if it is a partial fulfillment, the user has the option of applying fees/shipping in a proportional manner.

Enter a shipping or handling fee
At the document level, you can enter an Order Fee and select an Order Fee Type. The Fee Types available for selection are defined in Admin Console > Node Preferences > Transactions > Fees/Shipping.
1. With the order in displayed in Edit mode, touch or click the Transaction Details button.
2. Select the Fees tab.
3. In the Order Fees area, enter a Fee Amount and select a Fee Type.
4. Touch or click the OK button.

To enter shipping:
- With the order in displayed in Edit mode, touch or click the Transaction Details button.
- Select the Shipping tab.
- In the Order Shipping area, enter a Shipping Amount and select a Shipping Method.
- (Optional) Enter a Tracking Number, if available. If not available, you can edit the transaction later, after the Tracking Number has been assigned by the carrier.
- Click OK to return to the transaction.
- Complete the rest of the transaction and print/update.
Applying Shipping when Fulfilling an Order
- Use Transaction Lookup to find and display the order.
- Touch or click the Order Details button.
- Select the Fulfill Order button.
- If multiple quantities were ordered and there is a shipping amount, select how the shipping should be applied: Proportional, Remaining, or None.
- Select a fill option: Fill Item Qty, Fill Item Due, or Fill All Due.
- If you selected Fill Item Qty, a dialog for selecting the quantity to fulfill is displayed. Enter the Quantity to be fulfilled and then touch or click OK.
- Touch or click the OK button on the Order Fulfillment screen.
- Touch or click the Tender Transaction button and take payment. (If a deposit was taken, a prompt to use the deposit is displayed.)
Enter Carrier Tracking Number
On the Shipping tab of the Item Details screen, you can enter the name of the carrier transporting the merchandise and a tracking number.
- With the order in edit mode, select an order item and touch or click the Item Details button.
- Select the Shipping tab.
- In the Order area, enter the Tracking #.
- Click OK.